Water your plants with a Raspberry Pi
With a Pi Zero and a few components, you can build an inexpensive and reliable automatic watering system for your plants in next to no time.
Whether in an apartment, on a balcony, in a greenhouse, or in a garden, if you are not at home and want to water your plants remotely, an automated system is your only option. In this article, I show you how to harness the power of a Raspberry Pi Zero as a reliable helper to manage the watering system.
Design
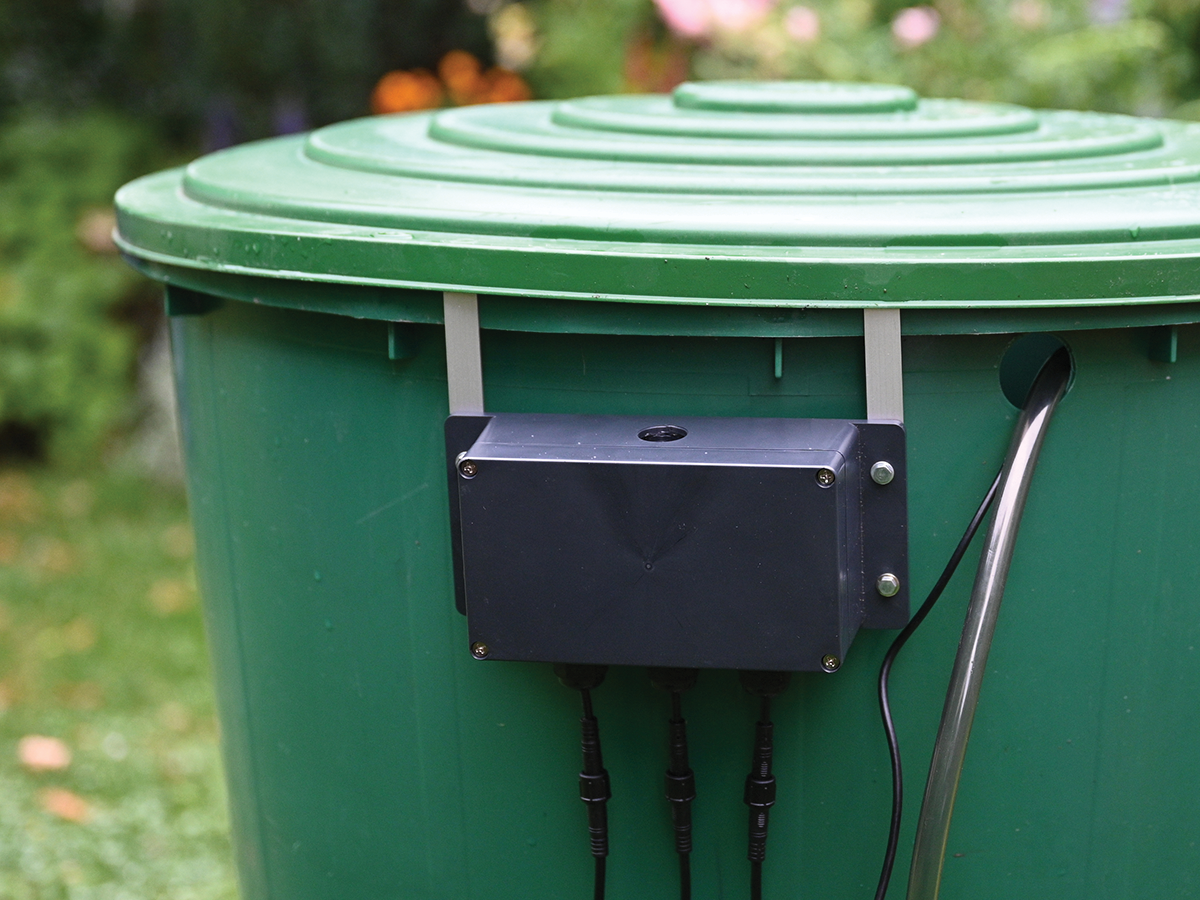
Automatic irrigation is nothing new. These systems not only exist on a large scale in agriculture and horticulture but have also been available for many years for domestic use. Some providers attach their systems directly to the water supply. In this project, I’ll instead draw water from a 200-liter tank reservoir with a supply that will last for a couple of dry days (Figure 1). The advantage of a tank is that you do not have to deal with a pressure line and you do not lose an uncontrolled amount of water in the event of an accident. The aim is to create a robust solution that you can tailor entirely to your own needs, thanks to the flexibility of the Raspberry Pi and your own hardware and software.
The storage tank for just a room can be much smaller; in fact, a water bucket is all you need, with a submersible pump and a riser to deliver the irrigation water. Two pipes supply water to plants through a branch distributor. The whole thing can be controlled on demand by solenoid valves. The project design also uses two moisture sensors to check that the water reaches the plants. (See the “Parts List” box.)
• Raspberry Pi Zero W (model 1 or 2)
• Centrifugal pump with 1.2m head
• Solenoid valves (x2)• Relay modules (x3)
• ADC (ADS1115, or similar)
• Moisture sensors (x2)
• Plugin power supply (5V)
• Housing, wiring
• Various hoses and clamps
• Adapters, control valves, ground spikes
Getting Started
To get the Raspberry Pi up and running, it’s a good idea to download a new Pi OS image in the usual way and transfer it to a microSD card. With the screen and keyboard plugged in, the boot options and network settings can be configured. A desktop environment is not needed, which is why I went for automated login from the CLI with SSH enabled. All further settings can then be configured in a terminal window from a computer on the same network. The Raspberry Pi needs a hostname that reminds you of the task in hand (e.g., watering in this case). The next step is to create a separate folder for the project files in your home directory.
Structure
The main electronics of the control system will live in a ready-made housing with a rubber seal in the lid and a terminal strip, on which all the external wires will be patched (Figure 2). Two small support plates are bolted on inside to fasten all the modules securely.
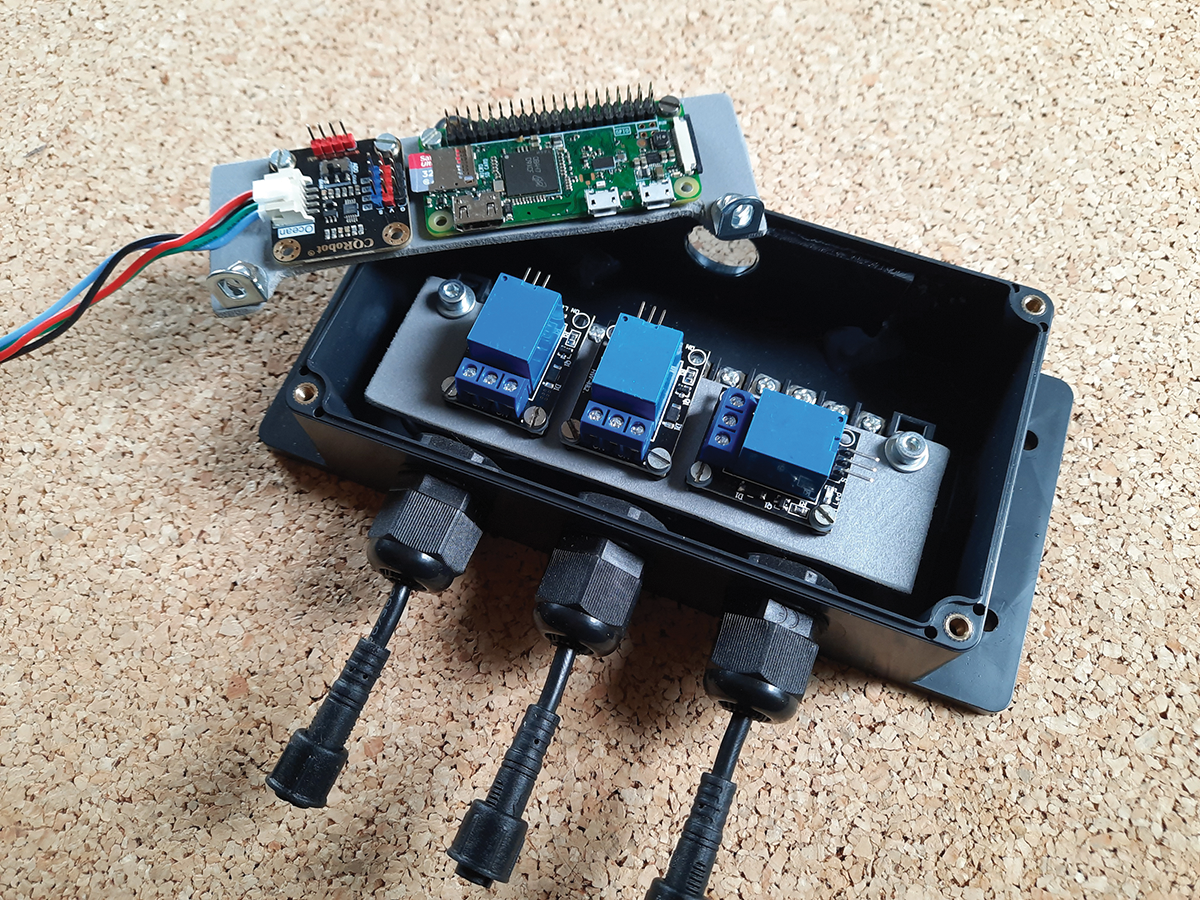
The housing for the control unit holds the Raspberry Pi, an analog-to-digital converter (ADC) module, and three relays. The external power supply, connections for two soil moisture sensors, two solenoid valves, and the pump are routed in from below with three four-core lines. At the top, where I sealed the unused screw hole with transparent material, an LED indicates operational readiness.
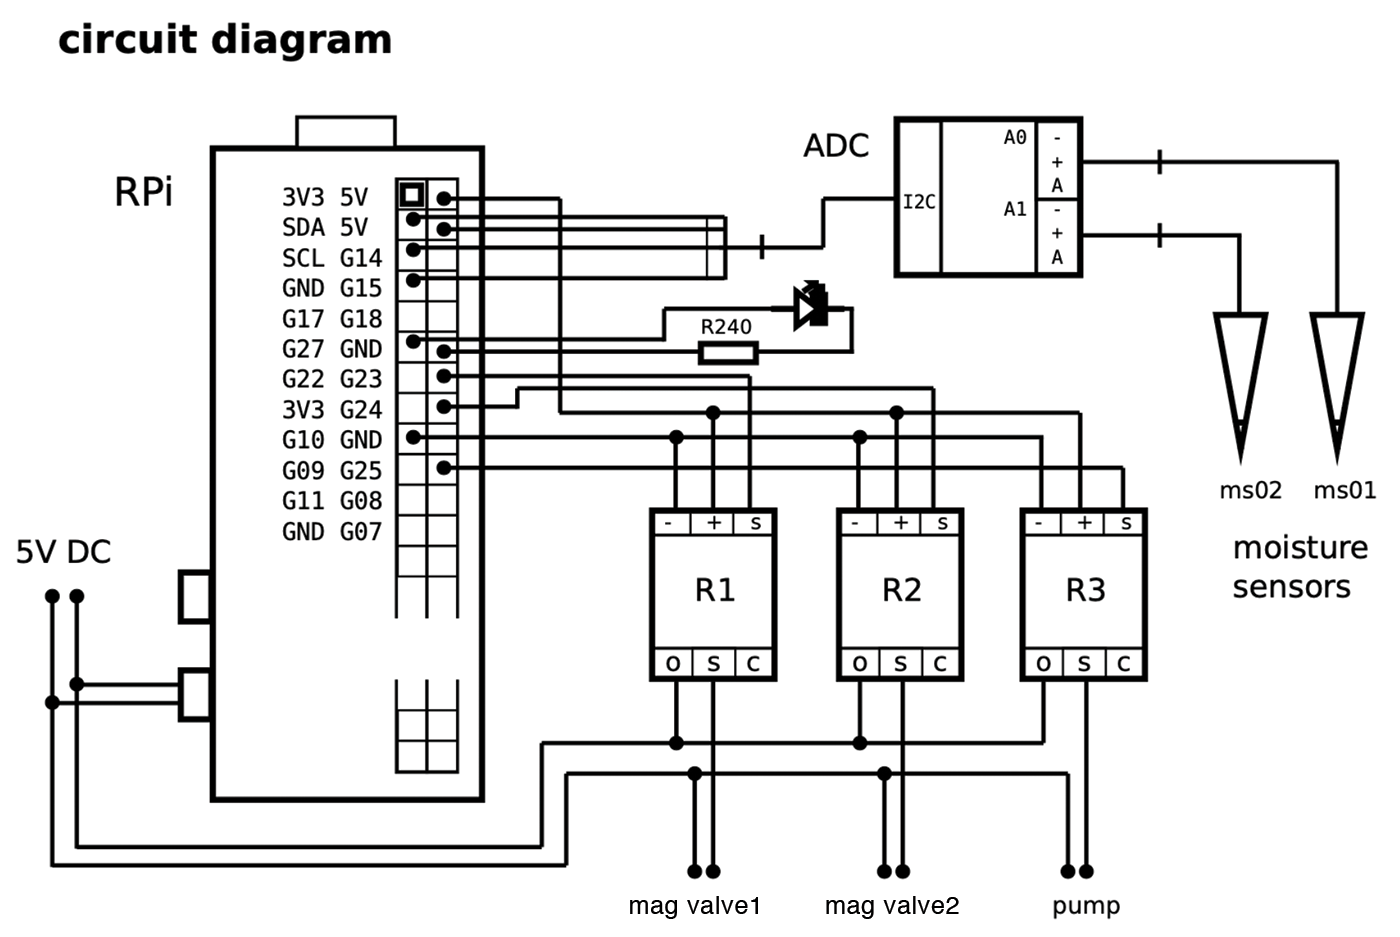
The Raspberry Pi needs a total of four GPIO pins for the control PINs on the relay boards and the signal LED; the ADC is connected over the I2C bus. The internal terminal strip routes the converter’s analog inputs with the humidity sensors and the switching outputs of the relays for the pump and solenoid valves to the outside. The schematic (Figure 3) and associated program files are on the GitHub page for the project or see the files in MakerSpace 03 2023.
Now it’s time to connect the external hardware, pump, and solenoid valves to the hose material (Figure 4). Because no suitable distributor was available downstream of the pump, I soldered one myself from brass. The two control valves allow for a two-way system that can supply two groups of plants with different water needs.
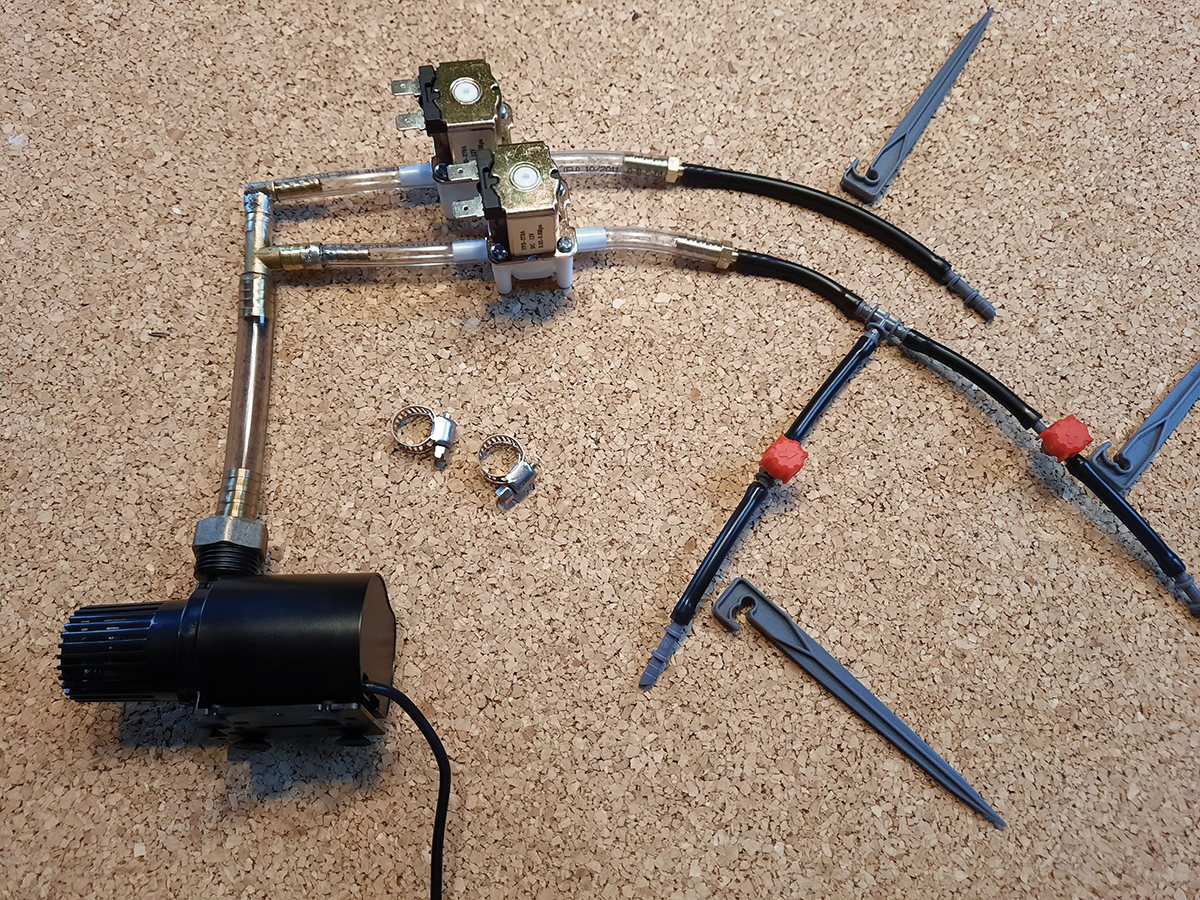
Thanks to the valves, the two main lines can also be reliably blocked against the reservoir being evacuated in idle condition. Distribution downstream can be done with a smaller hose diameter; T-pieces are used for more branches. Small regulators ensure that water reaches all the plant locations evenly; setting them up requires some trial and error. For an initial test, I first extended the connection on the centrifugal pump to allow immersion.
If everything works satisfactorily, you can then proceed to trim hoses and cables to the required lengths, route them correctly, and fasten them with ground spikes. Hose clamps around the thicker hoses reliably prevent them slipping off the connections while you are away.
Control
If you look at commercial irrigation systems, they often seem relatively complicated to operate. In contrast, I want this system to be as simple as possible, so the DIY system remains manageable and works safely during periods of absence from home. That said, the automatic watering system does have one special trick up its sleeve: It can extend the watering time to achieve a certain level of moisture in the soil with the use of sensors that provide appropriate feedback from two different plant locations.
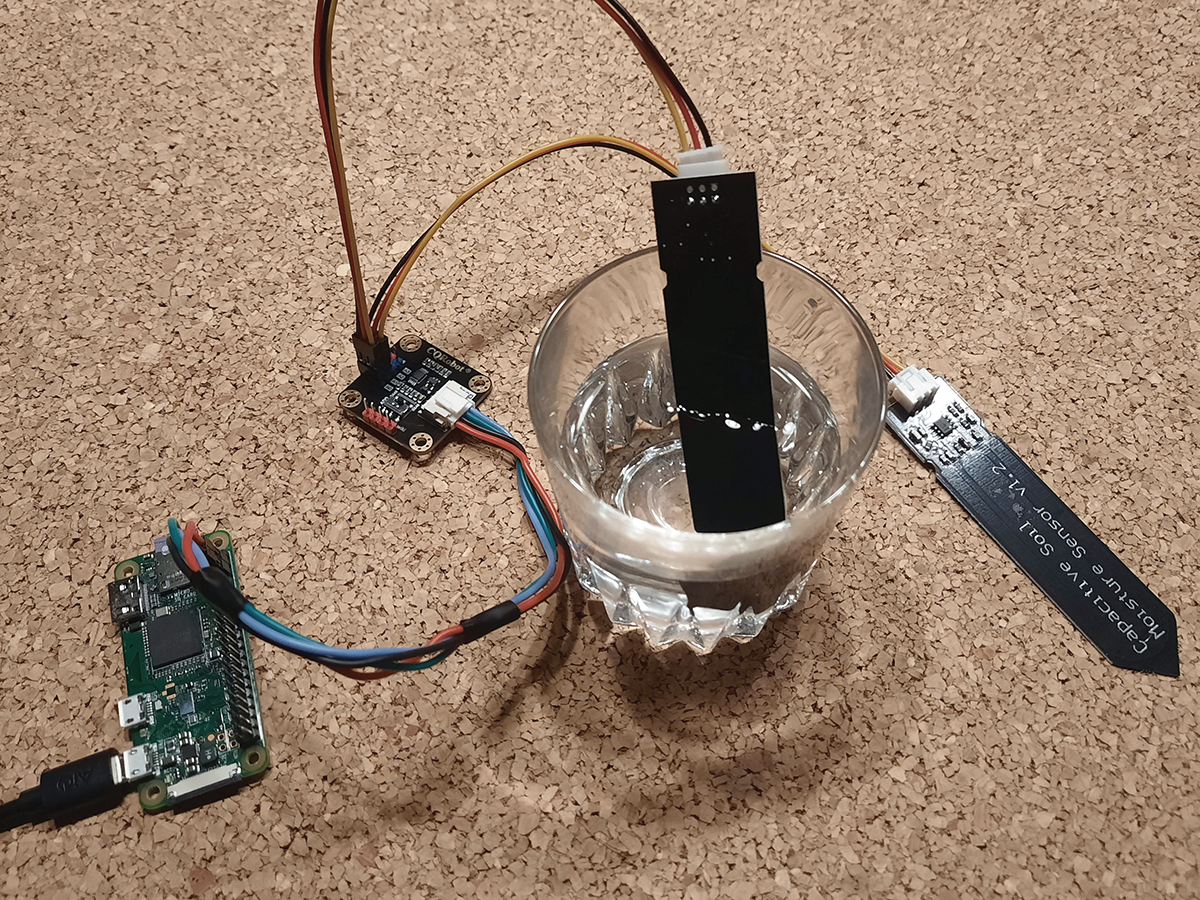
Capacitive sensors were chosen because they are less susceptible to corrosion than resistive sensors. Although I am talking about models with analog output, they can be connected quite easily to the Raspberry Pi in the control center through the ADC. To determine the various limits up front, I immersed the sensors in water in a test (Figure 5) and then put them in moist soil. The ADC in this setup is an ADS1115, which is addressed in Python 3 with a library by Adafruit. The easiest way to install it is to use the command:
This solution relies on a central control script named watering.py, which resides in the Raspberry Pi’s memory and takes care of flow control and polling the humidity sensors. The timing settings are stored there, as well. In an initial saver mode, the system now waters the plants for two minutes at 5:00pm every day. Controlled by the second solenoid valve, it then does the same thing for a little longer – five minutes. The values can be adjusted as required.
To water the plants, the Raspberry Pi always opens both solenoid valves first and then starts pumping from the tank. Once the timer for the first water delivery has expired, the system checks the first moisture sensor to discover whether the soil moisture at the plant location has reached the “wet” state; if not, follow-up is provided. The first valve then shuts off. The second line remains open for a longer time and is controlled along the same principle until the script first stops the pump and then finally shuts off the second valve.
The Python script resides in a separate folder below the home directory. Because it is called in rc.local, it runs automatically at boot time. If you like, you can also convert the script into a genuine daemon. Everything has been kept quite simple here, but it’s for daily use and can be extended at any time if you feel the urge to do so. The script and the remote control PHP website described below can be found in my GitHub project, where the wiring and routing diagram for the water supply also reside.
Because the Raspberry Pi is connected to the local network, you can also access and maintain it there over SSH. To do so, just log in to a terminal with:
In contrast to similar projects, however, the automatic watering device does not have a separate terminal-based menu. At the end of the day, it is a simple workhorse that always follows the same routine. The idea is to do everything else that needs to be done in the web browser.
Web-Based Remote Control
The watering system works reliably even without Internet access, but it should at least have remote access to avoid the need to read everything at the device or to install buttons and a touchscreen. You have to remember that everything needs to be pretty much waterproof.
If the irrigation system in your garden is outside the range of your router, a repeater set up halfway can help. Alternatively, during the test phase, simply disconnect the control unit from the connectors and reprogram the Raspberry Pi on your home network. A network connection is always required for remote access, so you can intervene, even when on vacation.
Some of today’s commercial watering systems come with a smartphone app. I designed a web interface that also works on cell phones. Without the benefit of a vendor-operated cloud, the Raspberry Pi, including the HTTP server, needs to be accessible over a static IP address on the Internet.
However, I went for a simpler variant and located the user interface (Figure 6) in a PHP file in my own web space. After calling the URL, the interface sends predefined commands to the watering system at the push of a button. Currently, the five actions in Table 1 are implemented. The Raspberry Pi queries the corresponding commands in the control script at short intervals and triggers the matching actions if needed.

The basis for the implementation is a development by Christian Grieger. The advantage of his method is that it does not require elaborate arrangements such as dynamic DNS. The disadvantage is that feedback arrives with a bit of a delay; however, this delay is not likely to be of much importance, although you will definitely want to secure the remote control website with a login.
Conclusions
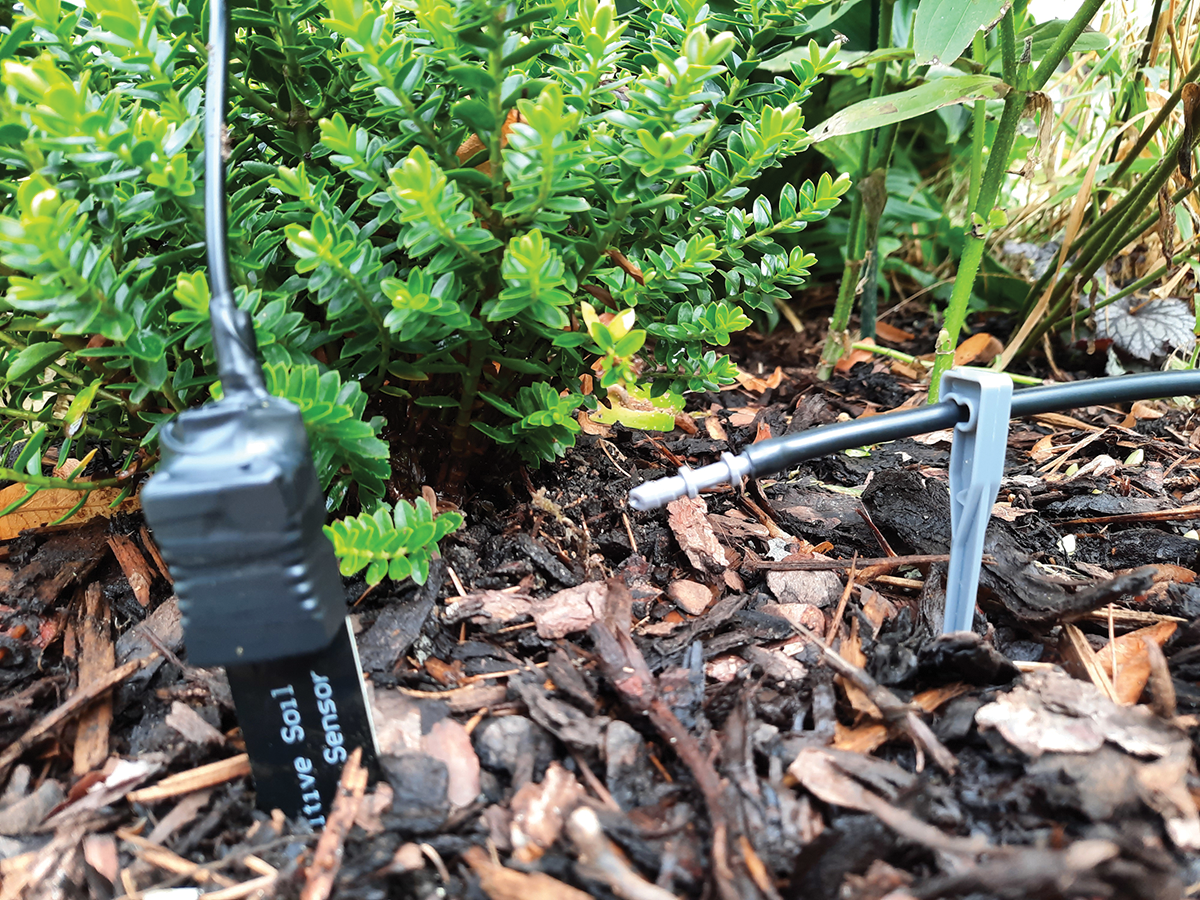
The plant watering system does exactly what it’s supposed to do, in a positive way. I ran it at home in sunny weather during the last few days of summer, and checking it for functionality was no problem (Figure 7).
The system will star as my vacation stand-in next year. Trying to supply the whole garden would probably be overshooting the mark, but if you are looking to rescue your most important plants in a limited area (e.g., a greenhouse, conservatory, or living room), this controller can be a real helper.