
Lightweight Internet communications with the simple Gemini Protocol
Create Gemini pages to show sensor data or control a Raspberry Pi rover.
The Gemini Protocol is a relatively new Internet communication protocol for accessing remote documents. Unlike an HTML web page that contain layers of style sheets, JavaScript, and HTML tags, a Gemini document is a simple readable document.
Gemini’s Gemtext format is easy to learn, requiring about five codes. Children or new coders could easily put together a small documentation server or custom application server without many programming skills.
In this article, I introduce the Gemini protocol with three simple projects. The first project creates a Gemini server and client with just one line of Bash code. In the second project, a Bash script creates a common gateway interface (CGI) page that connects to a sensor to show temperature and humidity data. The third project uses Gemini document links to control Raspberry Pi general purpose input/output (GPIO) pins to drive a rover.
Getting Started
Any text editor can be used to create Gemini documents. The Gemtext format is a little bit like a slimmed down version of the Markdown syntax. The default file extension for a Gemini document is .gmi.
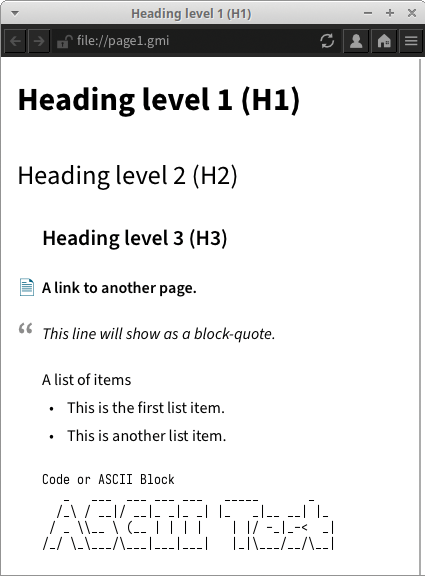
The example file in Listing 1 (page1.gmi) shows all of the Gemtext format codes, including headings (three levels), document links, block quotes, lists, and preformatted text. I’ll look a little later into the use of preformatted text for ASCII art and output from Bash commands.
Listing 1: Gemini Document
# Heading level 1 (H1)
## Heading level 2 (H2)
### Heading level 3 (H3)

=> testpage.gmi A link to another page.

> This line will show as a block‑quote.

A list of items
* This is the first list item.
* This is another list item.

```
Code or ASCII Block
   _   ___  ___ ___ ___   _____       _
  /_\ / __|/ __|_ _|_ _| |_   _|__ __| |_
 / _ \\__ \ (__ | | | |    | |/ ‑_|_‑<  _|
/_/ \_\___/\___|___|___|   |_|\___/__/\__|

```
A good selection of Gemini client applications are available, such as the Lagrange desktop GUI client that works with both local files and Gemini network links. Figure 1 shows the example file (file://page1.gmi) accessed locally. Note that differences between the source file and the Gemini presentation are minimal.
Content Type
The content type is used by browsers and applications to determine how to manage the requested file. Typically, the content type is managed by the application server (e.g., a web server will send the “HTTP/1.0 200 OK” status code before sending an HTML file).
For the Gemini protocol, the content type is: “20 text/gemini”. Depending on the Gemini server and the file extension of the requested file, the user might have to add the content type manually. (More about this when I look at Bash and CGI servers.)
Simple Bash Gemini Servers and Clients
For basic testing, a one-line Bash statement can be used for either a Gemini server or a client. The Gemini protocol typically uses the Secure Sockets Layer (SSL) and Transport Layer Security (TLS) encryption, so the Bash ncat utility is needed. (Note: the simpler nc command does not support SSL.)
The Bash code to serve up the earlier single Gemini page would be:
while true; do { echo ‑ne "20 text/gemini\r\n"; cat page1.gmi; } | ncat ‑l ‑p 1965 ‑‑ssl; doneThis Bash statement echos the Gemini content type (“20 text/gemini”) and lists (cat) the example file when a request is received. The ncat utility listens (‑l option) on port 1965 (the default Gemini port) for incoming requests.
The Bash script to connect to a Gemini server is:
echo "gemini://192.168.0.105" | ncat ‑‑ssl 192.168.0.105 1965
Gemini clients start by sending “gemini://<requested_ip_address>”. This string is echoed to ncat with SSL enabled (‑‑ssl) and the Gemini server’s IP and port defined. This Bash client statement will output the Gemini page to the screen.
The at scheduling utility could be used with the Bash client statement to save a Gemini page at a specific time, for example, at 11:20am:
at 1120 $(echo "gemini://192.168.0.105" | ncat ‑‑ssl 192.168.0.105 1965 > page1120.gmi) &One benefit of one-line Bash utilities is that you can easily configure your own custom network applications without the need to load back-end FTP or web servers. The downside of the ncat utility is that it could be a security issue if it is used improperly.
Dynamic Bash Data
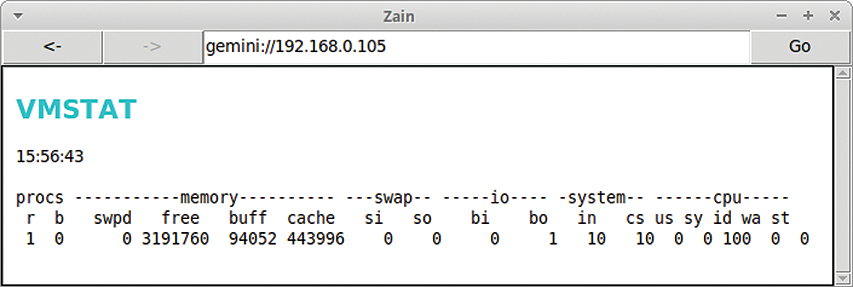
Instead of using the cat statement to list a static file, a script can be called by the Bash Gemini server. The Bash script in Listing 2 (showdata.sh) sends the Raspberry PI’s CPU stats with the vmstat utility. The script outputs a top-level heading (line 6) and the current time (line 7). Preformatted text is used (lines 10, 12) for a clearer presentation of the data.
Listing 2: Example Gemini Document
#!/bin/bash
#
# showdata.sh ‑ Output data for Gemini Bash Server
#
echo ‑e "20 text/gemini\n"
echo ‑e "#VMSTAT \n"
date +"%T"
echo  " "
# set Gemini formating for ASCII
echo ‑e "\`\`\`"
vmstat
echo ‑e "\`\`\`"
To make the script executable and run the script in the Bash server, you enter the commands:
chmod +x showdata.sh
while true; do ./showdata.sh  | ncat  ‑l ‑p 1965 ‑‑ssl; done
The content type is echoed within the script (Listing 1, line 5), rather than in the external while loop in the line that runs the script.
Depending on the Gemini client used, some tinkering on the Bash server’s SSL options may be required. I found a few more forgiving clients (Zain and Astro) that accept the basic SSL security setting. Figure 2 shows the output from the Bash server.
Sensor Project
The Gemtext format doesn’t support graphics, but you can use simple ASCII art. For this project, my goal is to show the sensor data along with some ASCII art and a joke or fortune of the day.
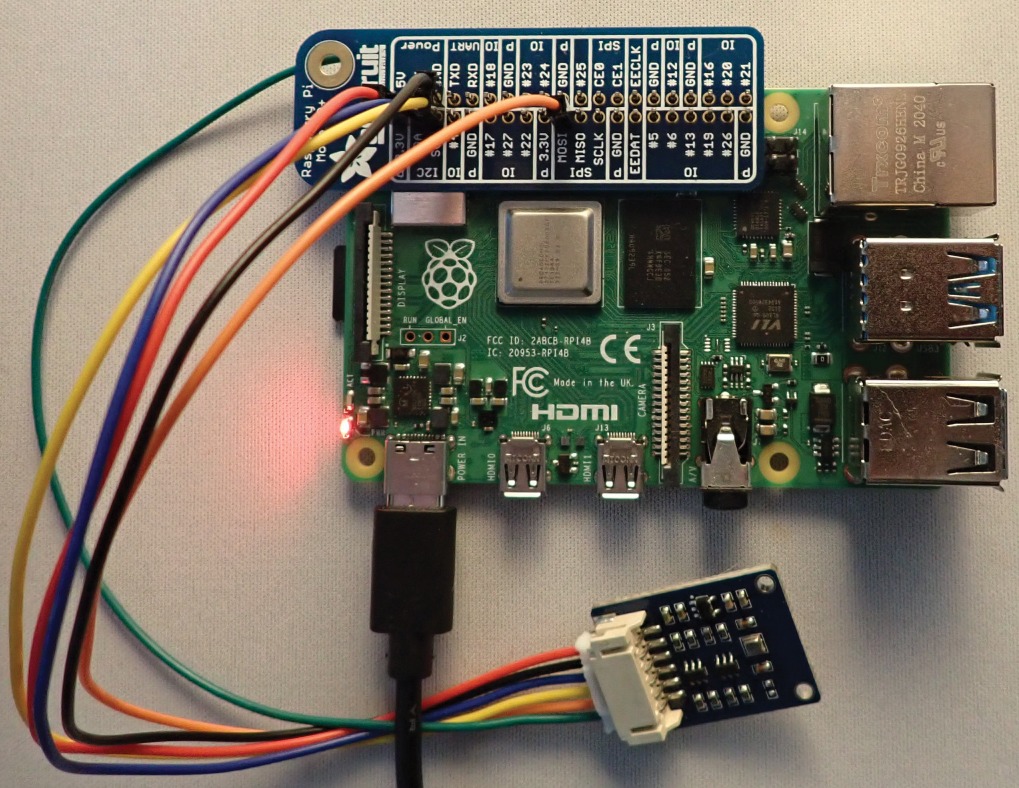
A good selection of sensors exist that can be used. I used a BME280 sensor (~$15) that returns temperature, pressure, and humidity values. The BME280 uses the I2C bus that wires to the SDA, SCL, GND, and 3.3V pins on the Raspberry Pi (Figure 3).
The BME280 Python library also contains a command-line option to read the sensor data. To install the library and test the read_bme280 utility, enter:
$ pip install bme280
$ read_bme280 ‑‑i2c‑address 0x77
1001.26 hPa
23.62 %
21.24 C
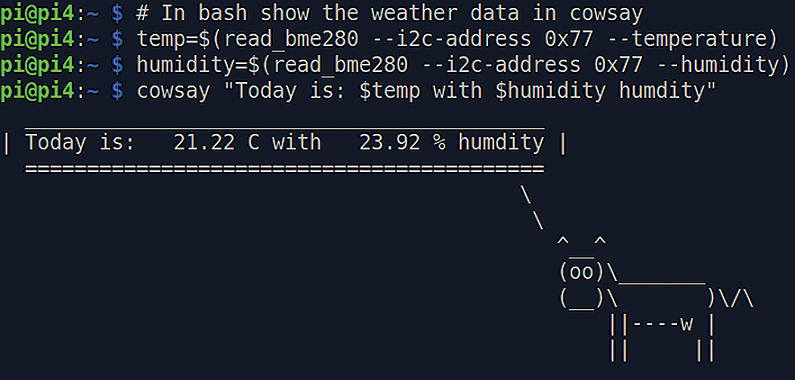
$ # check the sensor address: i2cdetect ‑y 1The cowsay utility is a neat command-line tool that embeds text in ASCII art. Install it with:
sudo apt install cowsayFigure 4 shows an example that reads the temperature and humidity into variables that are then passed into Cowsay.
The final step is to add a joke or fortune of the day. To install the fortune utility use:
sudo apt install fortuneOne of the limitations of using a one-line Bash server is that it’s awkward to show multiple Gemini pages. Luckily, a number of lightweight Gemini servers are available. For my testing, I used the Python-based Jetforce server. To install and run Jetforce on a Raspberry Pi without hard-coding the hostname, enter:
pip install jetforce
jetforce ‑‑dir /home/pi/temp ‑‑host "0.0.0.0" ‑‑hostname $(hostname ‑I) &
I put all my Gemini pages in the /home/pi/temp directory. By default, CGI files are defined in the directory cgi‑bin, which is under the Jetforce home directory.
Listing 3 (weather.sh) shows the Bash code to create a Gemini page (Figure 5) with sensor data. Preformatted text mode is used before and after the Cowsay ASCII art.
Listing 3: Example Gemini Document
#!/usr/bin/bash
#
# weather.sh ‑ send BME280 sensor data to a Gemini page
#
cd /home/pi/.local/bin
# use the read_bme280 utility to get the weather data
temp=$(read_bme280 ‑‑i2c‑address 0x77 ‑‑temperature)
humidity=$(read_bme280 ‑‑i2c‑address 0x77 ‑‑humidity)

# Output a Gemini page
echo ‑e "20 text/gemini"
#Note: Some Gemini CGI servers may do this
echo ‑e "\`\`\`"    # set preformatted mode
cowsay "Today is: $temp with $humidity humdity"
echo ‑e "\`\`\`\n"  # unset preformatted mode
/usr/games/fortune ; # Send a joke/fortune of the day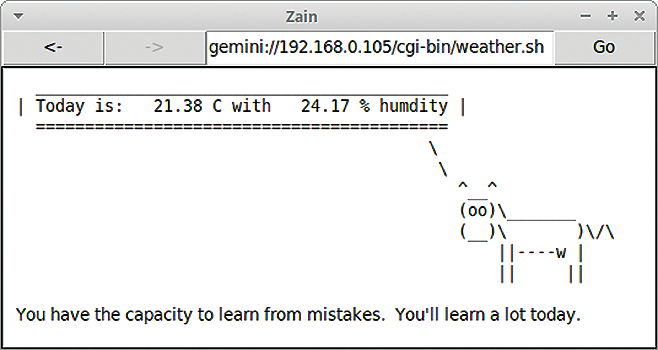
Rover Project
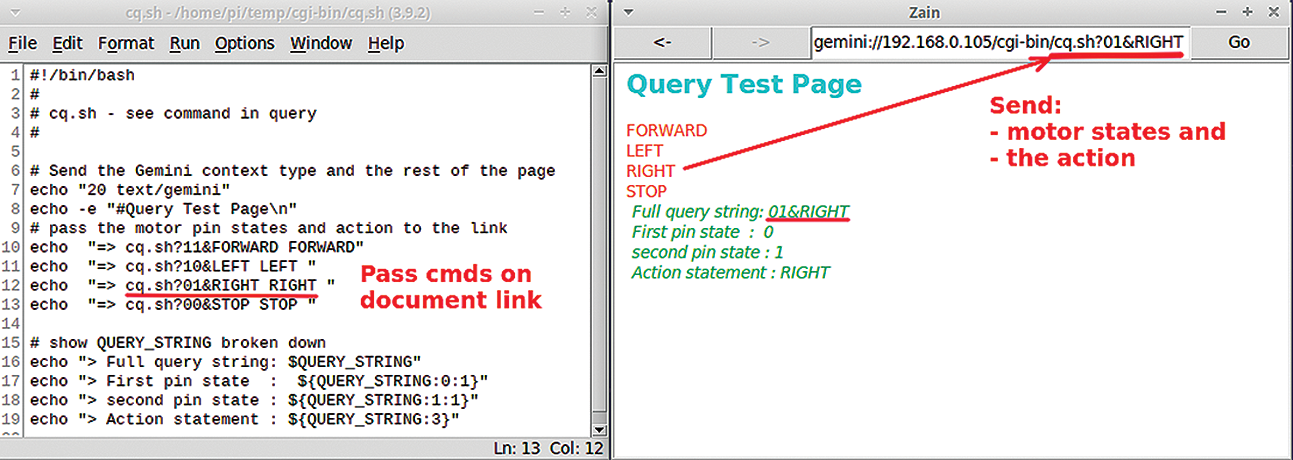
Gemtext doesn’t support buttons and forms like web pages, so simple workaround document links can be used to pass parameter information. For the rover project, I pass in the action and motor states as a query string on the document links.
Figure 6 shows the source file and the Gemini page (cq.sh) with query strings passed in the document links. For this example, the RIGHT link passes a parameter to define the first pin as 0 and the second pin as 1 and to set the action statement to RIGHT.
The gpio command-line utility enables Bash scripts or users to read and write manually to Raspberry Pi GPIO pins. The gpio utility is installed with:
git clone https://github.com/WiringPi/WiringPi.git
cd WiringPi
./build
Connecting motors directly to a Raspberry Pi pin is not recommended because large motors require more power than a Pi can supply, and power surges could damage the Pi hardware. A number of Raspberry Pi motor or relay shields can be used to solve this problem.
For this project, I use the Pimoroni Explorer HAT Pro (~$23), an Arduino car chassis (~$15), and a portable charger.
The connections of the left and right motor pins will vary with your setup. My setup had the left motor on pin 24 and the right motor on pin 29. To set a GPIO pin as an output, I use the command,
gpio mode 24 outwhere 24 is the pin number.
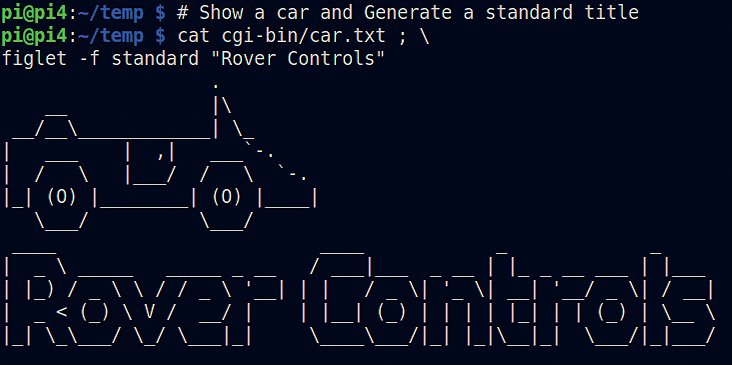
To make the Gemini page a little more presentable, I use an ASCII car image and the figlet utility to generate a four-line-high title. ASCII images take a little bit of practice to make manually. Luckily, a good selection of ASCII art can be found online.
The figlet utility is installed with:
sudo apt install figletFigure 7 shows the output from a couple of lines of Bash code to present a car image (car.txt) and a figlet-generated heading.
The final step of the project is to put all the pieces together. Listing 4 (rover.sh) checks the query string (line 9) and uses the earlier logic to parse the string to set the pin outputs (lines 11-14). The car image and the title are output in lines 22 and 23. The document links with the different query strings are defined in lines 28 to 31. Listing download.
Listing 4: Example Gemini Document
01 #!/bin/bash
02 #
03 # rover.sh ‑ Control a Pi Rover from a Gemini Page
04 #
05 lpin=24 # left motor pin
06 rpin=29 # right motor pin
07
08 # if the query string is not null, set the pins
09 if [ ! ‑z $QUERY_STRING ]
10 then
11 # set left motor to the first number
12 gpio write $lpin "${QUERY_STRING:0:1}"
13 # set right motor to the second number
14 gpio write $rpin "${QUERY_STRING:1:1}"
15 fi
16
17 # Send the Gemini context type and the rest of the page
18 echo "20 text/gemini"
19
20 # Show a car and Generate a large title
21 echo ‑e "\`\`\`" ; # set preformatted mode
22 cat cgi‑bin/car.txt
23 figlet ‑f standard "Rover Controls"
24 echo ‑e "\`\`\`" ; # unset preformatted mode
25 echo ‑e "# Select Command"
26
27 # pass the motor pin states and action to the link
as a query string
28 echo ‑e "=> rover.sh?11&FORWARD FORWARD \n"
29 echo ‑e "=> rover.sh?10&LEFT LEFT \n"
30 echo ‑e "=> rover.sh?01&RIGHT RIGHT \n"
31 echo ‑e "=> rover.sh?00&STOP STOP \n"
32
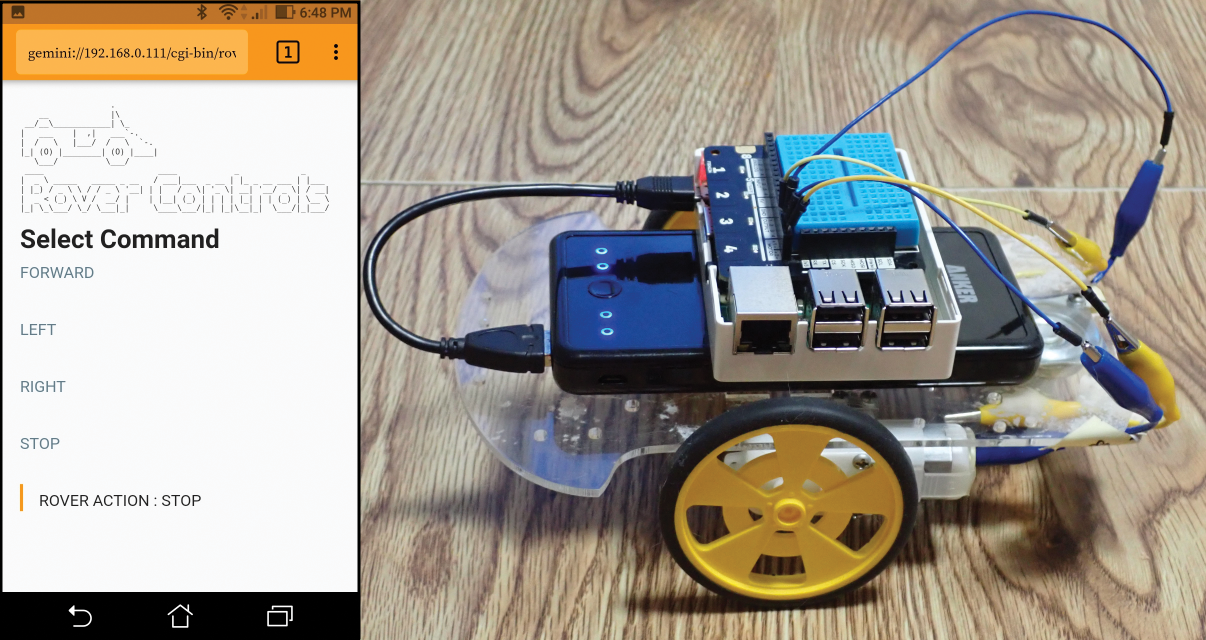
33 # show QUERY_STRING action as a blockquote
34 echo ‑e "> ROVER ACTION : ${QUERY_STRING:3}\n"A number of Gemini clients run on smart phones. I used the free Android Deedum app for this project. Figure 8 shows the Raspberry Pi rover and the Gemini Rover Controls page.
Some Final Comments
The Gemini protocol doesn’t offer the graphic capabilities of an HTML page; however, if you are looking for a quick weekend project, Gemini might be just the answer.
For these projects, I tried to keep things lean with the use of Bash CGI pages, but you could use Python or any other CGI-capable language.
Some good options for horizontal and vertical ASCII bar charts are out there if you are looking to add some charting to your sensor projects.