Arduino Calling SQL
If you need to store long-term historical data, you can cobble together some Arduino modules, sensors, and displays and get them all to talk to an SQL server.
In most Arduino projects, devices use messaging protocols like Message Queuing Telemetry Transport (MQTT) or custom dashboard platforms such as Arduino Cloud or ThingsBoard to talk to each other. While those two approaches offer excellent solutions for viewing short-term sensor data, they have limitations when used for long-term historical storage.
A common solution that supports historical storage is to connect MQTT brokers to data-logging packages like Node-RED, InfluxDB, or Grafana. Another approach is to install SQL drivers on the Arduino controllers and then pass sensor data directly to a database server. There are Arduino C/C++ libraries for MariaDB/MySQL, Microsoft SQL, PostgreSQL and even local SQLite 3 databases. SQL-based solutions have some useful benefits such as:
- No intermediate storage is required
- Access raw historical data or aggregate calculations
- Write custom queries
- Use back-end views and procedures to minimize dashboard code
Depending on your project requirements, using an SQL server could be a good fit for your next Internet of Things (IoT) project.
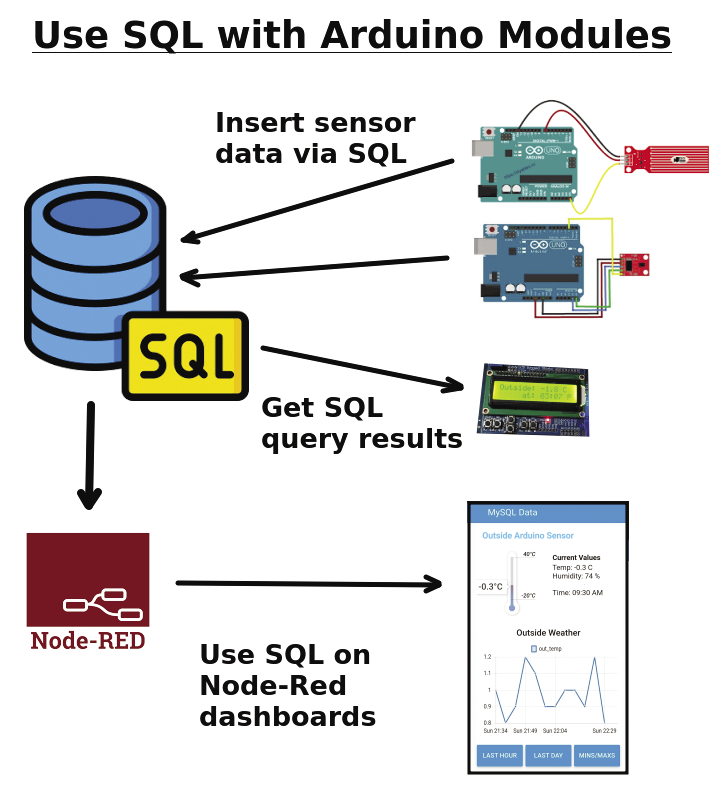
This article presents a sensor project that connects Arduino modules to a MySQL/MariaDB server (Figure 1). Dashboards showing current values and historical trend charts will be created using some SQL widgets in Node-RED.
SQL Libraries for Arduinos
There are a few C/C++ SQL libraries to choose from. For this project, I was quite happy with Charles Bell’s MySQL Connector Arduino package: I found it straightforward, and it has some good examples. This and the other SQL packages can be installed directly using the Arduino IDE’s library manager.
Note that due to the size of most of the libraries, using SQL with MicroPython or CircuitPython on a microcontroller will be challenging or impossible at this time.
Planning Your Database
Your data requirements will define your database setup. Key factors to consider are:
- How many sensors/inputs will be connected
- How often the data will be collected
- How long the raw data will be kept
For extremely small projects, an SQL server could be loaded on a Raspberry Pi, or you could use a free Internet SQL server. For my project, I ran MySQL on an Ubuntu laptop, and I remotely configured the database using the DBeaver Universal Database Tool.
Having one large table that contains all the raw historical data is difficult as sensor timestamps vary between the different Arduino modules. However, you could create combined signal roll-up tables that contain hourly or daily summary values. For this project, I gave each Arduino module its own table, and I used unique field names for each sensor.
Adding timestamps to the sensor data can be done either at the microcontroller level or by the SQL server. Arduino modules can use the Network Time Protocol (NTP) or a real-time I2C clock device like an 1339 module to get timestamps.
If you want to insert sample times at the SQL server level, the time field simply needs to be a timestamp data type with a default of CURRENT_TIMESTAMP. Figure 2 shows an example database arduino with a table garage that represents an Arduino module with a temperature and humidity sensor.

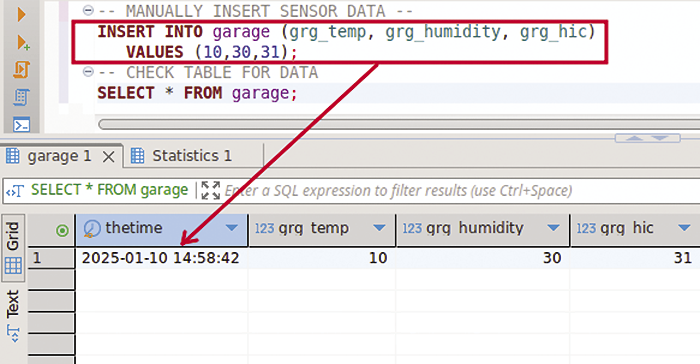
Data inputs can be manually tested using the SQL INSERT command. Figure 3 shows how inserting a new record with temperature, humidity, and heat measurements, but no timestamp, into the garage table automatically made the SQL server fill the timestamp field with the current time.
Inserting Data
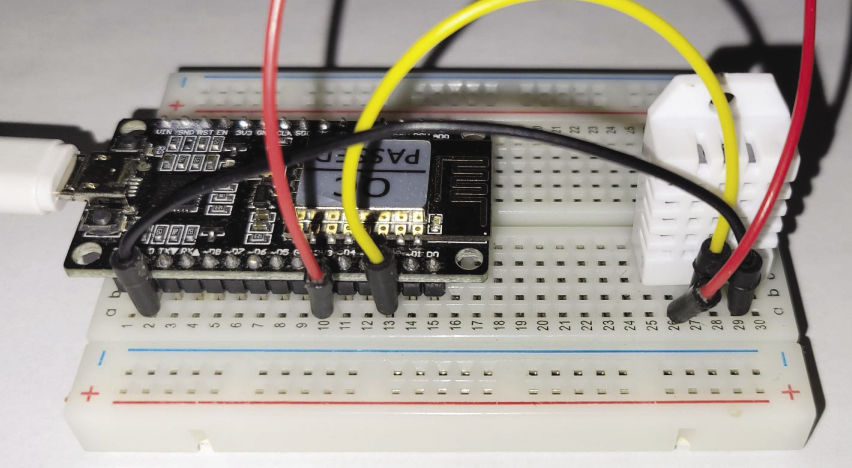
My test project used a variety of different Arduino ESP8266 modules and environmental sensors. A good indoor test prototype could use a low-cost NodeMCU module with a DHT22 temperature/humidity sensor (Figure 4).
Listing 1 shows a basic WiFi/SQL setup that reads a DHT22 sensor and then formats an SQL insert string that is passed to and executed on the MySQL server. The three key lines for inserting data are:
char INSERT_SQL[] = "INSERT INTO
arduino.outside
(out_temp, out_humidity, out_hic)
VALUES ('%.1f','%.1f','%.1f')";
sprintf(query, INSERT_SQL, t, h, hic);
cur_mem->execute(query);
Listing 1: Arduino Code to Insert Sensor Data
01 // Write DHT22 sensor data to an MS‑SQL/MariaDB database
02 #include <ESP8266WiFi.h>
03 #include <MySQL_Connection.h>
04 #include <MySQL_Cursor.h>
05 #include "DHT.h"
06
07 #define DHTPIN 4
08 #define DHTTYPE DHT22   // DHT 22 (AM2302), AM2321
09 DHT dht(DHTPIN, DHTTYPE);
10 byte mac_addr[] = { 0xDE, 0xAD, 0xBE, 0xEF, 0xFE, 0xED };
11
12 // MySQL server information
13 IPAddress server_addr(192,168,0,121);
14 char user[] = "pete";     // MySQL user login username
15 char password[] = "pete"; // MySQL user login password
16 char db[] = "arduino";
17
18 // Wi‑Fi connection info
19 char ssid[] = "TPLINK";   // your SSID
20 char pass[] = "xxxxxxx";  // your SSID Password
21
22 WiFiClient client;        // Use this for Wi‑Fi instead of EthernetClient
23 MySQL_Connection conn((Client *)&client);
24 // Create an instance of the cursor passing in the connection
25 MySQL_Cursor cur = MySQL_Cursor(&conn);
26
27 // Setup Wi‑Fi and SQL interfacess
28 void setup() {
29   Serial.begin(9600);
30
31   dht.begin(); // Connect to DHT22 sensor
32
33   // Begin Wi‑Fi section
34   Serial.printf("\nConnecting to %s", ssid);
35   WiFi.begin(ssid, pass);
36   while (WiFi.status() != WL_CONNECTED) {
37     delay(500);
38     Serial.print(".");
39   }
40   // print out info about the connection:
41   Serial.println("\nConnected to network");
42   Serial.print("My IP address is: ");
43   Serial.println(WiFi.localIP());
44
45   //  WiFiClient client;
46   MySQL_Connection conn(&client);
47   Serial.print("Connecting to SQL...  ");
48   if (conn.connect(server_addr, 3306, user, password))
49     Serial.println("OK.");
50   else
51     Serial.println("FAILED.");
52
53   // create MySQL cursor object
54   MySQL_Cursor* cursor;
55   cursor = new MySQL_Cursor(&conn);
56 }
57
58 // Loop every 5 minutes sending with new sensor data to SQL server
59 void loop() {
60   // Get sensor readings
61   float h = dht.readHumidity(); //Read humidity
62   float t = dht.readTemperature(); // Read temperature in C
63   float hic = dht.computeHeatIndex(t, h, false); // heat index in C
64
65   // Check if any reads failed and exit early (to try again).
66   if (isnan(h) || isnan(t) ) {
67     Serial.println(F("Failed to read from DHT sensor!"));
68     return;
69   } else {
70     // Write to database with good data
71     Serial.printf("\nHumidity: %.1f %%", h);
72     Serial.printf("\nTemperature: %.1f °C", t);
73     Serial.printf("\nHeat‑Index: %.1f °C\n", hic);
74
75     // Initiate the query class instance
76     MySQL_Cursor *cur_mem = new MySQL_Cursor(&conn);
77
78     // Prepare INSERT query string
79     char INSERT_SQL[] = "INSERT INTO arduino.outside (out_temp, out_humidity, out_hic) VALUES ('%.1f','%.1f','%.1f')";
80     char query[128];
81     sprintf(query, INSERT_SQL, t, h, hic);
82
83     // Execute the INSERT query in the database
84     Serial.println(query);
85     if (conn.connected()) cur_mem‑>execute(query);
86   }
87   delay(5*60*1000); // Sample every 5 mins
88 }
INSERT_SQL contains the SQL string with placeholders for the values. Calling sprintf replaces those placeholders with the sensor values (t, h, and hic) and stores the resulting string in query. The final step is to execute the query using the predefined MySQL cursor cur_mem.
Viewing Current and Historical Results
Now that the Arduino modules are inserting sensor data, it’s time to view the results. Rather than writing complex queries on Arduino modules or within Node-RED, you can create SQL server side views. Data is inserted sequentially into a table, so you can get the latest sensor values by checking the last row in the table. The following SQL statement creates a view v_lastoutside that returns the latest readings from the outside table.
CREATE VIEW v_lastoutside AS
SELECT * FROM `outside`
ORDER BY thetime DESC LIMIT 1;
Once you’ve created this view, you can use it like a table:
SELECT * FROM v_lastoutside;
The next SQL command is more complex. It creates a view that we will later use in Node-RED for displaying the hourly minimum and maximum outside temperatures:
CREATE VIEW v_out_temp_hr AS
SELECT MIN(thetime) AS 'hrtime',
MAX(out_temp), MIN(out_temp)
FROM outside GROUP BY
DAY(thetime), HOUR(thetime);
You can add a WHERE clause to the v_out_temp_hr view to get a specific time range. The statement below uses the now() and adddate() functions to filter the hourly results from the last three days:
SELECT * FROM v_out_temp_hr
WHERE hrtime BETWEEN
adddate(now(),-3) and now();
By adjusting the starting and ending time ranges, you can scroll through the historical data.
Using Arduino to Read Data
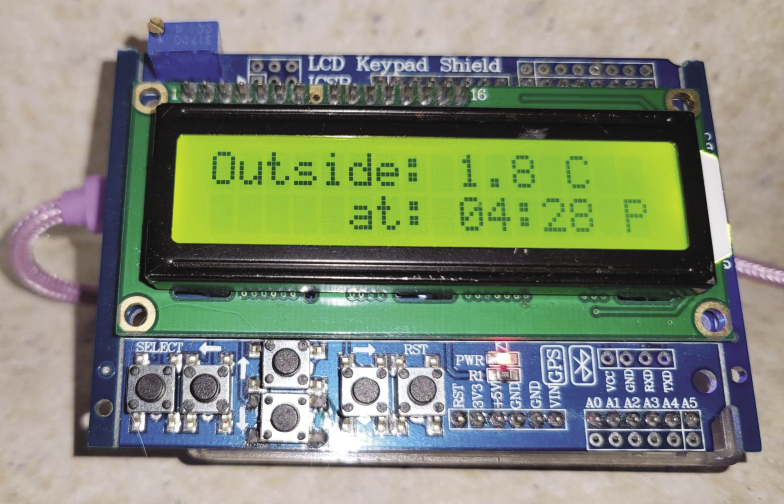
The code for connecting to the SQL database and reading data is similar to the earlier INSERT example, but now the MySQL cursor cur_mem returns data. Listing 2 shows a code snippet that shows how to run a SELECT query. The loop() cycles every 30 seconds and reads the latest outside temperature value with its sample time. This code runs on an Arduino WeMos D1 module with a 2x16 LCD push button shield (Figure 5).
Listing 2: Arduino Code Snippet to View SQL Data
01 // Code snippet to show SQL results on an LCD
02 void loop() {
03   // Initiate the query class instance
04   MySQL_Cursor *cur_mem = new MySQL_Cursor(&conn);
05   row_values *row = NULL; // rows of returned results
06   lcd.clear();
07
08   // Define query using a MySQL view of latest results
09   // First 2 items returned are: time and outside temperature
10   char query[] = "SELECT * from arduino.v_latest";
11   // Execute the query
12   cur_mem‑>execute(query);
13   // Fetch the columns (required)
14   column_names *columns = cur_mem‑>get_columns();
15   // Read the rows (for this query only one is expected)
16   do {
17     row = cur_mem‑>get_next_row();
18     if (row != NULL) {
19       Serial.printf("\nSample Time: %s",row‑>values[0]);
20       Serial.printf("\nTemperature: %s °C\n", row‑>values[1]);
21       // Show the results on an LCD display
22       lcd.print("Outside: ");
23       lcd.print(row‑>values[1]);  // show the temperature
24       lcd.print(" C");
25       lcd.setCursor(6,1);  // go to next line, position 6
26       lcd.print("at: ");
27       lcd.print(row‑>values[0]);  // show the time
28     }
29   } while (row != NULL);
30
31   delete cur_mem;
32   delay(30000);  // Check for updates in 30 seconds
33 }
To read the results from a SELECT query, you first have to get the column names (line 14). Then you run a do … while loop and iterate over the returned rows of data via cur_mem->get_next_row() (lines 16-29). We access individual fields of a row via row->values[index] where index counts from 0.
Future enhancements to this part of the project could include using the buttons on the shield to access historical information such as: “How cold was it last night?” or “When was it the coldest?”
SQL with Node-RED
Node-RED is an excellent open-source programming tool for both generating logic flows and creating web dashboards. It includes charting components that can store and present historical data, and it is a great option for looking at short-term trends. For SQL projects, the Node-RED charting widgets can use database query results directly rather than using their internal storage.
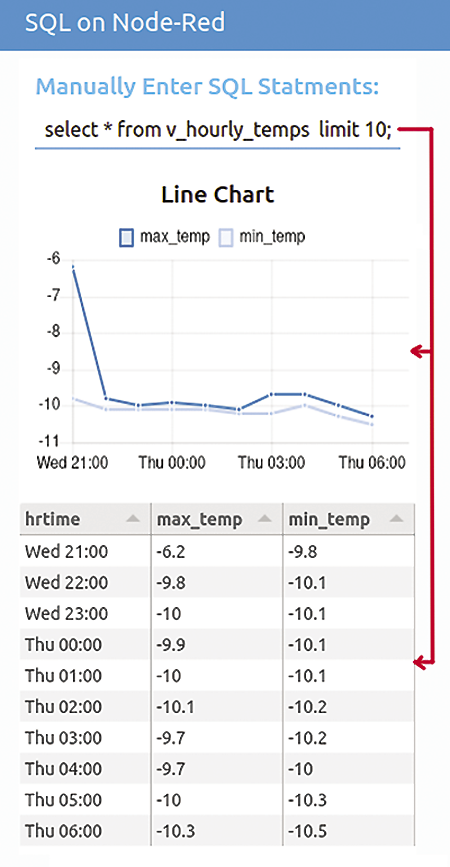
You need two important SQL components: node-red-node-mysql (a node to read and write to a MySQL database) and node-red-db2chart (a node that formats SQL results for charting). A good way to play with SQL statements is to create a dashboard that sends the results from a text input node to a line chart and a data table widget. The logic for this example only requires six nodes (Figure 6). You start by manually entering the SQL statement into a text input node. The SQL string in msg.payload is then moved to the msg.topic with a change node, and this is passed on to a mysql component. The output from the mysql node can be used directly in a table, but you need a db2chart widget to format the data for a line chart. Figure 7 shows the dashboard for this logic.

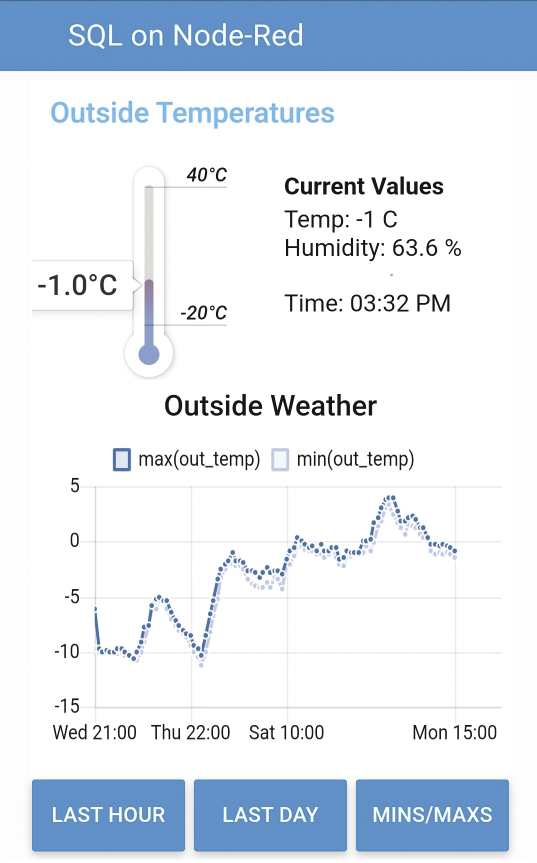
Node-RED offers a rich set of dashboard components that can be used to present both SQL and NoSQL data. For my project, I used a thermometer widget to show the outside temperature and a template item for the raw data. Button widgets call predefined SQL views to offer different charting options (Figure 8).
Summary
With an SQL database, you get long-term storage of raw data, and you can perform aggregate calculations and custom queries. The Arduino C/C++ coding required to handle either MQTT or SQL calls is very similar. Having access to historical information at the microcontroller level is a nice bonus. Unlike MQTT brokers, which are basically plug-and-play, managing SQL databases does require some upfront design and a reasonable understanding of the SQL syntax, but the added flexibility is worth the extra effort.

