
Shell Programming in Python
Create lightweight Raspberry Pi scripts with Xonsh, a Python shell that lets you write scripts in Python with Bash commands mixed in.
For Raspberry Pi users, Xonsh offers many opportunities to write some extremely lightweight scripts, with Python connecting to physical devices and Bash utilities accessing system and file resources.
In this article, we look at two lean Xonsh projects for the Raspberry Pi. The first program connects to a DHT11 temperature and humidity sensor and shows the results in a Bash dialog in just five lines. The second project calls the Bash top utility in a lean eight lines to show the Raspberry Pi idle time and user time on a 16x2 LCD screen.
Getting Started
Xonsh has two requirements: Python 3.8 or greater and a Bash shell. To install and run Xonsh on a Raspberry Pi, Ubuntu, or Debian system, enter:
sudo apt install xonsh
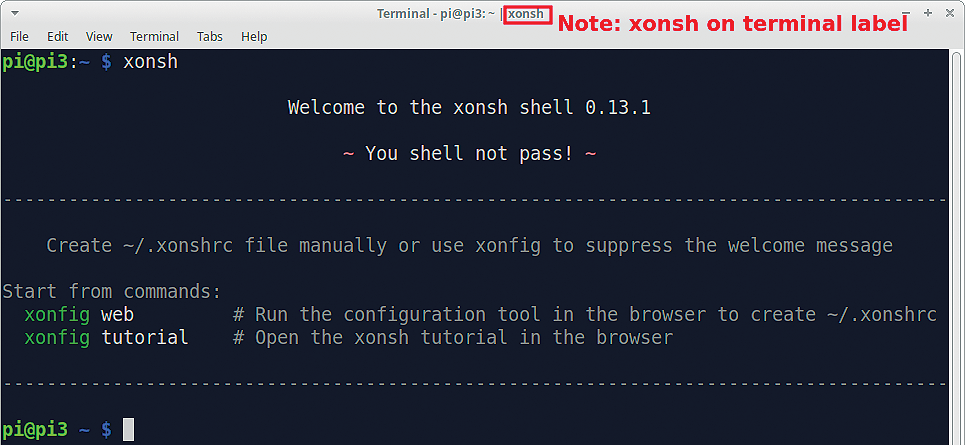
xonshWhen the Xonsh shell opens, the terminal label changes so you can see that you are working in Xonsh rather than a standard Bash shell (Figure 1). When the shell first starts up, two options are presented: xonfig tutorial, which opens a browser help window, and xonfig web, which allows users to tweek the xonsh shell configuration.
Within the Xonsh shell, you can enter both Bash and Python statements, such as:
$ # Mix Bash and Python Lines
$ echo "Time is:" $(date +%T) ; # Bash
Time is: 12:59:51

$ print("%d + %d = %d" % (2,3,2+3)) ; # Python
2 + 3 = 5
Xonsh in the Terminal
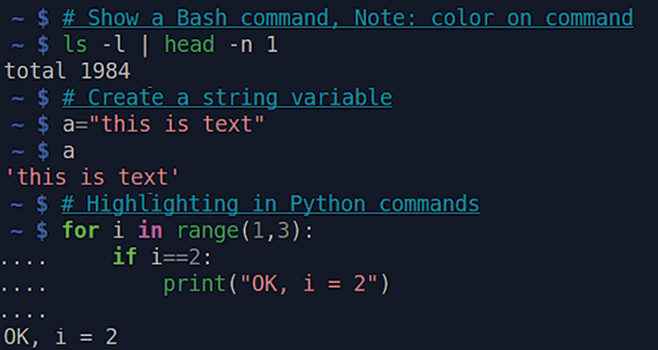
The Xonsh shell is designed for Python users, so some handy features are available from the command prompt. The first of these features is code highlighting. Xonsh highlights comments, strings, functions, and command statements (Figure 2).
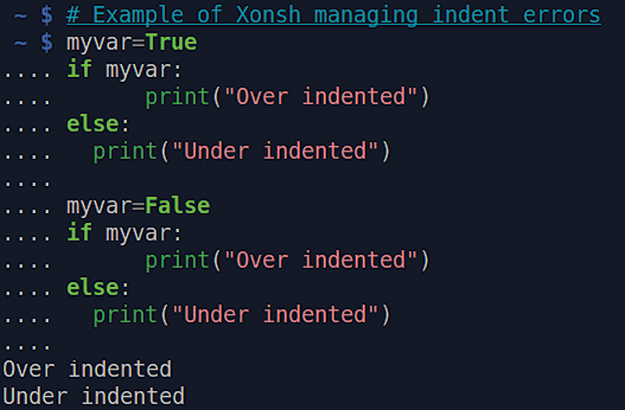
Xonsh also handles Python indentation errors for single-line statements and non-control statements. Figure 3 shows an example of Python code that successfully runs with both overindented and underindented statements.
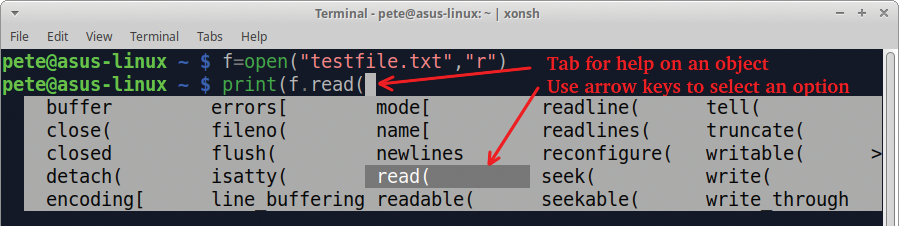
The next useful feature is Python help (Figure 4). The Tab key offers a dropdown dialog of Python objects or methods from the typed string. The arrow keys let you select the required help options within the dialog.
Bash Zenity Dialogs with Python
Python has some great graphic libraries such as Tkinter, Qt, and PySimpleGUI. These libraries are excellent for complex GUI applications, but they can be overkill if you only need a simple dialog.
The Zenity utility is a quick way to present a variety of dialogs in just one line of Bash code. Zenity is preloaded on Raspberry Pi OS and most Linux installations, so no added installation is usually required.
The basic syntax for a Zenity information dialog is:
$ zenity ‑‑info ‑‑title=myTitle ‑‑text=myMessage
In Xonsh, Python statements and variables are used directly in a Bash statement as:
@(<Python statement>)
For example, the Bash echo command can print a Python statement:
$ import sys
$ echo "OS: " @(sys.platform)
OS:  linux
These two steps can be combined to show the OS in a Zenity dialog:
$ import sys
$ zenity ‑‑info ‑‑title=System_OS ‑‑text=@(sys.platform)
Once you have these two concepts working (Zenity and Python embedded in Bash), you can start creating some quick and easy Raspberry Pi applications.
Raspberry Pi DHT11 Sensor Project
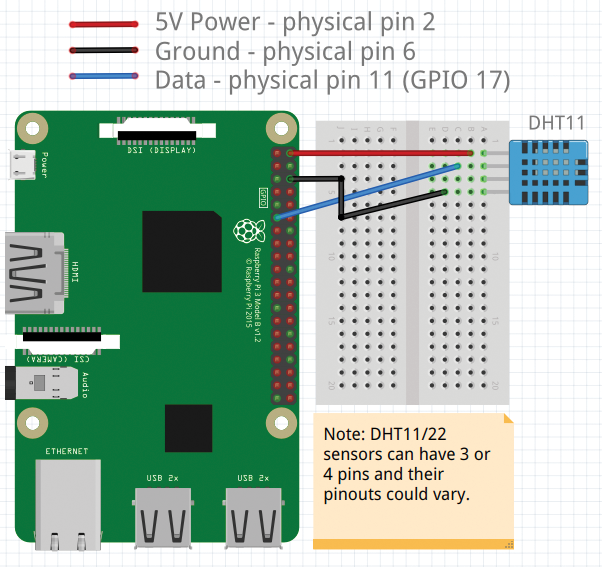
The DHT11 and DHT22 sensors are low-cost components (~$1 to $10) that measure ambient temperature and humidity. Figure 5 shows a typical DHT11 setup with the data pin (blue wire) set to GPIO17 (note that sensor pin arrangements may vary).
The DHT11/DHT22 Python library is installed by:
pip install Adafruit‑DHTListing 1 uses the Python Adafruit_DHT library to get the temperature and humidity (line 9) and then passes the data variables to a Zenity info dialog (line 11).
Listing 1: dht11_dlg.sh
01 #!/home/pi/.local/bin/xonsh
02 #
03 # dht11_dlg.sh ‑ using xonsh to show DHT11 sensor data in a dialog
04 #
05 import Adafruit_DHT
06 sensor=Adafruit_DHT.DHT11
07 gpio=17
08 # Get the humidity and temperature
09 humidity, temp = Adafruit_DHT.read_retry(sensor, gpio)
10 # show the data in a Zenity info dialog
11 zenity ‑‑info ‑‑title=DHT11_Sensor_Data ‑‑width=150 ‑‑text=@( "Humidity: {} %\nTemperature: {}".format(humidity,temp) )
To run this script, enter:
$ xonsh dht11_dlg.sh
$ # or make the script executable and then run it:
$ chmod +x dht11_dlg.sh
$ ./dht11_dlg.sh
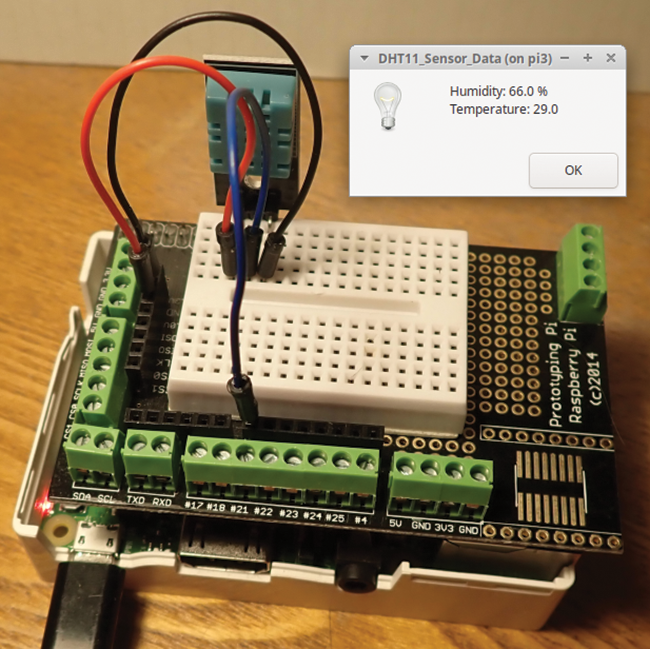
Figure 6 shows the project hardware with the Zenity temperature and humidity dialog. Once you have the hang of how to use Zenity dialogs, you can modify this project to work with a variety of other Raspberry Pi sensors, such as BMP180 barometers, moisture sensors, or passive infrared (PIR) motion sensors.
LCD Project
A number of different LCD screens can be connected to a Rasperry Pi. For this project, we used a 16x2 (two rows of 16 characters) I2C LCD screen ($3-$15), which has an easy four-wire setup (SDA, data line; SCL, clock line; VCC, power input; and GND, ground).
The first step on this project is to check and enable I2C (inter-integrated circuit, a serial communication bus) on the Raspberry Pi, which you can do by running:
# Check I2C status: 0=enabled, 1 = disabled
sudo raspi‑config nonint get_i2c
# Enable I2C: 0=enabled, 1 = disabled
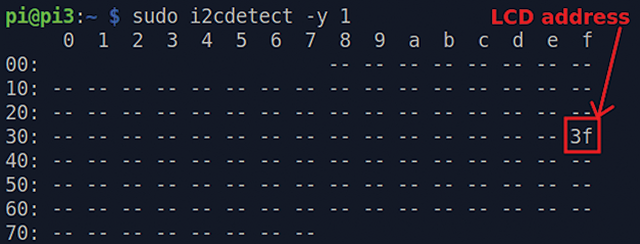
sudo raspi‑config nonint do_i2c 0The next step is to connect the LCD to the Raspberry Pi. The LCD lights up after it is wired to the Pi. The i2cdetect utility shows active I2C hardware addresses (Figure 7).
A Python library for this hardware is installed with:
sudo pip3 install rpi_lcdThe rpi_lcd library assumes an I2C address of 27. Unfortunately the LCD device used was at address 3F, so you have to take an extra step to change the address:
# change the LCD default address from 27 to 3f
cd /usr/local/lib/python3.9/dist‑packages/rpi_lcd
sudo sed ‑i 's/address=0x27/address=0x3f/' __init__.py
To test that the LCD screen is working, enter a few lines at the Xonsh prompt:
from rpi_lcd import LCD
lcd = LCD()
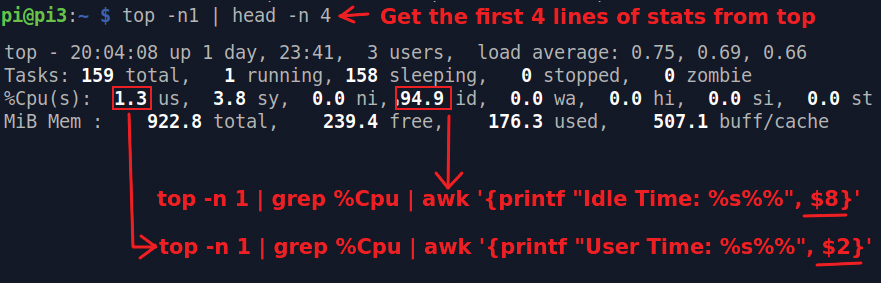
lcd.text("Hi from Xonsh",1)The goal for this project was to show the Raspberry Pi’s user time and idle time on the LCD screen. The top utility displays Linux running processes and CPU stats. By piping the output from top to a grep statement, you can isolate a line of just the CPU stats. A third pipe with awk creates a string with either the user time or the CPU idle times (Figure 8).
The output from these long Bash statements can be stored in variables to be used directly in Xonsh Python. The script in Listing 2 gets the user time (line 10) and the idle time (line 12) and shows these strings on the LCD display (lines 14, 15). The display is updated every five seconds by looping with a Python while statement (line 8) and delaying with a Bash sleep statement (line 16). By mixing Python and Bash in Xonsh, this script only requires eight lines of code. Figure 9 shows the LCD project with live data.
Listing 2: top_2_lcd.sh
01 #!/home/pi/.local/bin/xonsh
02 #
03 # top_2_lcd ‑ show Bash Top data on a LCD screen
04 #
05 from rpi_lcd import LCD
06 lcd = LCD()
07
08 while True:
09   # Get the user CPU time
10   user=$(top ‑n 1 | grep %Cpu | awk '{printf "User Time: %s%%", $2}')
11   # Get the total idle time
12   idle=$(top ‑n 1 | grep %Cpu | awk '{printf "Idle Time: %s%%", $8}')
13   # Show user time on line 1, Idle time on line 2
14   lcd.text( user , 1)
15   lcd.text( idle , 2)
16   sleep 5
The 16x2 LCD display is a great device for a variety of projects. We had a lot of fun experimenting with other Bash utilities (e.g., df, iostat, vmstat, and ifstat) and displaying the result on the LCD screen.
Summary
Raspberry Pi users could really reap some benefits from lightweight Xonsh scripts. We found that the utility allowed us to do some manual testing at the command prompt and create some very lean code examples (see the listing download for MakerSpace 03 2023).
Because Xonsh is a Python shell, all control statements (e.g., while and for loops, if statements) should be executed in Python and not in Bash.