
One for All
Proxmox-Port, an unofficial ARM port of Proxmox VE, offers a virtualization solution for the Raspberry Pi. We test it out on the Pi 5. By Bernhard Bablok
Single-board computers (SBCs) from the Raspberry Pi Foundation used to be so cheap that you could simply install a new box for every required service, but those days are gone. Luckily, it’s not just the prices of the small computers that have crept up, but also the performance. This is particularly true for the Raspberry Pi 5, which lets you run a virtual zoo of SBCs instead of buying more boxes.
Virtualization solutions primarily differ in terms of how the systems are isolated and work independently of each other. On the one hand, there is complete hardware virtualization where you can choose which guest systems to use and the guest operates completely autonomously. On the other, there are containerized solutions that access the host’s resources. The hardware is only virtualized to a limited extent; more specifically, the host CPU architecture also determines the type of guest.
Proxmox Virtual Environment (VE) by Austria-based Proxmox Server Solutions GmbH is a well-known, open source virtualization solution, with no restrictions on its use. (The company makes its money from support contracts, primarily with professional customers). Proxmox has recently gained momentum, not least because king of the hill VMware is increasingly alienating its customers.
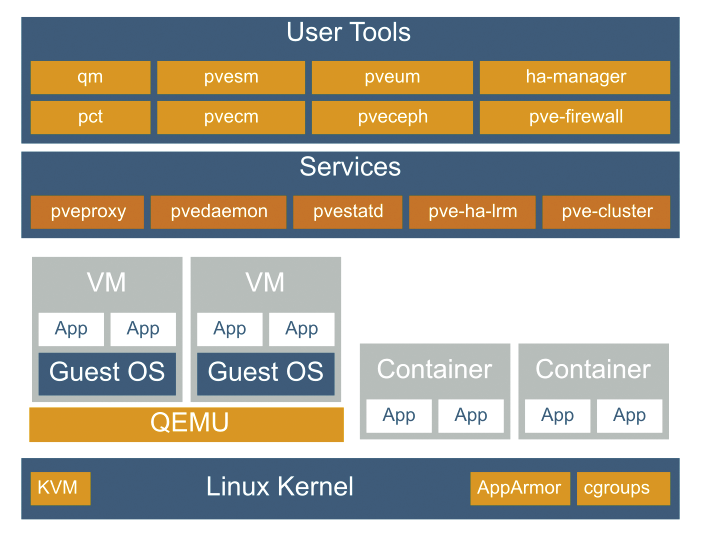
Proxmox VE’s functional scope includes both full virtualization and a lean version based on Linux containers (Figure 1). The company hasn’t published an official port for ARM64 or the Raspberry Pi thus far, but given that Proxmox VE is Debian-based and the sources are open, there is now an unofficial port, whose makers gave it the fairly unimaginative name of Proxmox-Port.
Installation
To use Proxmox-Port, start by installing the latest 64-bit version of Raspberry Pi OS Lite. A production system will benefit from a fast NVMe SSD, but you will not need this for initial tests. A few tweaks are needed on the freshly installed system for the Proxmox installation to work later on. See the “Customizing Pi OS for Proxmox-Port” box for details.
Raspberry Pi OS needs a few tweaks before you can install and run Proxmox-Port. Start by typing
sudo passwd to set a root password; you will need this later on to log in to the web interface. The root user must also be allowed to log in via SSH. EnablingPermitRootLogin yesin the daemon’s config file
/etc/ssh/sshd_config takes care of this. Then restart the SSH server by typingsudo systemctl restart sshdThe Pi also needs a static IP address and a virtual network bridge to which you’ll later connect all the VMs and containers. To set this up, edit the
/etc/network/interfaces file as shown in Listing 1. Change the IP addresses in lines 10 and 11 to suit your environment and then add them to the /etc/hosts file. The last line in the hosts file would then be something like 192.168.2.10 pi5.Listing 1: /etc/network/interfaces
01 auto lo
02 iface lo inet loopback
03 iface eth0 inet manual
04 auto wlan0
05 iface wlan0 inet manual
06 wpa-roam /etc/wpa_supplicant/wpa_supplicant.conf
07 iface default inet dhcp
08 auto vmbr0
09 iface vmbr0 inet static
10 address 192.168.2.10/24
11 gateway 192.168.2.1
12 bridge-ports eth0
13 bridge-stp off
14 bridge-fd 0
The next task is to add the repository with the Proxmox-Port packages on Raspberry Pi OS. To do this, you need to add the key that was used for signing the packages to your list of trusted keys and add the package repository. You can set up both by running the script in Listing 2 (as root). After these preparations, update the repositories with
sudo apt update && sudo apt full-upgrade
and install the required packages with
sudo apt install ifupdown2 proxmox-ve postfix open-iscsiListing 2: Extending the Package Sources
#!/bin/bash
# import repository key
curl -L https://mirrors.apqa.cn/proxmox/debian/pveport.gpg -o /etc/apt/trusted.gpg.d/pveport.gpg
# create repository entry
cat < /etc/apt/sources.list.d/pveport.list
deb https://mirrors.apqa.cn/proxmox/debian/pve bookworm port
EOF
Some packages will prompt you for details, such as Postfix, which wants to know about the type of installation. If you do not run a mail server on your network, select local only.
If everything went well, you can reboot the machine. Then access the Proxmox-Port system’s admin interface via https://<ip-address>:8006 from any machine in your local network. You’ll be shown a login window where you can log in as root with the password you’ve set earlier. All told, the installation dumps files with a total volume of 2.1GB on the SD card, but this will only take a couple of minutes.
Getting Started
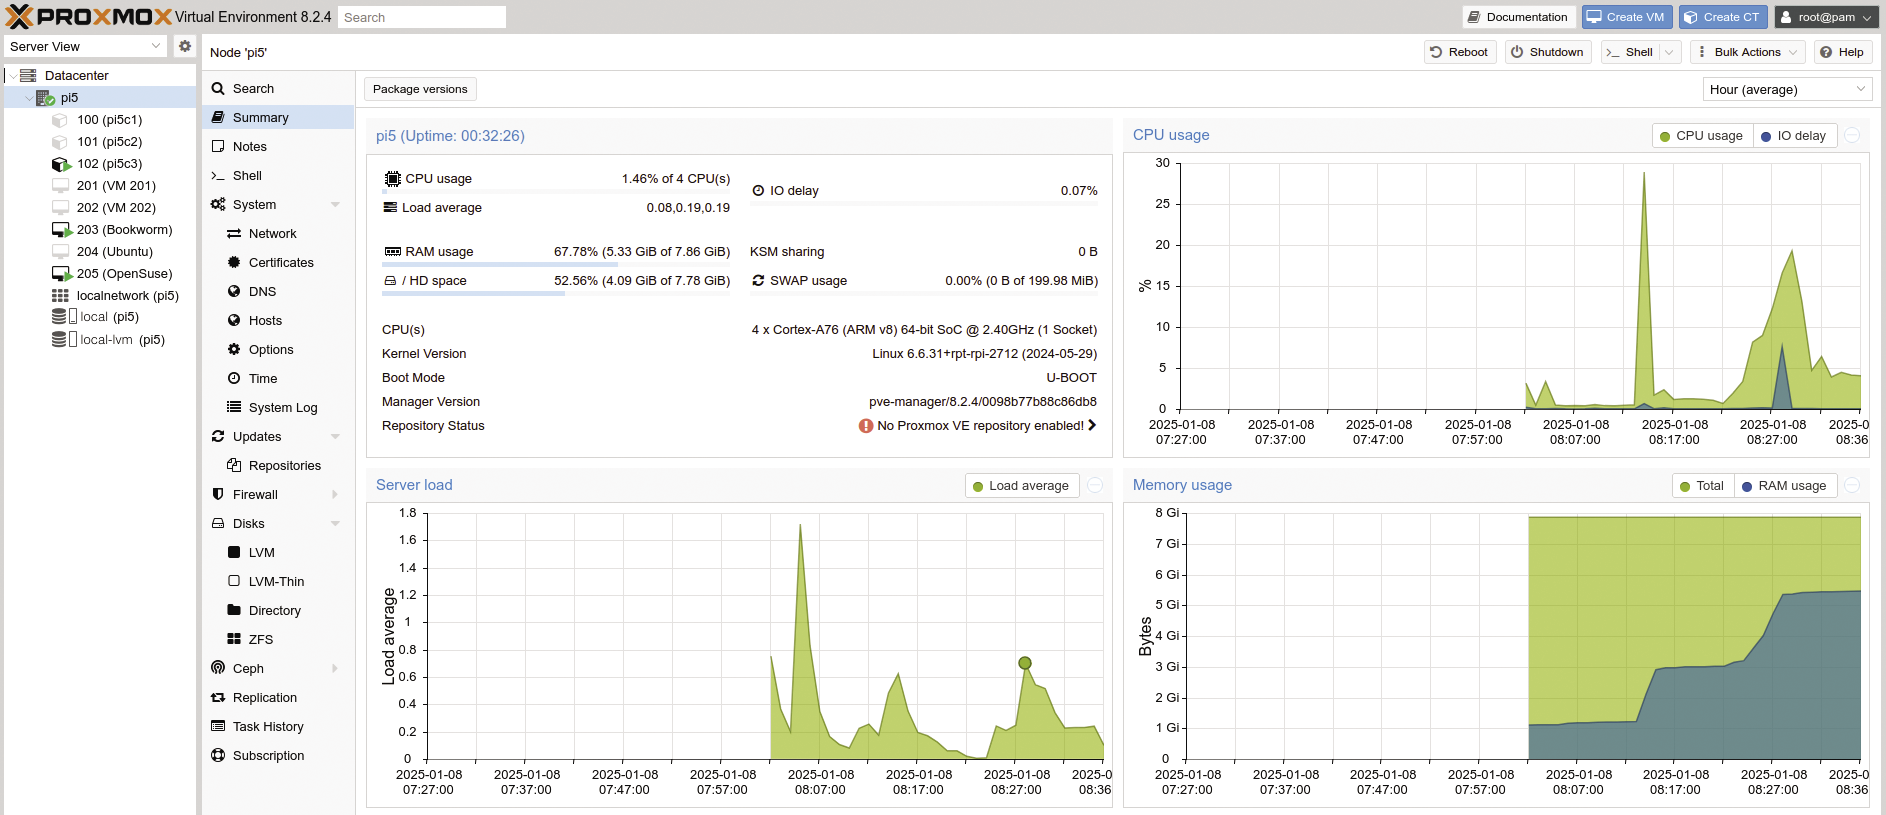
The web interface consists of several columns. On the left, you will see an overview of the Proxmox cluster (Datacenter with nodes) and the installed systems. The center column contains context-specific menu items (e.g., entries for selecting a host). The third column shows details on the selected menu item. In Figure 2, pi5 is selected on the left; it is the only computer in the cluster. After selecting Summary from the menu in the center column, the main window displays various statistics for the node.
You can now proceed to select menu items that let you customize the infrastructure to suit your needs. For example, it makes sense to change the Datacenter | Storage (Figure 3) settings and provide storage space for VMs and containers on an SSD or at least in a separate directory: By default, the system uses /var/lib/vz/ for everything, effectively ruling out any kind of clean demarcation of system and application data. For more information, see the “Performance Tip” box.
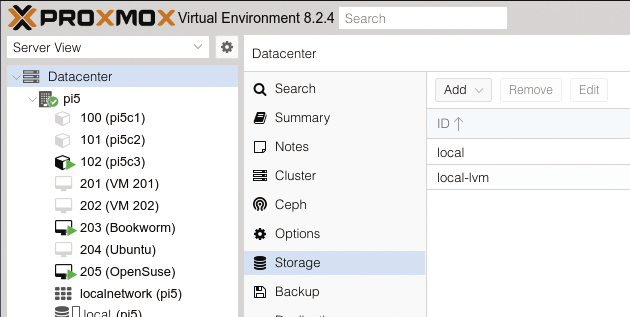
In production use of containers and VMs, you will definitely benefit from an LVM-managed storage pool. The Proxmox documentation describes its use in detail. The pool’s physical partition should ideally reside on an SSD. You will also want to have a separate, directory-based storage pool for keeping ISO images and other files.
So, if you’re using an SSD, you should manually partition it instead of leaving the job to Raspberry Pi OS, which would insist on creating a single oversized partition.
The online help is very comprehensive; you can access it by pressing the Documentation button top right in the web GUI. You will also find numerous how-tos and tutorials relating to Proxmox VE online. Although they refer to the x86_64 version, the differences to the Raspberry Pi version are minor when it comes to managing the infrastructure.
Containers
Proxmox-Port gives you a choice between virtual machines (VMs) and containers (CTs), with CTs being easier and quicker to set up. To do this, you need a template consisting of a packed root filesystem. As containers generally only have a single task, the available templates are minimal and consequently not too large.
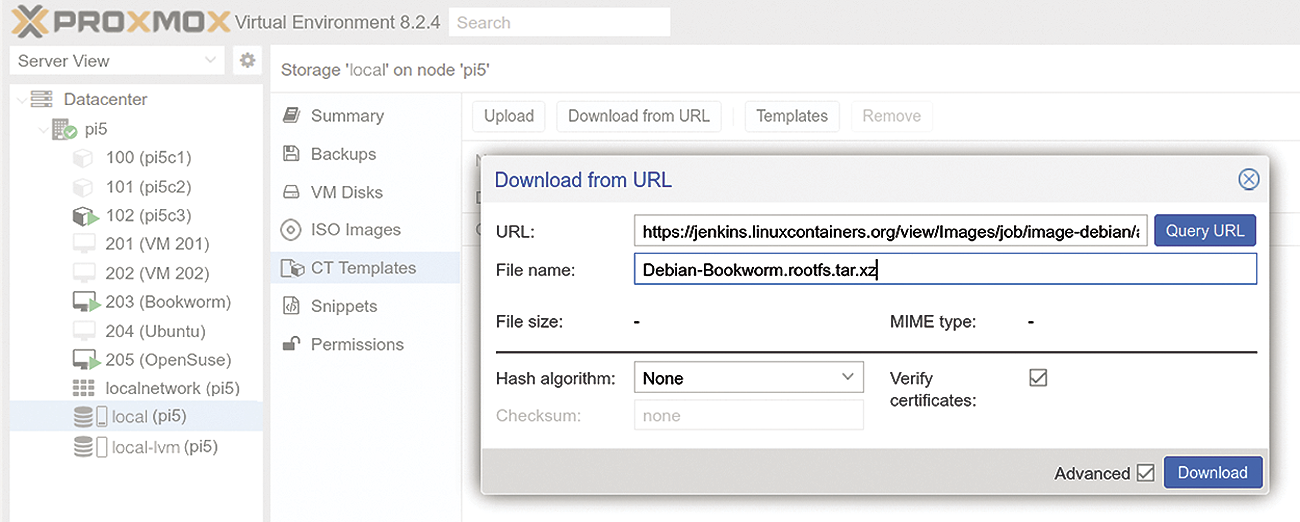
You can find suitable templates for many Linux distributions on the Jenkins website. Typically, they’ll be available for various target architectures and distribution versions. On the website, navigate to your preferred ARM64 template and copy the link for the file, which will always be named rootfs.tar.xz. Typically, you just right-click on the link and select Copy link address.
Then in the Proxmox-Port interface, select Datacenter | [Server] | local to navigate to the storage area, where you can save your templates. Select CT Templates (center column) and click on Download from URL. In the dialog box shown in Figure 4, enter the link in the first input field and a meaningful filename in the second field – it must have a .tar.xz suffix – before starting the download. The window will stay open after completing the download, and you should see a success message in the last line of the log.
You can now create any number of containers from this template by clicking on Create CT. The configuration wizard prompts you for various bits of information, most of which are self-explanatory. The password you assign will be the root password for the new container. Select a free address on the Network tab; I used 192.168.2.100/24 which is a valid address when working with the settings of Listing 1. DHCP is a good alternative for quick tests, but typically a bad choice for servers.
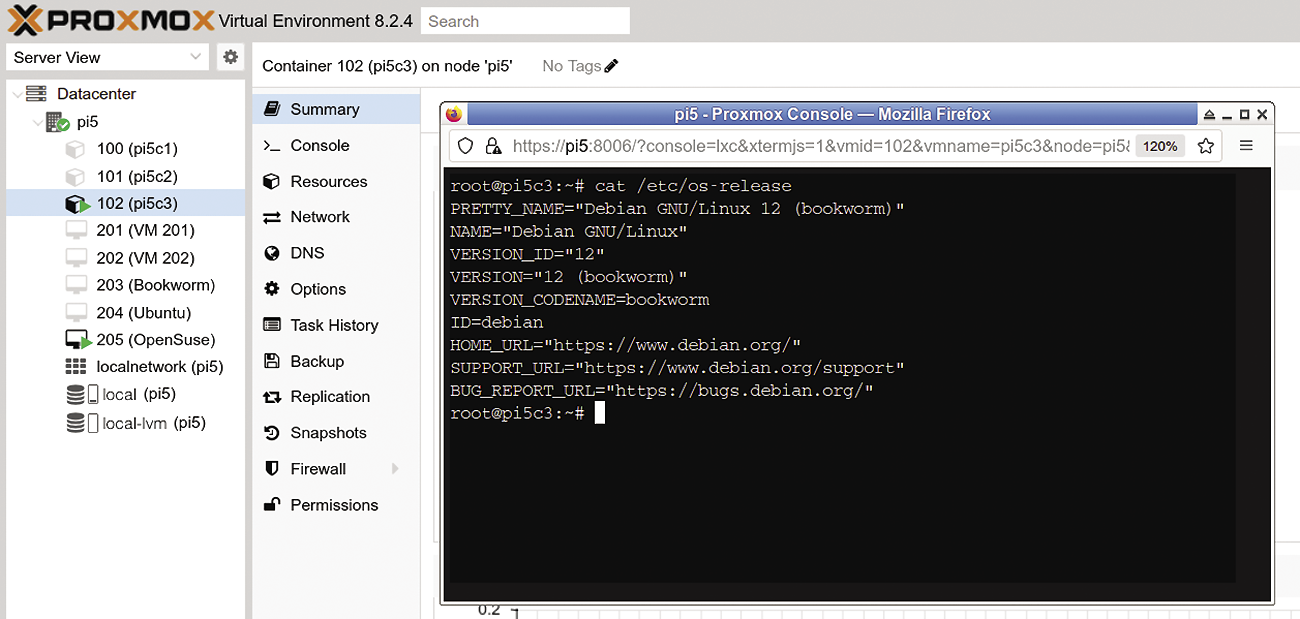
When you create a container, it does not start automatically – you need to launch it in the web interface. Select the container in the left-hand column and then click on Start. There is a button for a console session to the right of this. Initially, you may need become familiar with the individual buttons, but the interface is clear-cut and meaningfully structured. After starting the container, pop up a console, log in with the container’s root password, and get started (Figure 5).
Virtual Machines
You can also get preconfigured VM images, for example, with a Debian installation. But downloading, importing, and customizing them does not offer any genuine advantages over a basic installation. It makes more sense to use a – typically lean – ISO image for a network installation. Just remember that you need the variant for ARM64 or AArch64: Booting from an x86_64 image won’t work. As with the container images, you can copy and paste the link and then download the ISO file using the Proxmox-Port interface.
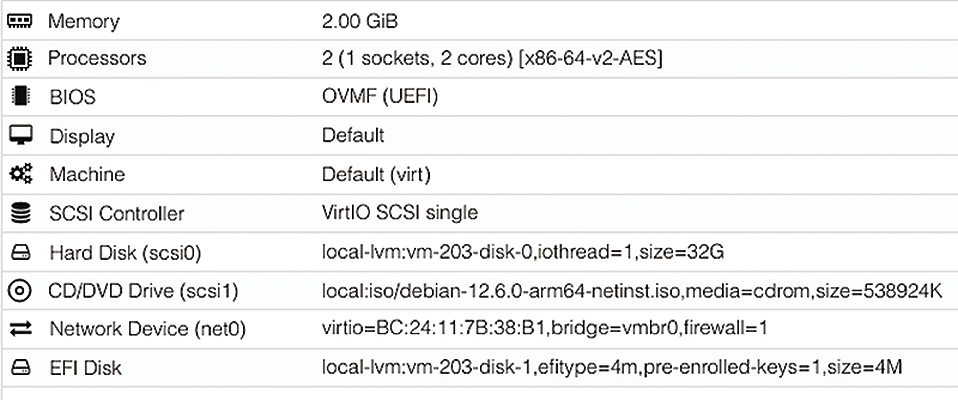
A new VM will need suitable resources (Figure 6). For the CD/DVD Drive, select the ISO file and also make sure that it is at the top of the boot list that you’ll find in the Options after creating the VM. You can also adjust the hardware configuration and other settings later, but if you make any changes to a running VM, they’ll only take effect after restarting that VM.
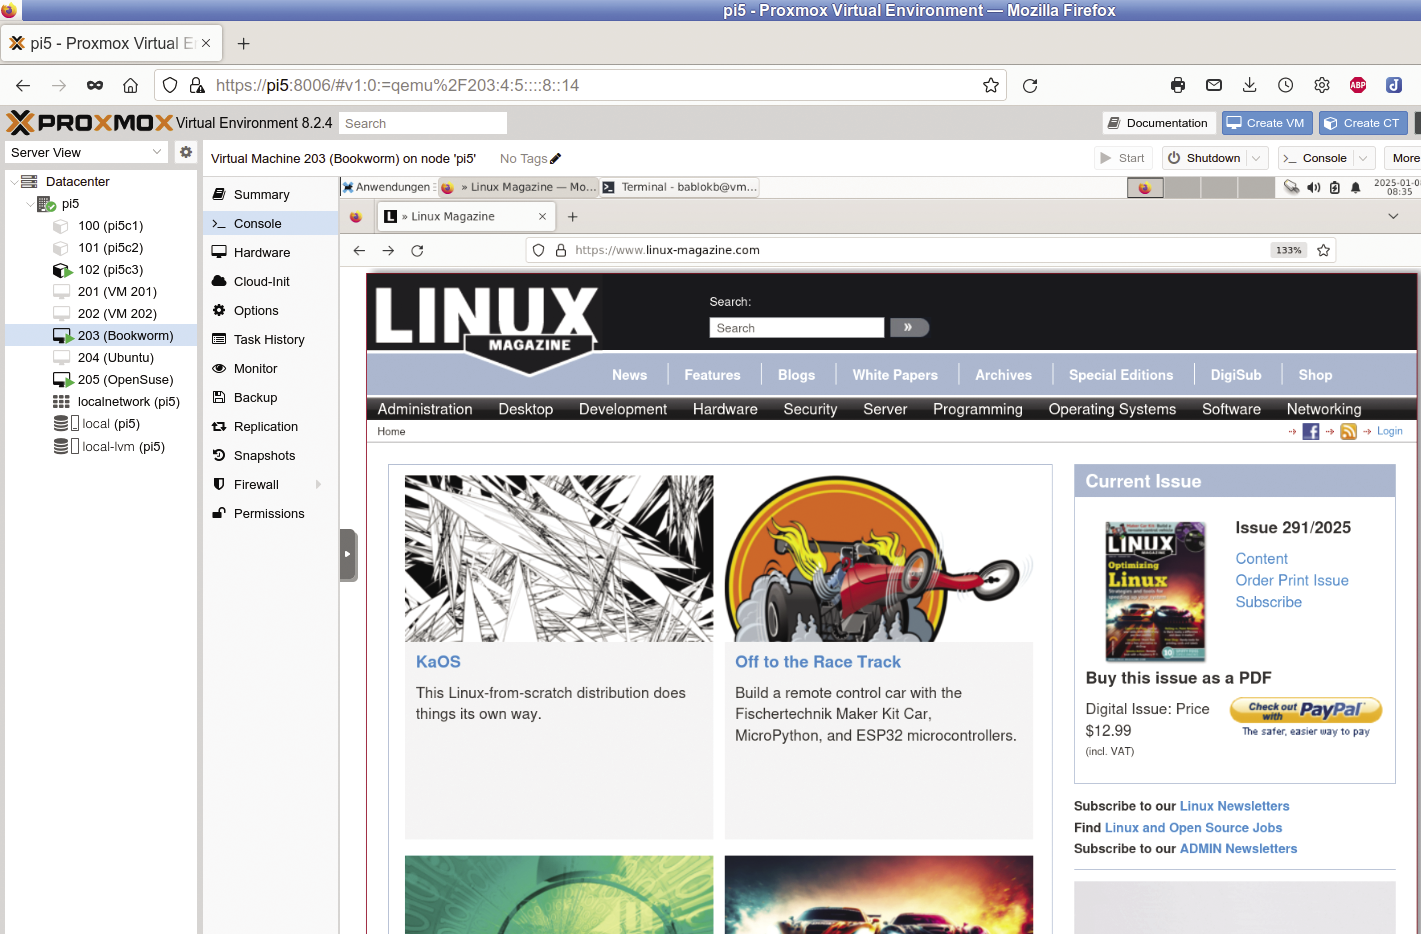
I was able to install Debian 12 “Bookworm,” which is 95 percent identical to Raspberry Pi OS, without any problems during testing. Figure 7 shows Firefox running on the real machine, displaying the Proxmox-Port GUI, inside which I’ve opened the graphical console that shows the Debian VM’s desktop. On that desktop, I’ve launched another Firefox in which I’ve loaded the Linux Magazine website.
Besides Debian, I’ve also installed Ubuntu and openSUSE during testing. While Ubuntu did not cause any problems, it does occupy a large amount of space, and the installer downloads a similar volume of data. The openSUSE installer initially refused to work and instead opened a number of consoles; after manually killing the installer process, I was able to restart YaST, which resulted in a fully installed system.
Conclusions
Proxmox-Port worked without any problems during the entire test – kudos to both Proxmox and the developer who ported the system. It is not surprising that Proxmox has been growing their user base (which includes paying customers) in the PC world. The Raspberry Pi 5 I’ve used for testing the ported version never reached its limits despite the various containers and VMs, but this also depends on the use cases. Idle containers or VMs are unlikely to cause any serious load.
If you tend to work with a graphical desktop and occasionally need a throwaway test system, you are better off using a physical computer for your tests. Proxmox VE is clearly geared towards operation in data centers, and it is not the obvious choice for home use. On the other hand, if you use many services on your home network, you will definitely want to take a look at the virtualization solution instead of using a zoo of physical machines. Proxmox VE and Proxmox-Port make it far easier to create and manage a large number of systems.
The third target group is likely to be admins who work with virtualized systems as part of their job. The VMs that you’ll need will probably not run on a Raspberry Pi 5, but it is hard to find a test and development environment that covers the entire feature scope of a large environment as cheaply as Proxmox-Port with a few SBCs.