Old Dogs, New Tricks
Reuse your old Arduino hardware while learning Python.
Snek is a tiny embeddable language that can run on processors too small for MicroPython. It supports about 20 of the older Arduino modules (e.g., Duemilanove, LilyPad, Mega, Nano, and Uno), as well as Snekboard controllers and LEGO robotics projects that use the LEGO EV.
Snek is based on Python syntax, but it only supports a small subset of the full Python language. The Snek implementation on Arduino hardware allows you to build some enjoyable Python projects with just a few lines of code. The programming experience you gain in Snek can be used in larger Python 3 or MicroPython projects.
In this article, I introduce Snek by showing you how to install and set up some simple Arduino projects. None of these examples use more than 10 lines of code.
Installation
Arduino Uno, Nano, or Pro Mini modules can load their firmware directly from a web page. The web uploader page (Figure 1) installs Snek v1.5. To install the latest firmware (version 1.9 at press time) or to upload to modules not supported on the web page, enter the following commands in a terminal window:
$ wget https://sneklang.org/dist/snek-linux-1.9.sh
$ chmod +x snek-linux-1.9.sh
$ # Create a local dir with all files
$ ./snek-linux-1.9.sh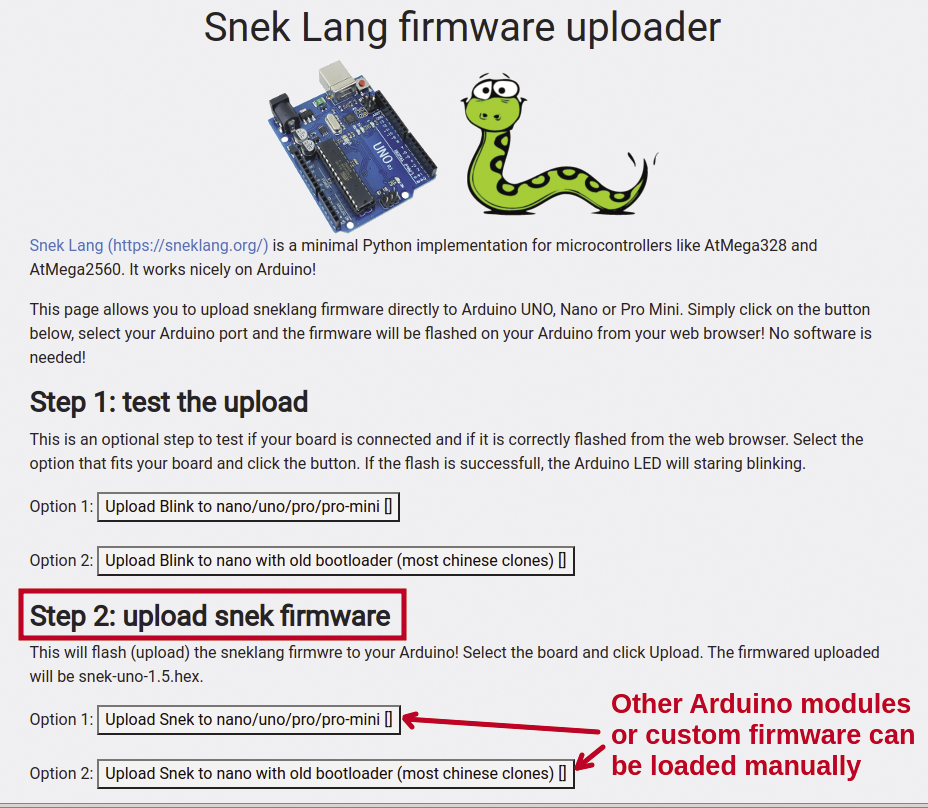
Once the files are stored locally, an Arduino Uno module can be uploaded with the latest version:
$ # Move to the Snek install directory
$ cd Snek
$ # Upload Uno module with the basic v1.9
$ ./snek-uno-install -hex snek-uno-1.9.hex
It’s important to note that different hardware might support added features. For example, the Adafruit ItsyBitsy M0 module supports NeoPixel LED arrays, and the LEGO EV3 controllers can use servomotors and color, touch, and ultrasonic sensors.
Because of limited amounts of RAM and memory on certain Arduino modules, basic and big firmware versions are available. The big versions support added features, but they might not be installable on certain modules without some extra steps (see the Snek homepage [1] for more details). The Arduino Mega supports the big version as its default. For all the examples in this article, I have used the basic firmware on an Arduino Uno.
Connecting and Testing
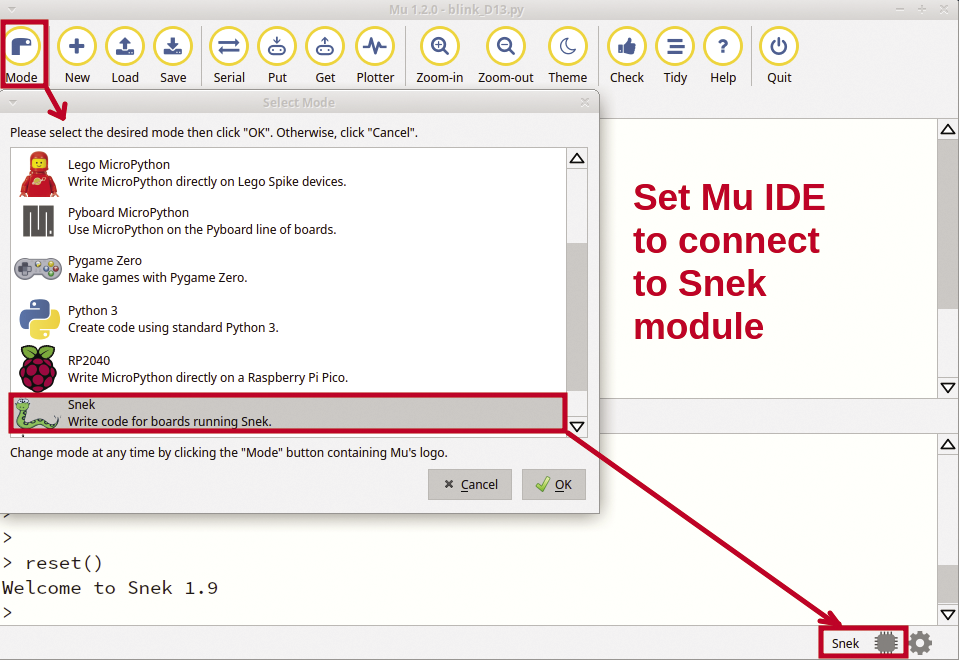
A number of different integrated development environments (IDEs) can be used with Snek. The Mu code editor is a simple and popular tool that can be used with Python 3, MicroPython, and Snek coding.
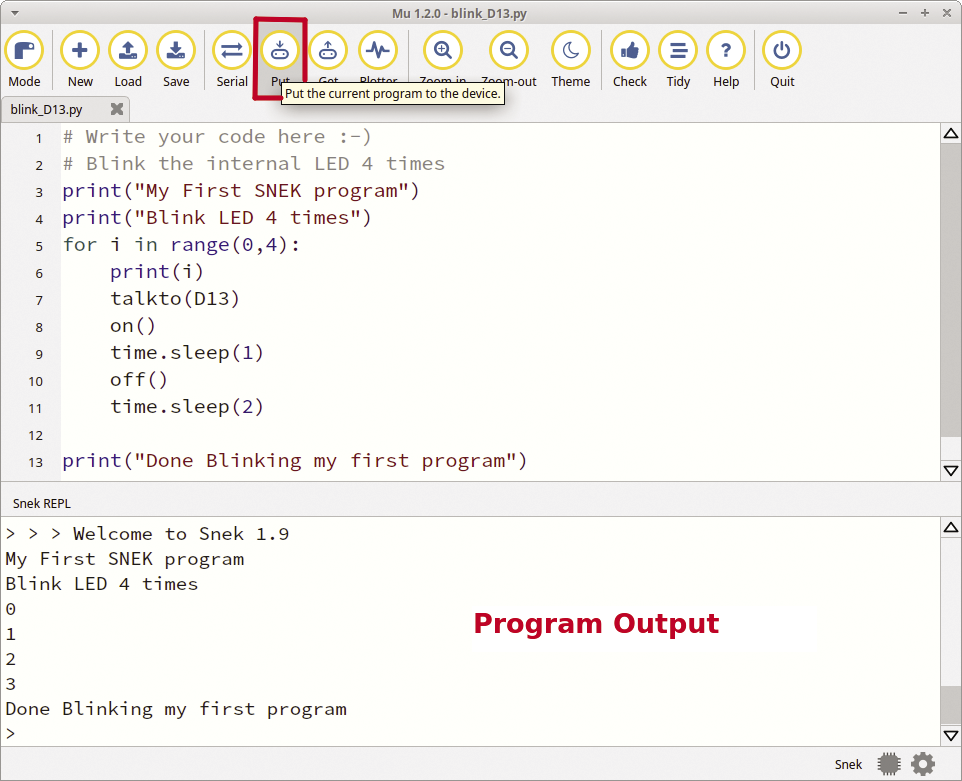
To use Mu with Snek, connect an uploaded Arduino module to your laptop and select the Mode icon (Figure 2). After Mu is connected to the Arduino module, the Serial option lets you manually enter and run Snek commands (Figure 3).
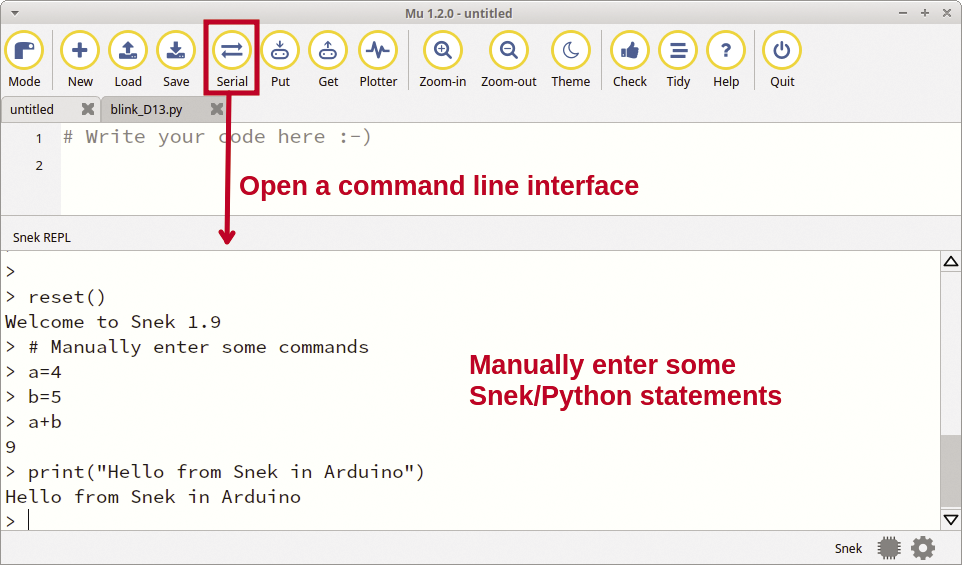
The Put icon uploads and runs a Snek file. Figure 4 shows the code to blink the on-board LED (digital pin 13) four times. Snek print() statements show the program starting, iterating, and completing. Support for the general purpose input/output (GPIO) pins is built into Snek, so unlike Python and MicroPython, no libraries need to be imported. The talkto(pin) command (Figure 4, line 7) connects to a specific pin, and the on() (line 8) and off() (line 10) commands set a GPIO pin to a 1 or 0 output state.
Reading and Writing to GPIO pins
In the next GPIO project, user input generates output. The project uses:
- A Keyes L9110 fan motor (~$4)
- A touch sensor (~$5)
- An Arduino Uno
- Meccano construction pieces for support
The touch sensor toggles and holds a state with each touch. The first touch holds and reads as a 1, and then a second touch holds and reads as a 0. This 1-0-1-0 holding of values removes any problems of quick touches being missed.
Figure 5 shows my setup with some Meccano pieces securing the fan motor. A simpler project to illustrate read/write to GPIO pins could be done with a basic push button and an LED. The fan motor has four pins: VCC (power), GND (ground), INA (direction), and INB (on/off). The INB pin is wired to digital pin 12 (D12) on the Arduino, and the INA (direction) pin isn’t used. The touch sensor has three pins: VCC (power), GND (ground), and SIG (data signal). The SIG pin is wired to digital pin 3 (D3) on the Arduino.

The Snek code (Listing 1) uses the talkto(<pin>) function to set up output commands to a GPIO pin (line 6), and then on() and off() commands can be sent (lines 10 and 12). The read(<pin>) function reads both analog and digital pins (line 9).
Listing 1: Toggle a Fan
01 # button2led.py ‑ Toggle a fan with a touch sensor
02 #   Note: the touch sensor toggles and hold the last state
03 fan_pin = D12
04 touch_pin = D3
05
06 talkto(fan_pin)
07 while True:
08     # toggle the fan state with each touch
09     if read(touch_pin) == 1:
10         on()
11     else:
12         off()
Arduino Add-On Components
Snek only supports the basic GPIO functions of digital and analog reads and writes, so unfortunately, equipment that has I2C, serial, or specialized communication solutions won’t be usable. Despite this limitation, you still have a good selection of Arduino add-on modules and components you can use on your Snek projects. For the next example, I used an HY-M302 multifunction shield (~$12), a general-purpose board with buttons, buzzers, LEDs, and analog inputs that can be accessed through the standard GPIO pins. The shield has a pair of buttons that can be used to turn on LEDs (Figure 6).
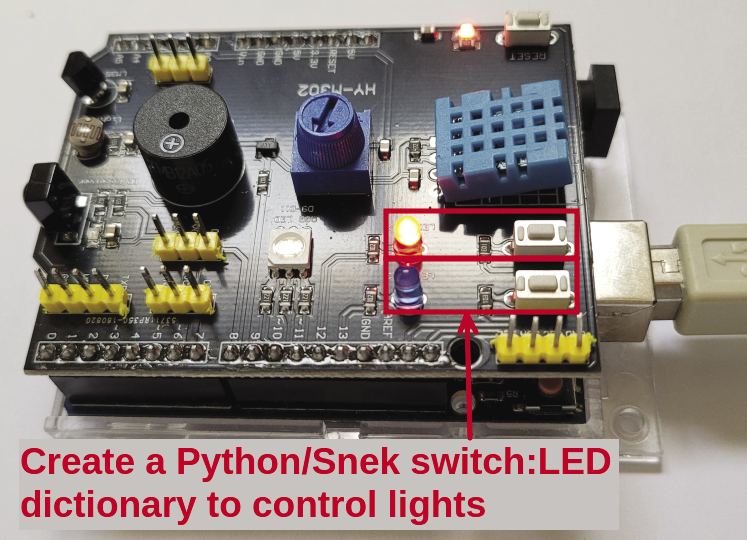
In this example (Listing 2), I created a dictionary with pairs of switch pin numbers and the LED pin numbers (line 5). The for loop (line 10) iterates through the pairs dictionary, and an if statement checks for a button push (line 11). It’s important to note that the Snek default is for GPIO pins to be pulled up, so an open connection is 1 and a closed, energized, or (in this case) pressed button reads as 0. If the button is pressed, the onfor(3) statement turns on the LED for three seconds (line 14).
Listing 2: Button Press LEDs
01 # button2led.py ‑ Turn on an LEDs for 3 seconds with buttons
02 #
03 # create a dictionary of switches and LEDs
04 # pairs = {switch_pin : led_pin, ... }
05 pairs = { 2:13, 3:12 }
06
07 # Cycle and watch for a button press
08 # Note: LEDs are normally off
09 while True:
10     for switch in pairs:
11         if read(switch) == 0:
12             led_pin = pairs[switch]
13             talkto(led_pin)
14             onfor(3)
For just two input/output pairs, a dictionary might seem like overkill, but this approach works well for projects with multiple inputs, such as controlling motor pins for forward, stop, left, right, and reverse actions.
This project could be enhanced to create car or boat projects that use a remote four-input radio frequency (RF) module (XD-YK0) with a keypad (~$12) and motor or relay shields ($10-$15).
Block Programming Interface
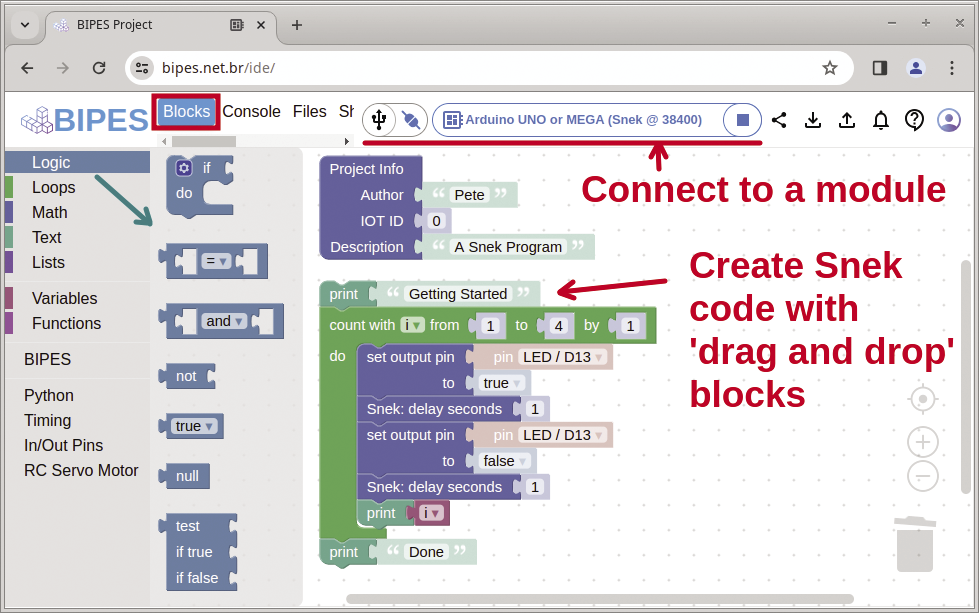
The BIPES (block-based integrated platform for embedded systems) Project offers a block programming environment for MicroPython, micro:bits, and Snek projects. The Snek interface is tested with version 1.5, but other versions might also work.
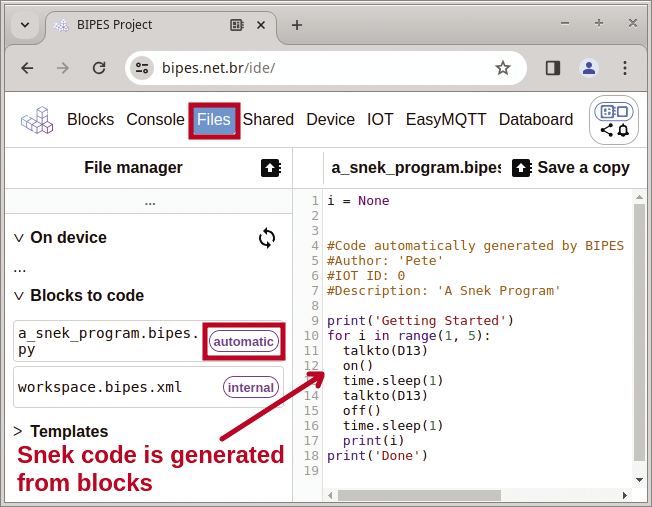
The BIPES integrated development environment (IDE) [5] offers a palette of Snek blocks that can be dragged, dropped, and connected together into logic. Figure 7 shows the blocks for the previous project with onboard blinking LEDs. Block logic is automatically generated into the equivalent Snek code (Figure 8). The BIPES Console tab is used to download the generated Snek code and to enter commands manually.
Note that BIPES blocks are great for simple tasks, but the interface doesn’t support all the Snek and Python statements. For example, the earlier project with the HY-M302 shield would need an alternative approach for the logic, because BIPES does not support Python dictionaries or the onfor(<seconds>) statement.
Summary
Snek programming offers the new Python enthusiast a simple approach for creating Arduino hardware projects. For older Arduino modules, such as the Nano and Uno, Snek is the only Python interfacing option available. I occasionally had Snek versioning issues – for example, I wasn’t able to use Mu with an Arduino Mega module running version 1.5 – but it worked fine with BIPES.