
Playing old DOS games on the Raspberry Pi
Play old DOS games on the Dosbian operating system, which turns the Raspberry Pi into an 80486 PC.
Many users still hold old DOS games dear despite, or maybe precisely because of, their blocky graphics, beeping sounds, and chiptune music. Of course, state-of-the-art PCs are not much use for installing games for the old 16-bit operating system. The installation will typically fail, the hardware is far too fast, and the systems no longer support numerous components such as Soundblaster 16 sound cards or floppy drives. DOS runtime environments and DOS emulators such as DOSEMU and DOSBox often require a complex setup on Linux to run old DOS games.
Because older computer systems that are still suitable for the 16-bit operating system from the 1980s and early 1990s are becoming increasingly rare, the Raspberry Pi is a great alternative platform for the old games. Paired with Dosbian, a development by Italian programmer Carmelo Maiolino, you get a mature and easy-to-deploy solution.
Prerequisites
Dosbian on the Raspberry Pi does not take much in terms of resources. The operating system can be used on a Raspberry Pi 2B, although some modifications of the configuration are required to run games smoothly. All of the more recent generations of the small-board computer (SBC) will support Dosbian without problem. However, for old Windows games to run well on Dosbian, a Raspberry Pi 4 with added RAM is recommended because the software for these games requires fairly extensive memory capacities.
The Dosbian developers do not list any further requirements. The operating system automatically emulates the required legacy hardware, such as sound cards and network and graphics cards, and it allocates memory resources to match. Moreover, the current version of Dosbian lets you generate floppy disks and hard disk storage designed for a capacity of up to 2GB.
Setup
Dosbian is based on Raspberry Pi OS and DOSBox. Because the distribution is specially adapted for use with DOS software, its use as a conventional desktop system is not intended. You can pick up the operating system image from the project’s website as a 7Z archive weighing in at 1.1GB, unpacking to 3.6GB. You can then transfer the image to a microSD card in the usual way (e.g., with the Raspberry Pi Imager or the Linux dd command).
Unlike Raspberry Pi OS, Dosbian takes you to a DOS prompt rather than a graphical user interface. Dosbian emulates a 80486DX2 CPU running at 66MHz with 16MB of RAM. The operating system launches the preconfigured DOSBox in the background at boot time. To work with it, you need to be familiar with the basic command syntax of the 16-bit operating system.
Settings
Although many very old DOS games and numerous applications under DOS do not support mouse control, you should have a mouse connected to the system to adjust some settings. If you want to use Dosbian with an older Raspberry Pi that does not yet have hardware for wireless network access, you will need to connect the SBC to the Internet with the Ethernet socket; then, boot the system and enter the exit command at the DOS prompt. Dosbian now opens a special configuration menu (Figure 1).
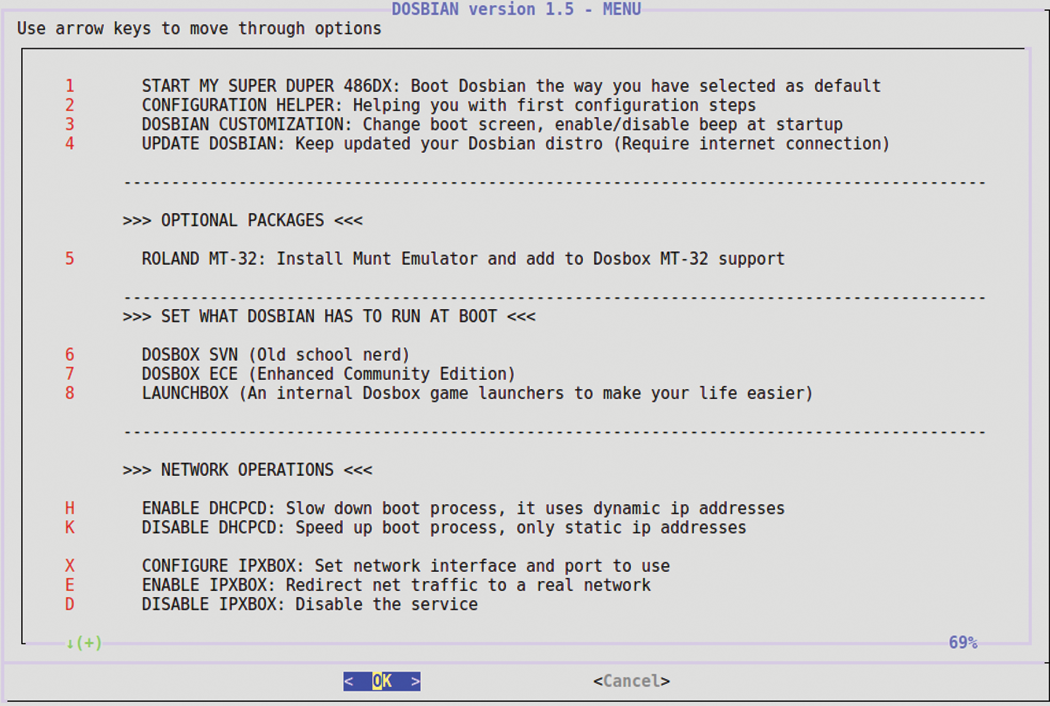
In the menu, first open the Raspberry Pi software configuration tool by pressing C and OK to confirm (Figure 2). Now select the first entry 1 System Options and then S1 Wireless LAN if you are using a current fourth generation Raspberry Pi. In the next two dialogs, you have to enter the service set identifier (SSID, or WiFi network name) and the passphrase for your WiFi installation. After that, you are taken back to the main menu. When you get there, select 6 Advanced Options and A1 Expand Filesystem. Dosbian then expands the filesystem to the entire size of the microSD card and displays a message on completion.
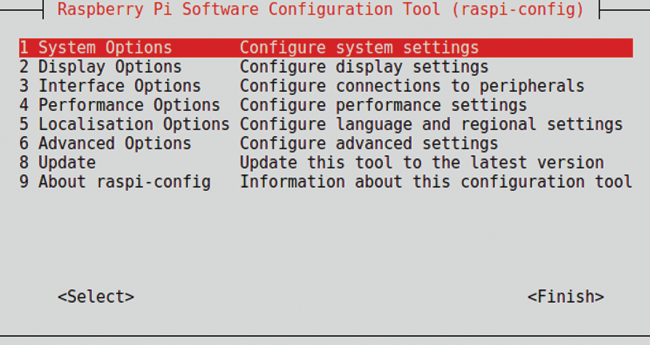
To access the Raspberry Pi over SSH, start the SSH server by selecting 3 Interface Options from the main menu and P2 SSH from the next menu. After that, reboot to enable all the new settings.
Variants
Dosbian comes with two variants of DOSBox: the conventional SVN version, which is compiled directly from the source code, and the ECE variant, which has been improved by the community and has a number of technical enhancements (e.g., more video memory and a bug-fixed emulation of the CGA and EGA video modes).
From the Dosbian configuration tool, which you can access by entering the exit command at the DOSBox prompt, you can permanently define the mode in which DOSBox runs on your Dosbian installation. To do this, open the 6 DOSBox SVN option in the configuration tool to use the official SVN mode or 7 DOSBox ECE for the advanced mode. To enable the setting, you again need to reboot the system.
Data Transfer
Dosbian stores the DOS games in the GAMES/ directory below the /home/pi/dosbian/ folder, which is where you can organize your games in separate subdirectories to facilitate access. By default, Dosbian already has two games installed. To transfer data, use the SSH server, which you enabled in the Pi’s configuration console. On the client desktop computer, the easiest way to transfer data if you are working with Linux is to use an SSH GUI client such as PuTTY or EasySSH. Alternatively, you can set up a network drive in the file manager of the graphical Linux desktop.
After completing the data transfer, you need to unmount and remount the C:\ drive in the Dosbian installation to gain access to all the data. To do this, switch to the Dosbian configuration tool at the prompt by entering the exit command; then select the 1 Start My Super Duper 486DX option. After a short time, you will be returned to the DOS prompt. From there, you can now change to the subdirectory for the game of interest by typing cd <folder> and then launch the game.
Graphics
Dosbian also has a text-based graphical user interface in the form of LaunchBox, which is visually reminiscent of the GRUB boot manager and means the installed applications can be called conveniently from the start menu without having to change directories at the prompt each time. Additionally, you can configure LaunchBox in Dosbian so that it runs automatically at boot time, thus avoiding even seeing the prompt.
To enable LaunchBox as the startup screen after booting the system, exit DOSBox with the exit command and open the 8 LaunchBox option in the Dosbian configuration dialog. The system now sets LaunchBox as the startup screen and opens a window after you confirm the prompt. After rebooting, LaunchBox then automatically appears.
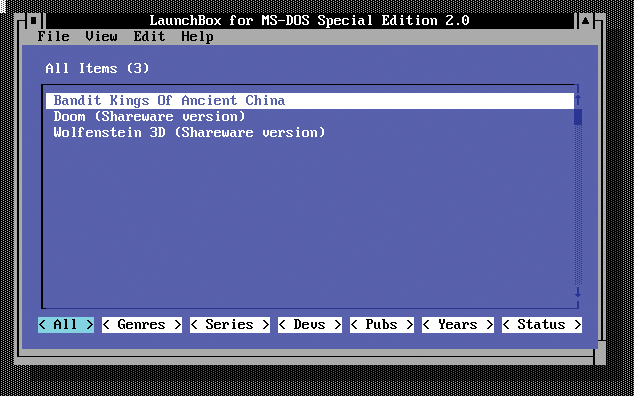
Initially, you only get a list in the selection menu of the two games already pre-installed. To add more games – or even applications – use the mouse to click Edit | Add at the top of the application’s menubar. Now a superimposed window opens where you have to specify various data about the new application to be added to the LaunchBox main menu (Figure 3).
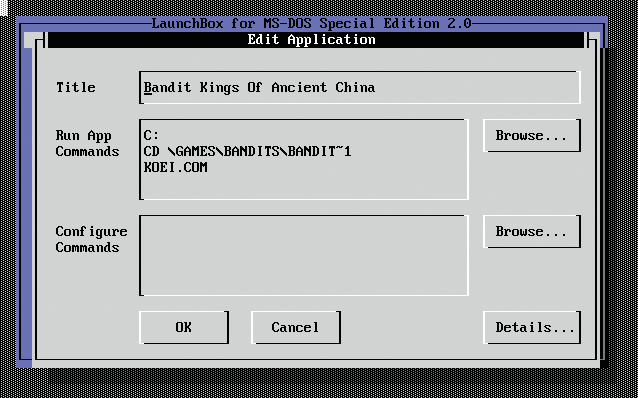
In the Title box, enter the title you want to appear as a starter in the menu. In the Run App Commands box, type the DOS command you normally use to start the new game or application at the prompt. If you don’t know the exact path, click the Browse button on the right to open another window with a small file manager, in which you click your way through the directory structure to the target folder and select the appropriate executable or batch file. The Configure Commands box also lets you specify additional parameters (e.g., if you need to call additional files in the context of the program file). You can enter these randomly or select them by clicking Browse to the right of the input field.
Clicking the Details button at bottom right lets you enter metadata for the respective application. (See the “Searching” box for why this is a good idea.) The most important details include the Genre, Publisher, and Release Year fields. If you check the Favorites box, you select the entry as a favorite, which means it will display at or near the top of the selection menu. After completing the entries and clicking OK, the new game or application appears in the LaunchBox main menu (Figure 4).
If you have added a large number of games to the main menu, you can filter the list from the bottom option line with keywords – assuming you entered some metadata to use for the search. The Tab key or arrow keys let you jump backward and forward between the individual categories in the lower option bar. The Genre selection, for example, puts in the upper part of the LaunchBox list the game genres you have entered. After selecting one of the genres and pressing Enter, the software branches to a new list that displays all the program entries that match the respective criterion. You can then select one of the matches and press Enter again to launch the selected game.
Conclusions
Dosbian left me with a consistently good impression in everyday use. The system is ready for use out of the box, and no stability or speed problems turned up in our lab with several games. Thanks to the integrated configuration tool and LaunchBox, Dosbian is also a great choice for those with little knowledge of Linux and DOS because you can bypass the prompt in many cases and do not need any knowledge of command parameters. If you want to use software originally developed for DOS, Dosbian on the Raspberry Pi is an excellent alternative to legacy hardware, which is not very efficient and prone to breaking down.