An AI module for the Pi 5
What happens when the Raspberry Pi’s makers and AI specialist Hailo collaborate on a project? We get an official AI kit HAT+ for the Pi 5 that adds an AI accelerator chip.
The Raspberry Pi AI Kit consists of two components: a generic M.2 HAT+, an adaptor board that lets you connect any two M.2 modules (e.g., for NVMe storage) to the Raspberry Pi 5 and therefore directly to the PCI bus, and a Hailo-8L AI accelerator, which could also be installed on any other computer with an M.2 interface. This entry-level AI chip achieves a performance of 13 TOPS, which is half the number of tera-operations per second that you’d get with the standard Hailo-8 model.
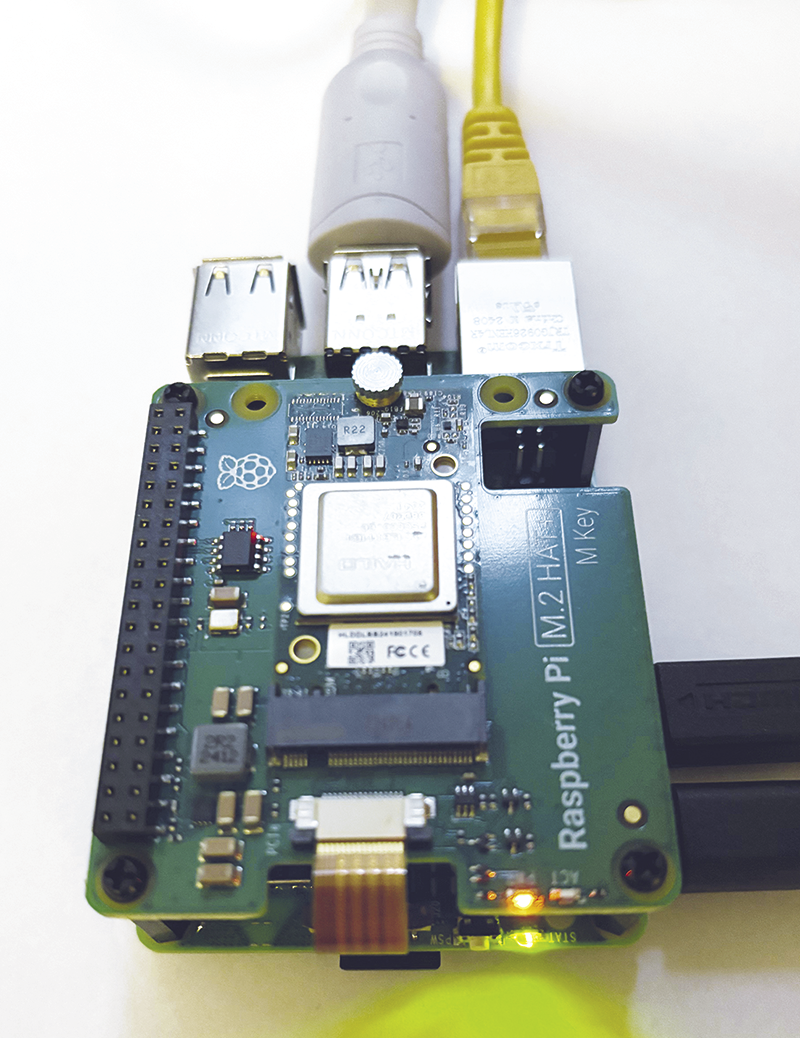
As a first step, you need to assemble the system. Fit the four spacers, a GPIO extension connector, and a PCIe extension cable on the Raspberry Pi. Then slot the M.2 HAT+ onto the spacers and plug the ribbon cable into the connector on the HAT. Figure 1 shows the fully assembled, working system.

After restarting the Raspberry Pi, the Hailo board appears in the lspci output as shown in Listing 1. The second line reveals that the installation of the AI accelerator was successful.
Listing 1: lspci Output
0000:00:00.0 PCI bridge: Broadcom Inc. and subsidiaries BCM2712 PCIe Bridge (rev 21)
0000:01:00.0 Co-processor: Hailo Technologies Ltd. Hailo-8 AI Processor (rev 01)
0001:00:00.0 PCI bridge: Broadcom Inc. and subsidiaries BCM2712 PCIe Bridge (rev 21)
0001:01:00.0 Ethernet controller: Raspberry Pi Ltd RP1 PCIe 2.0 South Bridge
What the Hailo Board Can Do
Hailo’s AI accelerator modules are not generic accelerators for neural networks that could be used to reduce training times. Instead, they boost the operating speed (i.e., the reasoning and inference steps). It turns out that addressing the accelerator is not exactly easy.
Many machine learning (ML) applications use PyTorch or TensorFlow, and pre-trained models are usually tailored to one of the two frameworks. If you want to use either one with a hardware accelerator, you can call simple functions that load the neural network into the graphics card, using the CUDA interface if you have Nvidia hardware. Then you can send input data to the graphics card and retrieve the response.
Using a Hailo board is different: You need a specially compiled and adapted version of the neural network. If you go to the Hailo website and select Products | Software, you will find both pre-compiled networks (Model Zoo) and the Dataflow Compiler, which can convert common formats to Hailo Executable Format (HEF).
In the Hailo world, “building” does not simply mean compiling. Developers need to understand how to convert their neural networks into the desired format. Hailo boards, for example, can only handle integer values, so the network may need to be adapted. Detailed instructions and tutorials are available on the Hailo website. The target board also plays a role in the build process: You cannot load a Hailo-8 HEF file into the Hailo-8L and vice versa.
The main application for Hailo’s AI accelerators is image recognition. According to the manufacturer, the boards can process significantly more frames per second than a Jetson Nano while using significantly less power at the same time. The performance of the Hailo-8 series boards is not sufficient for large language models (LLMs), but stepping up its game, Hailo has already announced the Hailo-10H M.2 Generative AI Acceleration Module, which is likely to be a useful choice for LLMs. Using a Raspberry Pi as a chatbot could be an interesting alternative, especially due to the Pi’s comparatively low power consumption.
Software Setup
You have two options for installing the software. The simple approach, assuming you are using Raspberry Pi OS, is to install the hailo-all package with apt. The meta package from the Pi OS standard repository installs the hailo-tappas-core-3.28.2, hailofw, hailort, and rpicam-apps-hailo-postprocess packages. The software has reached version 4.19 in November 2024, but this release does not include Python modules to enable direct use of the Hailo board in Python. The manufacturer’s code examples use GStreamer pipelines instead. You’ll find the required plugins in the hailort package. After rebooting, run
hailortcli fw-control identifyThe command checks whether the installation has succeeded. If the output looks like Listing 2, everything is OK. You can also use the hailortcli command to discover more of the board’s details. For example, the monitor sub-command uses a top-like approach to continuously show you what the Hailo board is doing, which neural networks are running on it, and what level of data throughput it is achieving.
Listing 2: Function Check
$ hailortcli fw-control identify
Executing on device: 0000:01:00.0
Identifying board
Control Protocol Version: 2
Firmware Version: 4.17.0 (release,app,extended context switch buffer)
Logger Version: 0
Board Name: Hailo-8
Device Architecture: HAILO8L
Serial Number: HLDDLBB241901708
Part Number: HM21LB1C2LAE
Product Name: HAILO-8L AI ACC M.2 B+M KEY MODULE EXT TMP
The second method of installing the required software involves a little more overhead. In Hailo’s Developer Zone, you can find Debian packages and Python Wheel packages. (You need to create a Hailo account for accessing these files.) If you’ve previously installed the same version from some other packages, you first need to completely uninstall the existing packages. If you fail to do so, mismatching versions of the kernel module and the firmware will be installed and will then interfere with each other. Note that, in my own experience and that of some users in the Hailo community, the sample code described in the next section will no longer work if you take this route.
Examples
Start by running git clone to download the repository with the sample code for the Raspberry Pi/Hailo combination. The download_resources.sh script that comes with the repository downloads the required models as *.hef files. The setup_env.sh script sets up a Python Virtual Environment inside which you can then install the required Python modules.
The basic_pipelines/ folder contains three scripts that will give you some idea of what the Hailo board can do:
detection.pyis used for classic object detection in individual images or videos.instance_segmentation.pycan be used to distinguish multiple objects in an image.pose_estimation.pyextracts a “stick figure” or the 3D coordinates of several points of a person such as wrists, knees, feet, eyes, and nose from a video stream. The input can stem from a USB camera, a Pi Cam, or a file.
All three scripts build a GStreamer pipeline. It is called from Python and controls the Hailo hardware. The calling script specifies a Python function as a callback. The data determined by the network (such as the object name or the 3D coordinates) are passed to the callback which lets the program code manipulate the results.
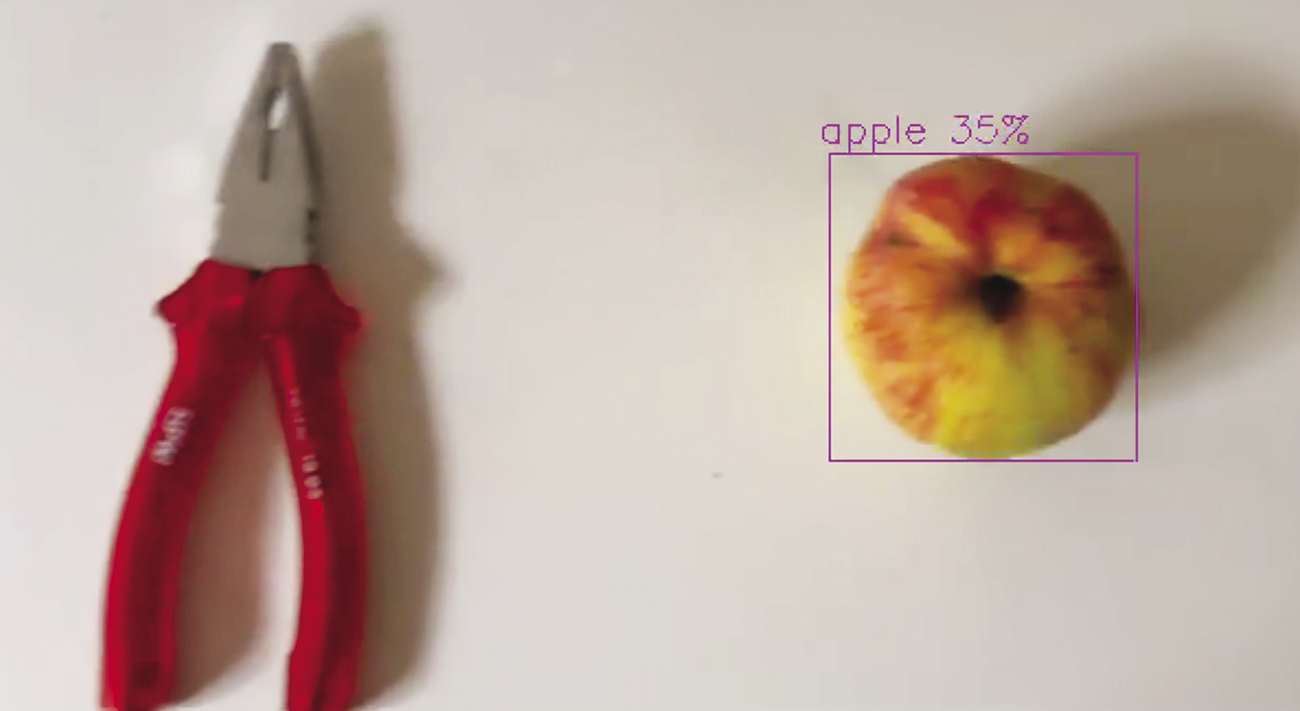
The scripts give you some graphical output at the end of the pipeline, assuming that your Raspberry Pi is running with a graphical user interface and either has a display or uses X forwarding to redirect the output. The output highlights objects detected by the network (Figure 2).

I have modified the code so that the script generates a video file (Listing 3). I’m sure that there are more elegant ways of doing this, but the results were good enough to see that recognition works as intended. If you used a null sink module that logs data without actually processing it, you could just run the callback and add code that triggers an action as soon as something specific is detected. Although this type of programming is a little roundabout, it can give you usable results.
Listing 3: Code Edit
### Original code, commented out
# pipeline_string += f"fpsdisplaysink \
#   video-sink={self.video_sink} \
#   name=hailo_display sync={self.sync} \
#   text-overlay={self.options_menu.show_fps} \
#   signal-fps-measurements=true "
### Replacement code for video
pipeline_string += "matroskamux ! filesink \
  name=hailo.display location=video.mkv"
You will find standard programming examples on Hailo’s GitHub page. This code runs with versions down to 4.18. Note that the download scripts provided there give you the HEF files in the format required for the Hailo-8, and not for the Hailo-8L. Also, there are no instructions on which model from the Model Zoo (which is also available on GitHub) you need to install for the scripts.
Conclusions
The Raspberry Pi AI Kit is relatively inexpensive and impresses with very low power consumption compared to a graphics card. The boards are only intended for inference (i.e., they cannot help you to train your networks during ML development). This limits their potential application scope. Also, getting a trained neural network to run on the board isn’t exactly easy.
At the end of the day, though, the AI Kit is a great choice for image recognition applications – thanks to its combination of performance and low power consumption – and it perfectly complements the Raspberry Pi.
There is an interesting announcement on the Hailo website relating to the Hailo-10H board. The manufacturer claims that this board is suitable for running LLMs in the style of ChatGPT (but admittedly only its smaller siblings). If this turns out to be true, you could run an LLM on a Raspberry Pi, which would be a very interesting option due to the Pi’s low power consumption.


