
Improved Performance on Old Pis
Light open source router firmware breathes new life into your old Raspberry Pi.
The OpenWrt project offers an open source networking-centric operating system that supports almost 1,000 different devices, mostly networking equipment (e.g., D-Link and Netgear routers), although other hardware such as Raspberry Pis, BeagleBone modules, and even old X86 computers can be used.
OpenWrt has an extremely small footprint, and it is designed to operate with as little as 8MB of flash RAM and 64MB of RAM. Because of these minimal hardware requirements, OpenWrt can be ideal for older Raspberry Pi hardware with speed and memory usage issues.
I was a little apprehensive when I saw that the OpenWrt Raspberry Pi image was only 185MB (compared with 520MB for the Raspberry Pi OS Lite image), but after everything loaded, I was happily surprised with its great system performance and quick bootup time.
For small projects, OpenWrt offers some useful networking solutions, such as an ad blocking, firewalls, virtual private networks (VPNs), web cam servers, and WiFi extending. However, it’s important to note that the Raspberry Pi WiFi hardware will not offer the same performance you would find on dedicated routers.
For this example, I will install OpenWrt on older Raspberry Pi hardware. I also discuss how to get up and running with many of the common Pi functions. Finally, I offer a Bash web example that uses OpenWrt’s default uHTTPd server to control a general-purpose input-output (GPIO) pin and show the status on a 2x16 LCD display.
Pros and Cons
Before jumping into a Pi OpenWrt project, it’s useful to know where it stands compared with the default Raspberry Pi OS. Some of the OpenWrt advantages over the Raspbian and Raspberry Pi OS include:
- Speed: It’s fast and was designed to run on lower end CPUs with limited memory
- No swap file, so the system can support an abrupt loss of power
- Web interface for system configuration and monitoring
- Network focused
Some OpenWrt limitations are:
- No X Window desktop
- Bare default installation
- No Raspberry Pi-focused setup (i.e., no
raspi-config) - Some packages may be challenging to install (e.g., Node-RED)
Performance Check
I did a side-by-side test of two identical Raspberry Pi 1 B+ modules. Ten minutes after a restart, I used the free and vmstat tools for a memory and CPU comparison (Figure 1). Of interest is that OpenWrt was running with four to five times more free memory and had an idle time of 93 percent versus 82 percent.
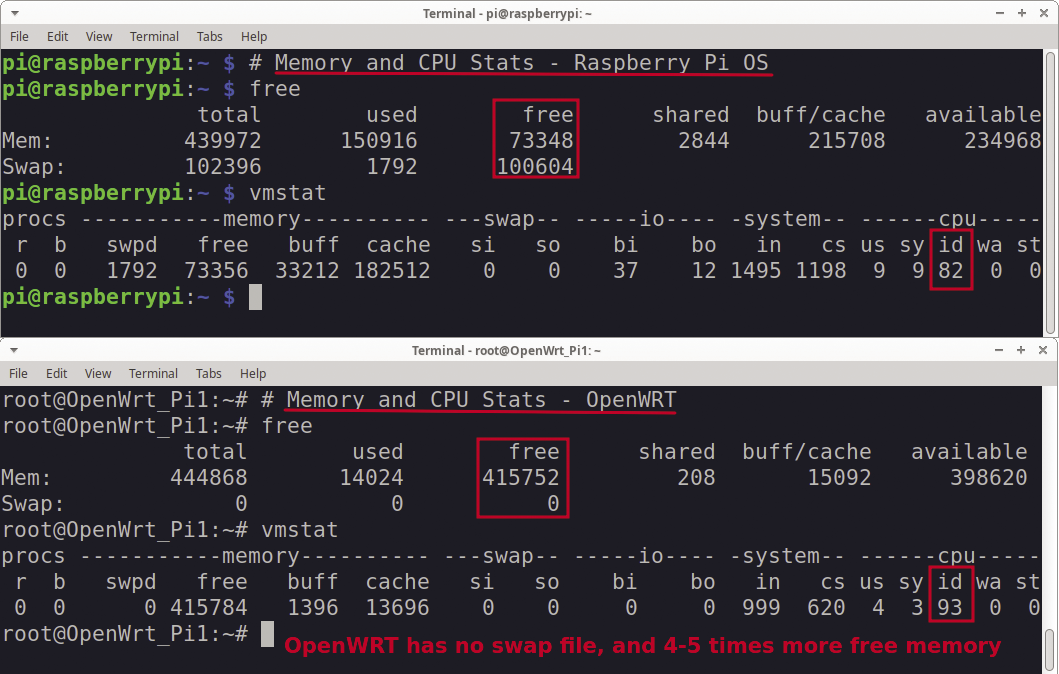
For system restarts, OpenWRT will have a noticeably faster boot-up time over Raspberry Pi OS. To improve Raspberry Pi OS performance, you can use the raspi-config tool to change the default logon from desktop to console mode. Running Raspberry Pi OS in console mode improves free memory usage from four times to only two times greater than OpenWRT.
Getting Started
Although OpenWrt is primarily designed to run on routers, in many ways it’s easier to play around with it on a Raspberry Pi. Two benefits of using a Pi over a router are that you can’t brick the Pi, and an HDMI connection lets you work directly on the hardware.
The standard Raspberry Pi Imager installs the OpenWrt image on an SD card. For Ubuntu/Debian systems, the rpi-imager tool is installed by:
sudo apt install rpi-imagerA monitor, keyboard, and wired Internet connection are recommended when getting started.
Once the Pi is powered up, hit a key on the keyboard to access the OpenWrt BusyBox console. The first step is to enable the wired Ethernet connection. If you are able to see IP addresses on your LAN, you can set up the OpenWrt Pi node for DHCP:
# Set Pi for DHCP and then check its address
uci set network.lan.proto="dhcp"
uci commit network
If you prefer defining a static IP address, use the following lines:
# Enter your own static IP
uci set network.lan.proto="static"
uci set network.lan.ipaddr="192.168.0.140"
uci set network.lan.netmask="255.255.255.0"
uci set network.lan.gateway="192.168.0.1"
uci set network.lan.dns="192.168.0.1"
uci commit network
After the Raspberry Pi is connected to the network, remote configuration can use either the OpenWrt library for user-centered interfaces (LuCI) web interface or by using a secure shell (SSH) connection.
LuCI Web Interface
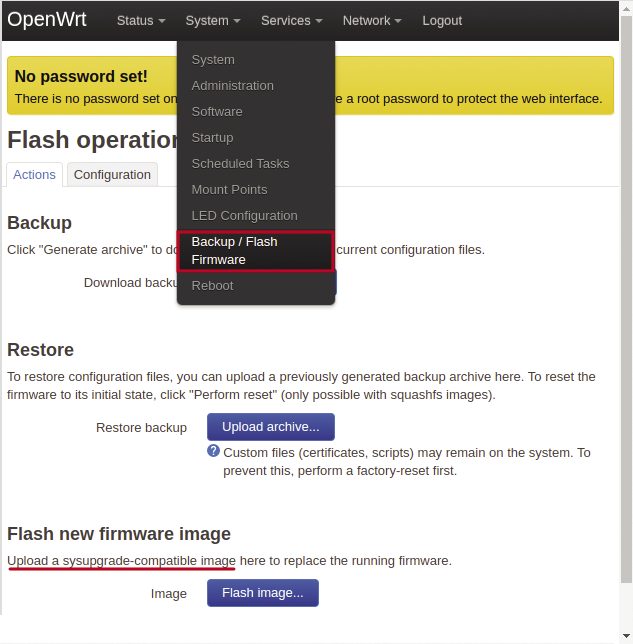
The LuCI web interface lets you configure networking interfaces, install software, and monitor the system. Once the base OpenWrt system is running, it is advisable to flash the sysupgrade image. Also, if you’re experimenting and checking out new features, it’s a good idea to do periodic backups (Figure 2).
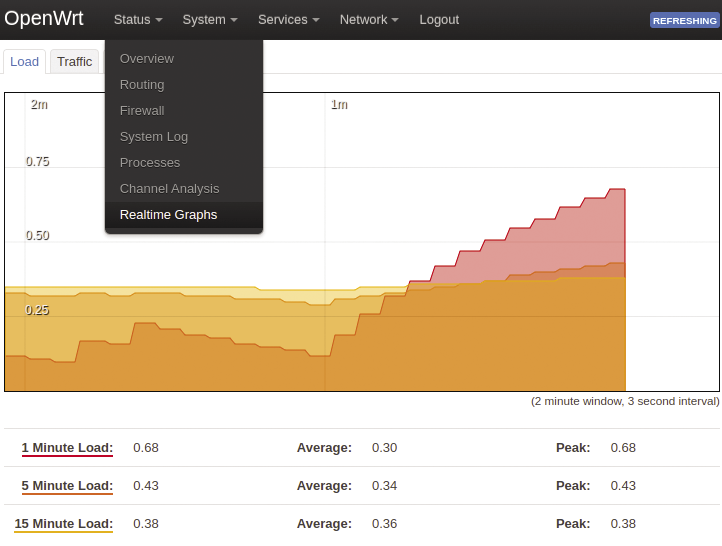
To get a feel for how the system is performing, OpenWrt offers a number of summary pages, such as Realtime Graphs (Figure 3).
Installing Software
The default OpenWrt installation is extremely bare, so you will probably need to install some basic packages from the web interface (Figure 4) or at the command line with the OpenWrt opkg package management tool.

To update the package list and install the nano text editor, use
opkg update
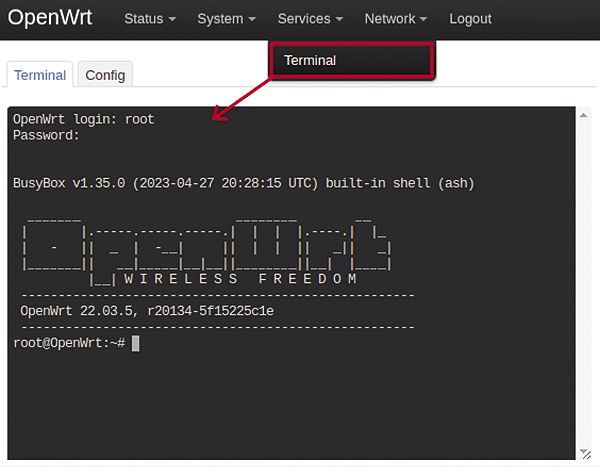
opkg install nanoat the command line. For configuration, I found I was often bouncing back and forth between an SSH terminal and the web interface. A useful software package to merge these two connections is luci-app-ttyd (Figure 5). This feature adds an interactive terminal page to the LuCI web interface.
OpenWrt is designed to run on networking equipment, so it has a very large variety of networking-centric applications that can be installed and managed from the LuCI interface.
Writing Apps
The base OpenWrt system has an Ash shell, a Lua interpreter, and the uHTTPd web server that supports Common Gateway Interface (CGI) applications.
Although I can get around with the Ash shell, I prefer to install and use the Bash shell:
# Install the Bash shell
opkg install bash
For most Pi users, the next step will be to load Python and Pip (the Python package installer):
opkg install python3 python3-pip
Python running on OpenWrt has two major differences from a Raspbian, Debian, or Ubuntu installation. The first is that the base OpenWrt doesn’t have an X11 server, so you won’t be able to create local GUI apps with graphic libraries like Tkinter, Qt, and so on. The second difference is that, because of kernel differences, some GPIO libraries will not work. Luckily, the UniversalGPIO library designed to work with OpenWrt and Raspberry Pi hardware can be used, but more on this later.
SFTP for Remote Work
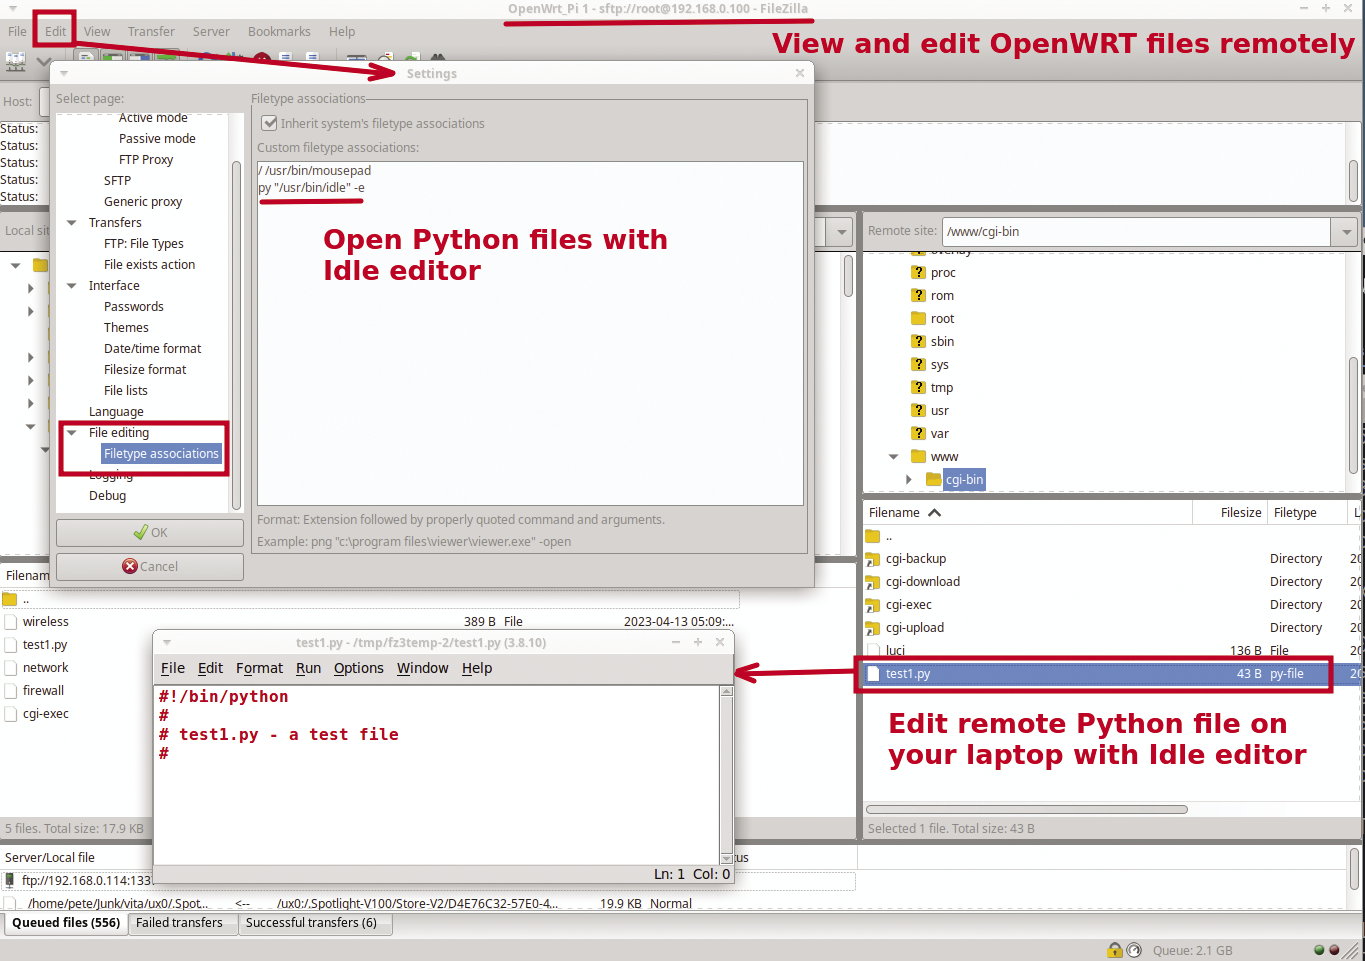
For Pi users who commonly use desktop applications, OpenWrt can seem a little challenging at first. A good workaround is to install a Secure File Transfer Protocol (SFTP) server on the Raspberry Pi and then use an SFTP client, like FileZilla, on a remote laptop.
FileZilla offers a visual interface for remote coding and maintenance. Figure 6 shows an example of setting up and using a Python IDE on a remote laptop to manage files on the Raspberry Pi OpenWrt hardware.
The commands
# For remote work add an SFTP server
opkg update
opkg install openssh-sftp-server
install the OpenSSH FTP server package on OpenWrt.
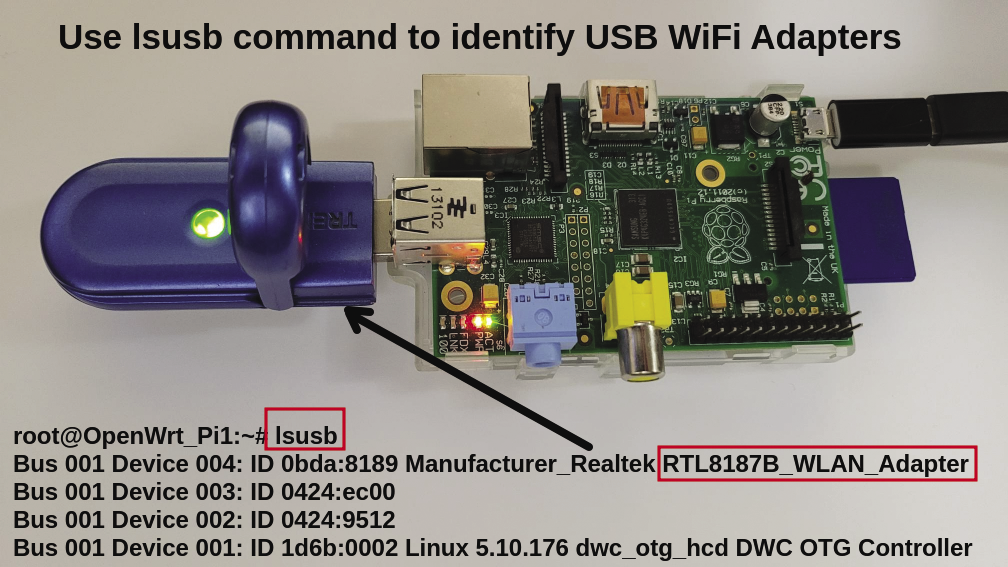
Pi USB WiFi Adapters
The OpenWrt images for Raspberry Pi models 3 and 4 support the on-board WiFi adapters. Unfortunately, the older Raspberry Pi models 1 and 2 use external USB WiFi adapters, so some manual steps are required.
To find and install the correct USB drivers, the first step is to load some USB utilities:
# Add USB Utils (including lsusb)
opkg install usbutils
Once usbutils in added, you can use the lsusb command to show information about the connected USB devices. For my Raspberry Pi B+ setup, the tool showed me that I needed to find a Realtek 8187 device driver (Figure 7).
The opkg tool with the list option can search with wild cards:
# Search for the Realtek 8187 driver
opkg list *8187*
kmod-rtl8187 - 5.10.176+5.15.92-1-1 - Realtek Drivers for RTL818x devices (RTL8187 USB)
# Install the required driver
opkg install kmod-rtl8187
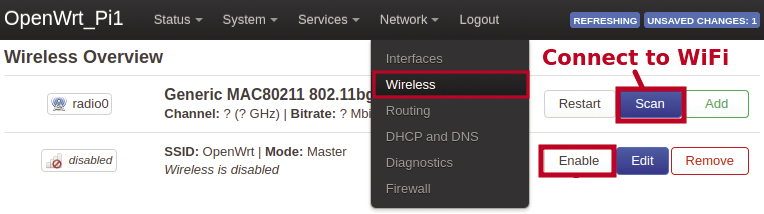
After a new USB WiFi driver is loaded, the system needs to be rebooted. The Raspberry Pi models 1 and 2 will now show a new entry on the Network | Wireless page (Figure 8). From this point, OpenWrt offers many networking possibilities, the simplest being to connect to a local WiFi network or to create a new access point.
GPIO
To get started working with GPIO on OpenWrt, some basic packages need to be installed:
# Update the packages list
opkg update
# Install basic GPIO tools
opkg install gpioctl-sysfs gpiod-tools
The gpioctl-sysfs interface tool manages the GPIO hardware through the file structure in /sys/class/gpio/.
In Bash/Ash scripts, tee creates a full GPIO pin definition with all the required files. For example, to enable GPIO pin 4, enter:
# Create a gpio4 definition
echo 4 | tee /sys/class/gpio/export
Under the newly created gpio/gpio4 directory, the status of the pin is shown in a number of files:
# Show the file structure
ls /sys/class/gpio/gpio4
active_low direction power      uevent
device     edge      subsystem  value
Once the a GPIO pin has been defined, a direction of either in or out can be set. The echo command is used to write either "in" or "out" to the direction file, and 0 or 1 is written to set the pin’s output in the value file:
# Define the pin as an output
echo "out" > /sys/class/gpio/gpio4/direction
# Set the pin on (1)
echo 1 > /sys/class/gpio/gpio4/value
# Read the pin value back
cat /sys/class/gpio/gpio4/value
1
As mentioned earlier, some kernel differences between OpenWrt and the Raspberry Pi OS will affect many of the Python GPIO libraries. The UniversalGPIO Python library offers a GPIO interface for Linux-based routers, network devices, and embedded devices. Install this library with:
pip install UniversalGPIOThe Python code
 >>> import UniversalGPIO.GPIO as GPIO
>>> # Set GPIO pin 4 as an output
>>> pi_pin4=GPIO.setup(4, GPIO.OUTPUT)
>>> # Set pin 4 high
>>> pi_pin4.high()
>>> # Get the value of pin 4
>>> pi_pin4.state()
1
sets up, writes, and reads to a GPIO pin.
I2C Setup
The inter-integrated circuit (I2C) serial protocol allows multiple sensors to be connected on a two-wire (clock/SCL and data/SDA) bus. The raspi-config tool lets you manage I2C on the Raspberry Pi OS. Unfortunately, this step needs to be done manually in OpenWrt. The first step in the I2C setup is to install the chipset drivers and some tools:
# Load Pi I2C chipset driver and the I2C tools
opkg install kmod-i2c-bcm2835 i2c-tools
The next step is to add the following lines to the bottom of the /boot/config.txt file:
dtparam=i2c1=on
dtparam=spi=on
dtparam=i2s=on
Once this file is edited, the system needs to be rebooted. After a restart, you can connect I2C devices. The i2cdetect command-line tool is useful for checking connected I2C addresses.
uHTTPd Web Server
OpenWrt uses the lightweight uHTTPd web server (uhttpd) for its LuCI web interface, a web framework that can also be used to incorporated user pages into the overall OpenWrt interface.
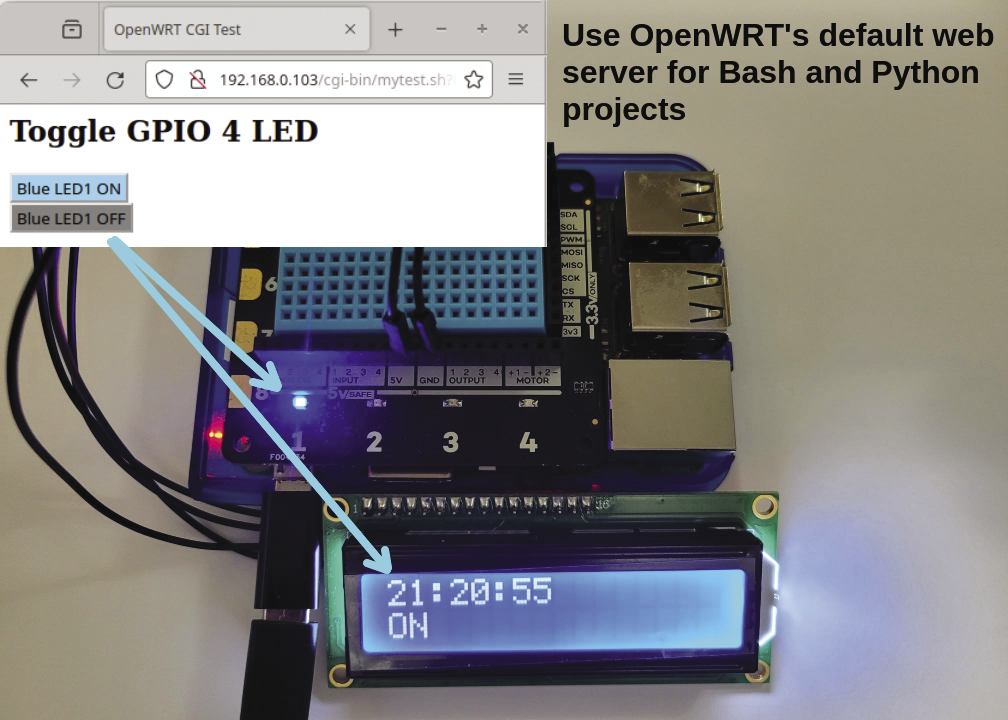
Luckily for small custom projects, LuCI integration isn’t required. For a final project, I keep things simple by using the uHTTPd CGI with a Bash script. My goal is to create a small standalone web page that toggles a GPIO pin and sends text to a 2x16 I2C LCD screen (Figure 9).
The first step is to install the Python libraries for the LCD screen:
# Install packages for LCD support
opkg install python3-smbus
pip install rpi_lcd
To test the LCD screen interface in Bash, call Python with the -c option to pass a string of commands. The following lines create a Bash string with commands separated by semicolons; the variable is then passed to Python:
# Pass a string of commands to Python
cmd="import rpi_lcd;rpi_lcd.LCD().text('Hi',1)"
python -c "$cmd"
This example shows Hi on the LCD screen.
The next step is to define a GPIO pin as an output. My setup on this project uses a Pimoroni Explorer HAT, which has a blue LED on GPIO pin 4. As you saw earlier, GPIO pin 4 is defined as an output by:
# Create a gpio4 definition
echo 4 | tee /sys/class/gpio/export
# Define the pin as an output
echo "out" > /sys/class/gpio/gpio4/direction
Now that all the pieces are in place, you can create a Bash CGI script file. The file mytest.sh (Listing 1) needs to reside in the uHTTPd cgi-bin directory (/www/cgi-bin).
Listing 1: OpenWrt Bash CGI Example
01 #!/bin/bash
02 #
03 # mytest.sh - Bash CGI example to toggle a GPIO pin
04 #             and output text to a 2x16 LCD screen
05
06 # If query string has on/off, toggle GPIO pin
07 if [[ "$QUERY_STRING" =~ "ON" ]]; then
08   echo 1 > /sys/class/gpio/gpio4/value
09 elif [[ "$QUERY_STRING" =~ "OFF" ]]; then
10 echo 0 > /sys/class/gpio/gpio4/value
11 fi
12
13 # Set the 2x16 LCD screen with time and pin value
14 # Pass a string of commands to Python
15 pycmd="
16   from rpi_lcd import LCD;
17   lcd=LCD();
18   lcd.text('$(date +%T)', 1);
19   lcd.text('$QUERY_STRING', 2)"
20
21 python -c "$pycmd"
22
23 # Create a web page
24 echo "Content-type:text/html"
25 echo ""
26 echo "
27 <html>
28 <head>
29 <title>OpenWrt Python CGI Test</title>
30 </head>
31 <body>
32   <h2>Toggle GPIO 4 LED</h2>
33   <button style='background-color:skyblue;'
34     onclick='location.href=\"?ON\"'>Blue LED1 ON
35   </button><br>
36   <button style='background-color:grey;'
37     onclick='location.href=\"?OFF\"'>Blue LED1 OFF
38   </button><br>
39 </body>
40 </html>
41 "
The final step is to make the script file executable:
# Set the file to be executable
chmod +x mytest.sh
The uHTTPd server passes web page information to CGI scripts with environment variables. HTML forms or buttons can append the QUERY_STRING string to a requested URL.
This example defines two buttons that pass either an ON or an OFF to the query string. Lines 7-11 check the status of the QUERY_STRING variable and then echo either a 1 or 0 to GPIO pin 4. Lines 15-21 create a string of Python commands and then pass that string to the Python interpreter. The Bash command $(date +%T) returns the current time (line 18), which is shown in line 1 on the LCD screen, with the QUERY_STRING variable on the second line (line 19). Lines 24-41 output the web page content.
The HTML button tags use an on_click method (lines 34 and 37) to refresh the page, with either an ON or OFF set as the query string.
This example page tests three main features: controlling GPIO pins, I2C functionality, and access to the uHTTPd server. The page can be viewed at http://my_pi_address/cgi-bin/mytest.sh.
For Python web projects on OpenWrt, you can use the uHTTPd server, but a lightweight web framework like Bottle would offer considerably more flexibility. Bottle can be installed by:
# Install the Bottle web framework
opkg install python3-bottle
A good future project would be to redo this Bash example with Bottle and the Python UniversalGPIO library.
Summary
OpenWrt can breath new life into old Raspberry Pi hardware. I noticed a great performance improvement on the old Pi hardware that makes the system quite usable. I also like the fact that OpenWrt doesn’t use a swap file, so I don’t have to worry about abrupt power losses.
The initial OpenWrt setup takes a few extra steps compared with Raspberry Pi OS; however, once things are up and running, LuCI offers a great web interface for added features and custom network configuration.