Off-Grid File Sharing
A battery-powered WiFi hotspot can provide useful services like file sharing even when you're off the grid. A Pi Zero 2 W as the hotspot with ownCloud installed does the trick.
I am lucky enough to have access to my extended family’s remote cabin. It’s beautiful and remote (Figure 1), but there is no grid – no electricity or Internet, not even by cell service. I set up a solar-powered WiFi access point that hosts exactly one website: a place to share files. This lets the different people who visit the cabin exchange info with the next group who is staying. It’s kind of fun, too: The shared data includes practical things like the new phone number of the fellow who delivers propane and playful things like photos of people swimming.

Getting Started
It might sound easy, but it took me about two weeks to figure this all out. I started with the goal of running Nextcloud on a device that uses the smallest amount of power possible, as power is in short supply. I knew that the “W” in Raspberry Pi Zero W meant built-in WiFi and the “Zero” indicated a small, low-power form factor. My first attempts with a Pi Zero W model (released in 2017) showed that it was too slow, so I ordered a Pi Zero 2 W (released in 2021). It has four cores, and its speed is adequate.
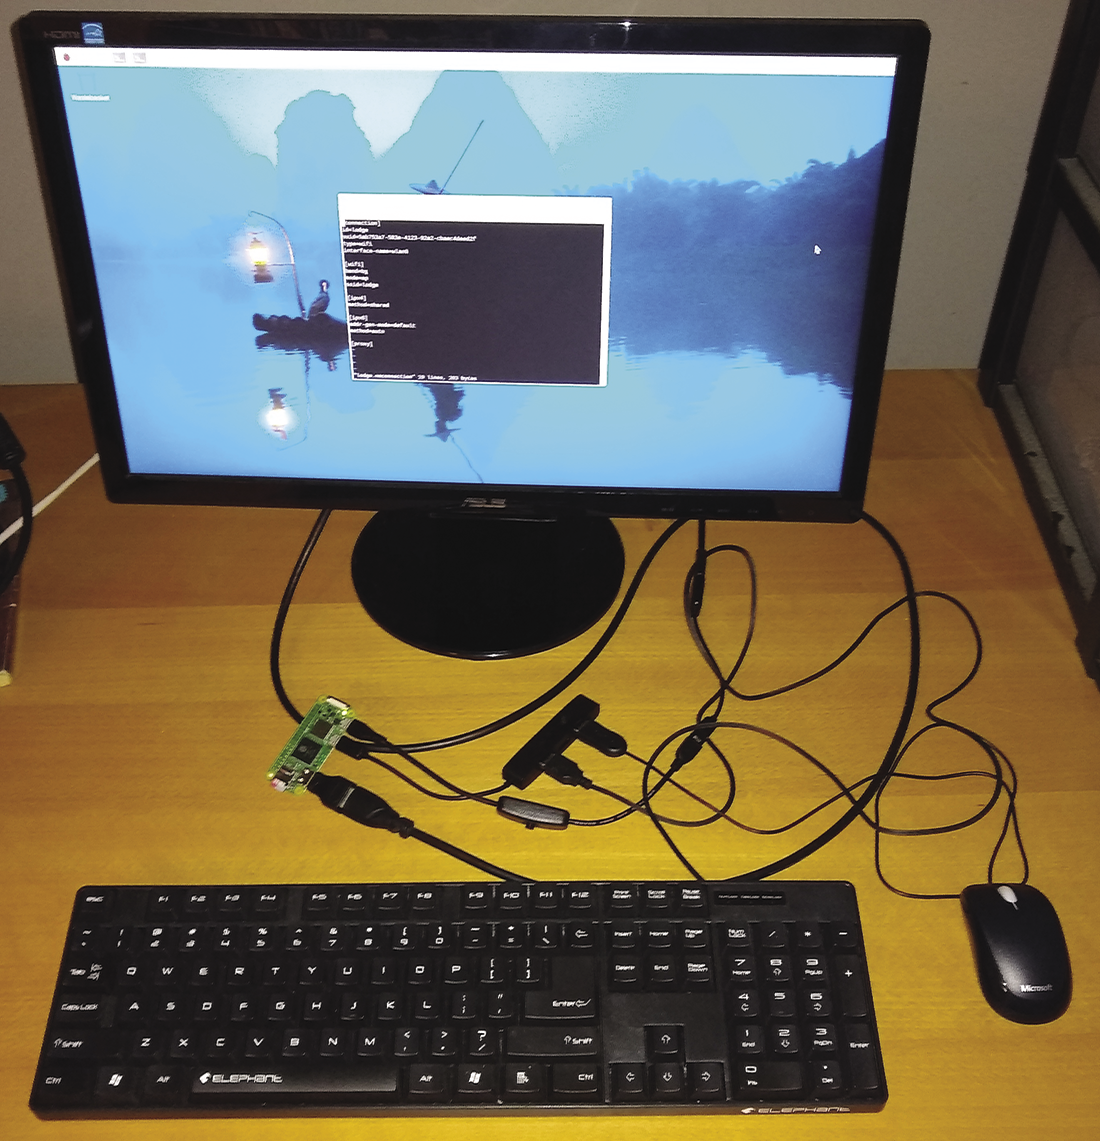
I also bought two different cases to try. Some have more openings than others, and I wanted black to be low-key. Since this project only requires WiFi and no HAT or buttons, I preferred the case with fewer openings. You can attach a WiFi antenna, but in my testing it wasn’t necessary to cover the cabin. If you’re just starting with the Pi Zero, I would recommend buying a kit: Mine came with an HDMI adapter, a USB power cord with an on/off switch, and an SD card, among other handy things. The Zero has two USB ports: for power and, well, non-power uses. I bought a USB hub so I could plug a keyboard and mouse into the non-power USB port. I already had a mouse, keyboard and HDMI monitor. With all this set up, I was able to use it like a regular, albeit slightly slow desktop computer (Figure 2). I read that the typical power consumption of a Raspberry Pi Zero 2 W is 350mA, making it one of the most energy-efficient options of Raspberry Pi models.
For the software environment, NextPi can turn your Pi into a Nextcloud appliance, but I wanted more control. Ultimately, I selected a regular Raspberry Pi OS install with ownCloud instead of Nextcloud (ownCloud, Nextcloud's predecessor, is still in development). The official Raspberry Pi Imager recommends the 32-bit OS for the Pi Zero W and the 64-bit version for the newer Pi Zero 2 W. You initially boot into the graphical environment. That’s cool, but I found that running apt update from a terminal window hung it. So I stayed in the graphical environment just long enough to enable SSH access and to tell it to boot in console mode.
Since every project needs a snappy name, I decided to call this “lodge” – that’s what we call the cabin where it lives, and that’s what I’ve named the access point and some other resources that I have set up.
ownCloud Setup
You can use the commands in Listing 1 to install and setup ownCloud like I did. Connect your Pi to the local network via an Ethernet cable and do not connect it to any WiFi network – you’ll need the WiFi to set up your own hotspot later. In the terminal, log in on the Raspberry Pi Zero via SSH and run sudo su to gain admin access for all the following commands.
Listing 1: ownCloud Setup
01 systemctl --now disable bluetooth
02 apt remove firefox chromium chromium-browser lynx vlc-\* pipewire pulseaudio cups-\*
03 apt install apache2 mariadb-server
04 systemctl restart mariadb
05 apt remove php8-\*
06 wget https://packages.sury.org/php/apt.gpg -O /usr/share/keyrings/deb.sury.org-php.gpg
07 echo "deb [signed-by=/usr/share/keyrings/deb.sury.org-php.gpg] https://packages.sury.org/php/ $(lsb_release -sc) main" > /etc/apt/sources.list.d/php-sury.list
08 apt update
09 apt install php7.4 libapache2-mod-php7.4 php7.4 php7.4-cli php7.4-gd php7.4-mysql php7.4-curl php7.4-xml php7.4-zip php7.4-intl php7.4-mbstring php7.4-common php7.4-readline
10 a2enmod php7.4
11 wget https://download.owncloud.com/server/stable/owncloud-complete-latest.zip
12 unzip owncloud-complete-latest.zip
13 mv owncloud /var/www/html/
14 chown -R www-data:www-data /var/www/html/owncloud/
15 mysql -u root
First, use systemctl to disable Bluetooth to save some power (line 1) – don’t uninstall it because that will stop WiFi. Next, remove some packages we aren’t going to use. I ran
apt --installed listto see what’s installed and then got rid of the packages mentioned in line 2. To run your website, you need to install Apache as well as MariaDB (line 3) since ownCloud requires a database to keep track of things. Since I am not expecting concurrent users, it seems reasonable to reduce the number of MariaDB threads by setting max_connections = 2 and thread_cache_size = 1 in the config file /etc/mysql/mariadb.conf.d/50-server.cnf and then restart the service (line 4).
At the time of writing, the latest ownCloud version requires PHP 7.4, but Raspberry Pi OS comes with PHP 8, so I uninstalled PHP 8 (line 5) – this command will give you an error if PHP wasn’t already installed. For installing PHP 7.4, I added the SURY repository, following instructions that were helpfully provided on GitHub (lines 6--8). That allowed me to install ownCloud’s dependencies with a longer apt command and enable Apache’s PHP module with a2enmod (lines 9-10). As there is no package for ownCloud, I downloaded a zip file with the binaries, extracted it and moved the contents to the right place (lines 11-13). Next, set the correct permissions by running chown on the ownCloud directory (line 14), create a database for ownCloud by running the mysql command-line client (line 15), and then entering the SQL commands from Listing 2, replacing your_password with a password of your choice – make sure to write that password down or memorize it.
Listing 2: Database Setup
01 CREATE DATABASE owncloud;
02 CREATE USER 'owncloud'@'localhost' IDENTIFIED BY 'your_password';
03 GRANT ALL ON owncloud.* TO 'owncloud'@'localhost';
04 FLUSH PRIVILEGES;
05 EXIT;
Finally you can access ownCloud. Open a web browser and navigate to http://raspberrypi_ip/owncloud (where you need to insert the IP address of your Raspberry Pi Zero) and then follow the on-screen instructions to complete the ownCloud setup. It will ask you the name of the database it should use. You’ve already created a database named owncloud and noted the password in the previous step. During this setup, you’ll need to provide a username and password for the admin account that you also must remember.
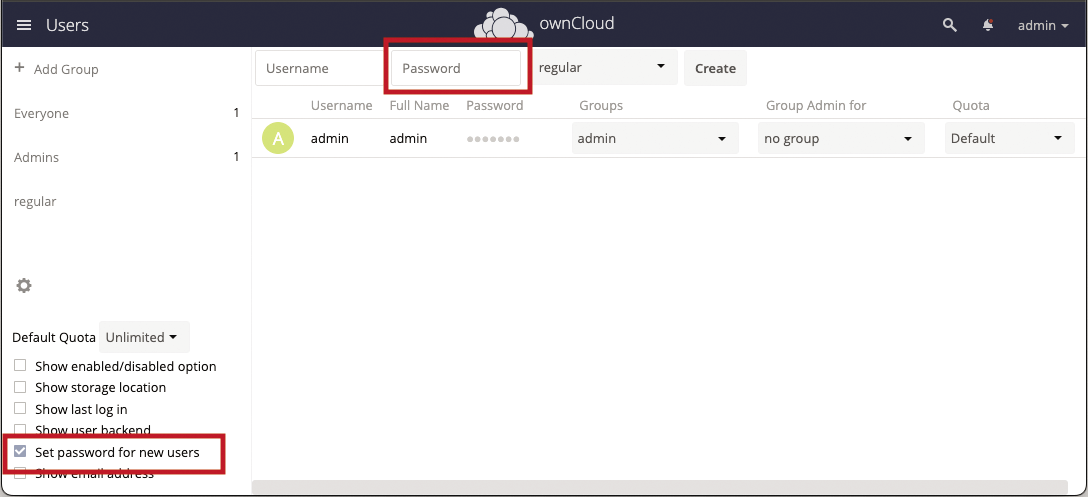
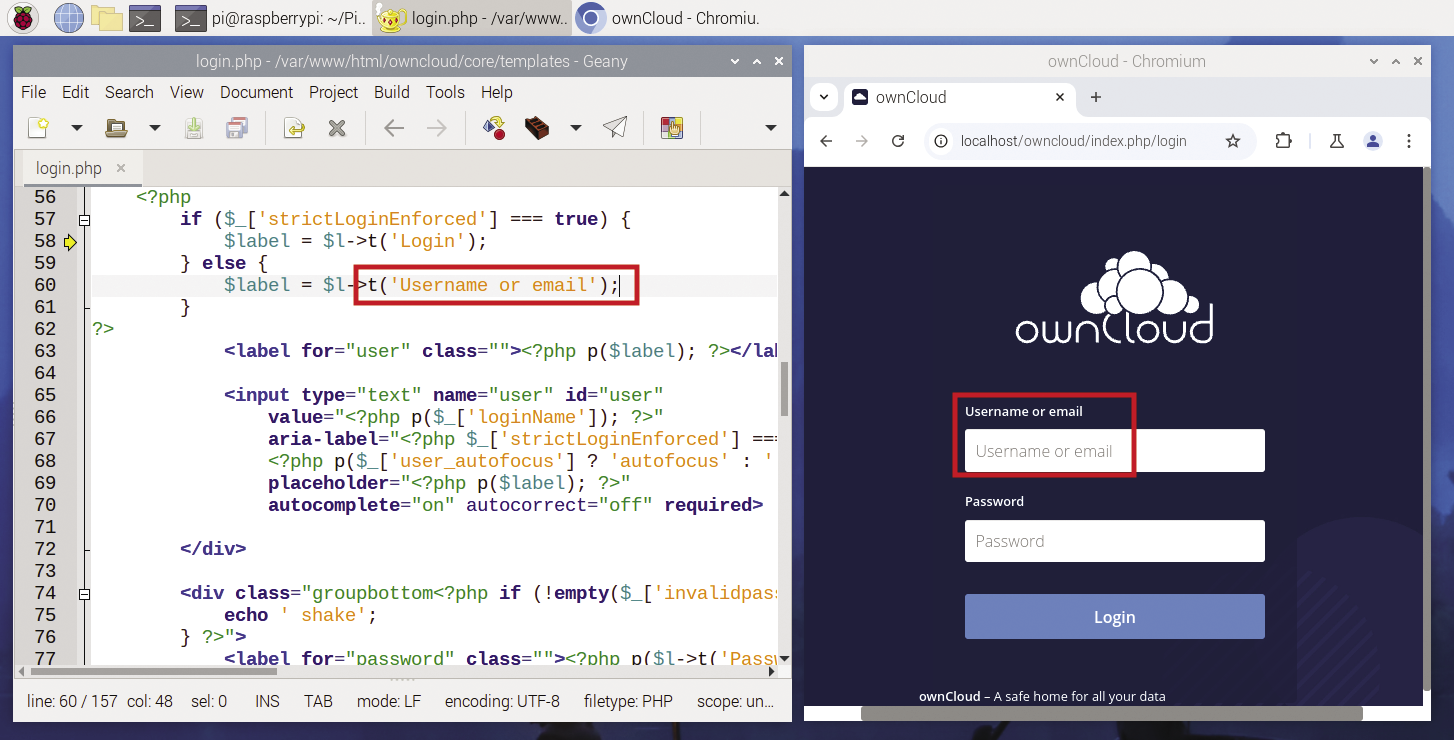
I added a group called regular (via admin/Users/Groups/add group) and made a user called user with password user on the same user and group management page. By default, ownCloud asks for an email address to validate a new user, but you can click on the cog icon in the lower left corner and enable the Set password for new users option: That will replace the email address input field with a password field (Figure 3). As a minor tweak, I changed the prompt message in /var/www/html/owncloud/core/templates/login.php so that it asks for Username instead of Username or email (Figure 4).
ownCloud will only allow users from certain trusted domains. Since my domain is lodge.local, I added it to file /var/www/html/owncloud/config/config.php that defines an array called trusted_domains.
Setting Up the Web Server
With Apache installed, now it’s time to customize it. First, enable the Apache rewrite module (you will use this later) with the a2enmod rewrite command. For the name of this server, I’m using lodge.local because that’s a proper fully qualified domain name (FQDN), which will not require a DNS lookup to resolve. Set the name of the server in the hostname file:
echo lodge.local > /etc/hostnameand add the IP address of that name by appending a line to /etc/hosts:
10.42.0.1 lodge.local(You will remove this entry later.) At the end of /etc/apache2/apache2.conf add:
ServerName lodge.localNow things are getting interesting. Remember this server isn’t going to be on the Internet. Later, when you set up the DNS, you’re going to redirect every domain (hostname) to here. However, that alone isn’t quite right. You need to check what host the browser is asking for. If it’s not your host, then you need to redirect the browser to your host. In /etc/apache2/sites-enabled/000-default.conf, add the code from Listing 3 at the end of the file. Then restart Apache via:
systemctl restart apache2Listing 3: Apache rewrite Rule
01 ServerName lodge.local
02
03
04 RewriteEngine on
05 RewriteRule ^/.*$ http://lodge.local/ [redirect=temporary,nocase,last]
06 </If>
This makes captive portal detection work. Recent smartphone and computer operating systems will check a known non-secure URL when first connecting to an access point to see if they’re online. (For example, some versions of Windows check http://www.msftconnecttest.com/connecttest.txt which returns Microsoft Connect Test.)
I first thought that returning anything but the expected text would make the client OS detect a captive portal, but that didn’t work. From experimenting, it appears that the client OS requires an HTTP redirect to reliably detect a captive portal, so that’s what this Apache directive does. It needs to be a temporary redirect so that it’s done every time.
You might ask: Why do you want the access point to be detected as a captive portal? If it isn’t, the client OS will say “no connection,” thereby misleading the user. Yes, it’s true that this access point has no connection to the Internet, but it does have its own website. When a captive portal is detected, the user will be instructed to log in, upon which the user will see the website, or more precisely, whatever content you put in /var/www/html/index.html, replacing Apache’s default page. Listing 4 shows a minimal HTML file that links to the ownCloud login page; Figure 5 shows the slightly more polished version I’ve created for the lodge (1) and how users can navigate from there to the ownCloud login (2), the top folder in the shared filesystem (3), and the picture folder (4).
Listing 4: Website (index.html)
01 <!DOCTYPE html>
02 Login as user <b>user</b> with password <b>user</b> <br>
03 <a href=/owncloud>OwnCloud</a>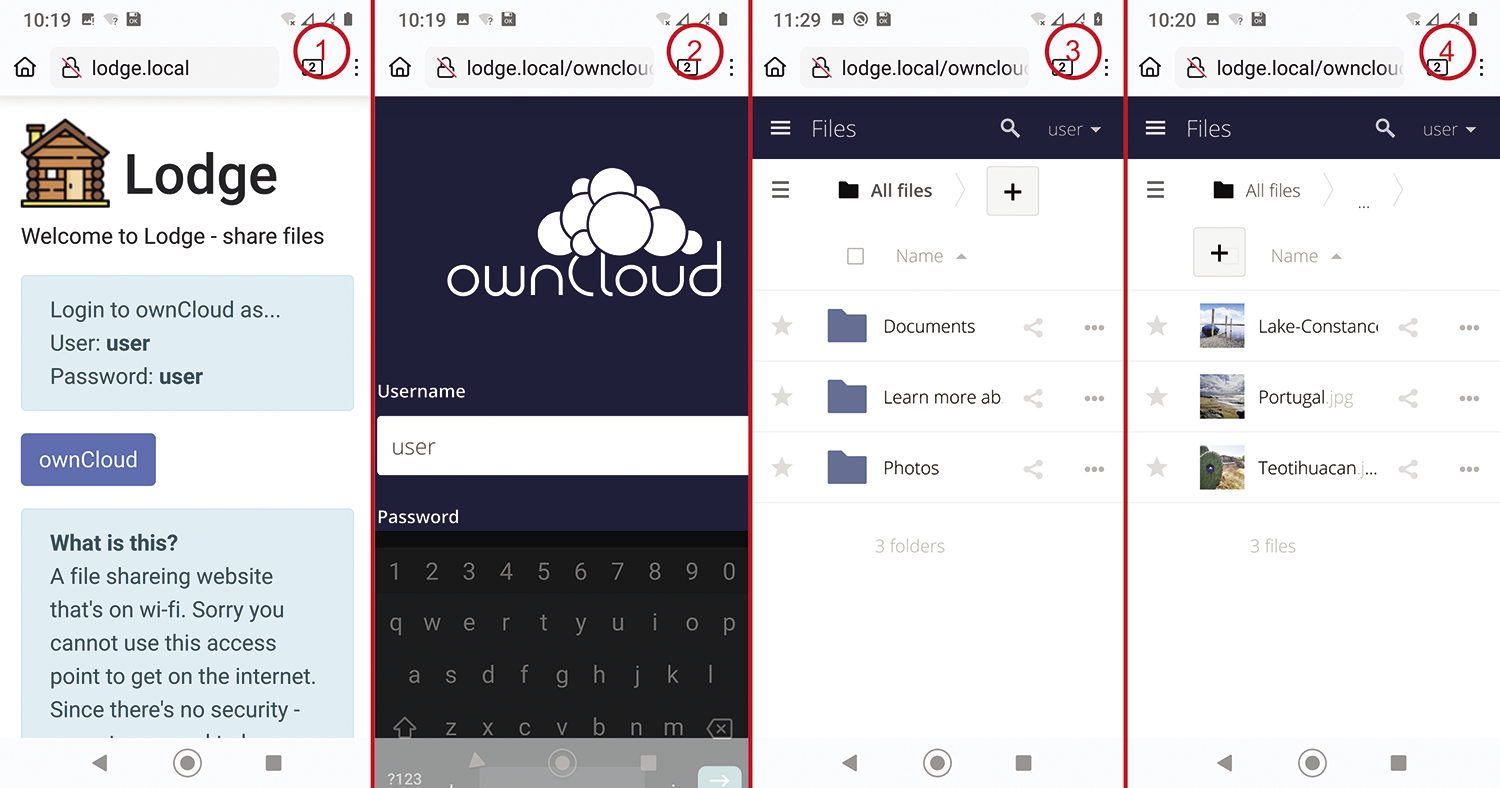
Note, I’ve only been dealing with the unencrypted HTTP protocol. For HTTPS, see the “What About HTTPS?” box.
Do you want or need SSL/TLS? There are two possible uses: to intercept HTTPS requests to other websites and redirect them to your homepage, and to present your homepage with HTTPS. Here is the breakdown:
1. I tried setting up SSL/TLS on Apache to intercept HTTPS URLs, but my certificate didn’t match and the browser correctly told the user so. There used to be a way for users to “accept the risk,” but that isn’t offered anymore. So now it will just confuse people.
2. Because I don’t have a live connection, I cannot get a certificate from Let’s Encrypt. So the only free option is a self-signed certificate. But browsers now complain about self-signed certificates, so HTTPS for my homepage doesn’t seem so great.
If you do want to create a self-signed certificate, you can find Raspberry Pi compatible instructions online.
Creating the Hotspot
So far, I have not turned the Raspberry Pi Zero into a WiFi access point. Listing 5 shows the necessary commands which, again, you need to run with root privileges. First use the Network Manager command-line tool (nmcli) to create an “open” (password-less) network (lines 1-3). Then make it auto-start at boot time (line 4). I also add the command
nmcli con up lodgeListing 5: Hotspot Configuration
01 nmcli con add type wifi ifname wlan0 con-name lodge autoconnect yes ssid lodge
02 nmcli con modify lodge 802-11-wireless.mode ap 802-11-wireless.band bg ipv4.method shared
03 nmcli con up lodge
04 nmcli con modify lodge connection.autoconnect yes
to the /etc/rc.local script, just before (not after!) the last line (exit 0). These steps enable the WiFi chip, open a hotspot with SSID lodge and give your Pi an additional IP address of 10.42.0.1.
Being offline means requires an unusual configuration for DNS. I use systemd-resolved for very little here: On my machine, it exists simply to connect DNS lookup requests to a different service running on the Rasp Pi. I first install systemd’s DNS resolver via
apt install systemd-resolvedand in the [Resolve] section of its configuration file /etc/systemd/resolved.conf I set
# Use dnsmasq
DNS=127.0.1.1:5353
and then start the service with
systemctl start systemd-resolvedThis will send all requests to a DNS server running on port 5353 on this machine – you’ll see why in a second. Perhaps confusingly, you will be using two different instances of dnsmasq for two different tasks:
- One instance runs as a regular daemon, controlled by
systemctland using the configuration file/etc/dnsmasq.d/lodge.conf. It will be doing DNS only. - Another instance is started by NetworkManager doing DHCP only. It does not read
/etc/dnsmasq.confor/etc/dnsmasq.d/lodge.conf; it starts on the fly from parameters in the/etc/NetworkManager/system-connections/lodge.nmconnection(Network Manager format) and/etc/NetworkManager/dnsmasq-shared.d/lodge.conf(dnsmasqformat) files.
I also need to install the second dnsmasq service. Run:
apt install dnsmasq Then create a new file /etc/dnsmasq.d/lodge.conf with the following two lines:
port=5353
address=/#/10.42.0.1
Now restart the dnsmasq service with
systemctl restart dnsmasqyou can also remove the lodge.local entry from /etc/hosts now. The address= line will make the DNS server return 10.42.0.1 (the Raspberry Pi’s WiFi IP address) as the answer to all DNS queries. Try it: Running ping example.com should return a reply that starts with:
64 bytes from lodge.local (10.42.0.1)Finally, I will configure the instance of dnsmasq that’s started by NetworkManager; it deals with DHCP and hands out IP addresses to clients that connect to my hotspot. Create a file /etc/NetworkManager/dnsmasq-shared.d/lodge.conf and add this line:
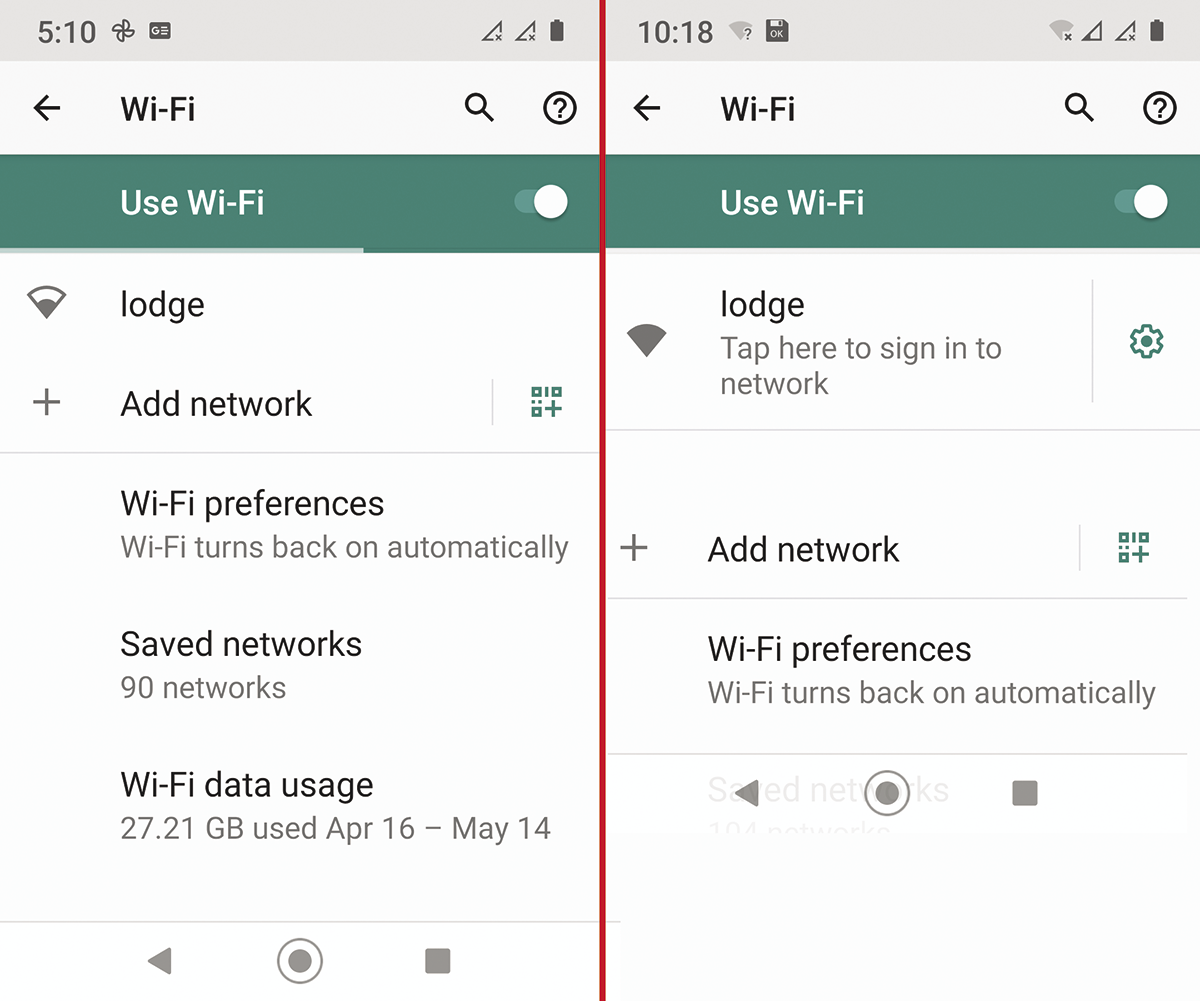
dhcp-option=114,"http://lodge.local"This will inform some WiFi clients about the captive portal mode, and it follows RFC 8910. It tries to achieve the same goal as my redirect configuration of the Apache server. When this is all put in place, users should see the lodge access point and be able to connect to it (Figure 6).
Conclusion
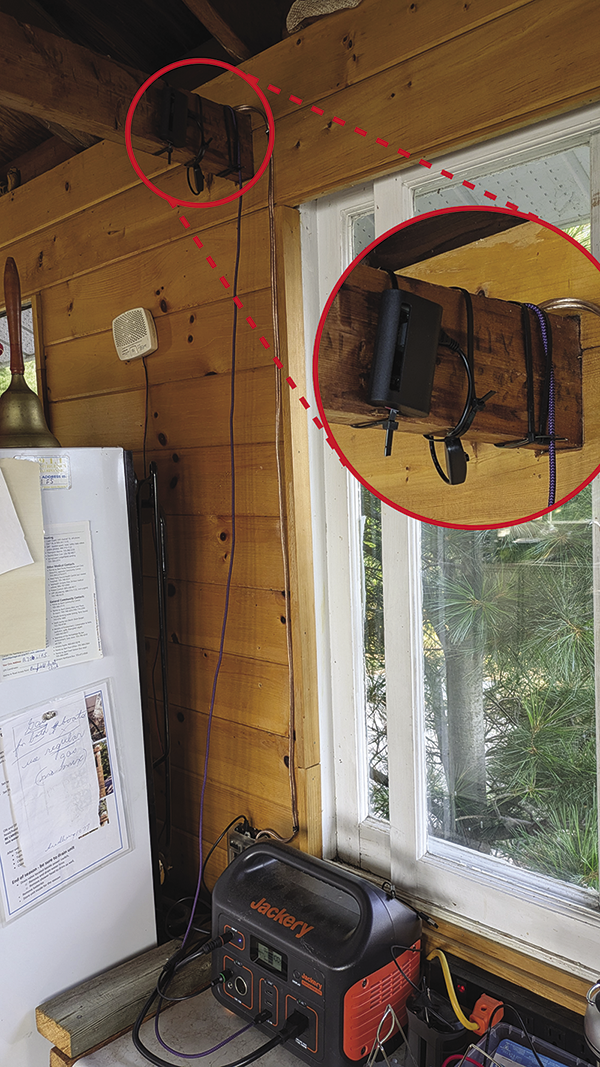
So there you have it: a user-friendly way for trading files via WiFi on low power (Figure 7). Sometimes convincing people to use a project is the hardest part. I am pleased to report that some extended family members have told me that they’re using it – quite probably for things I never imagined. Some were initially reticent since they didn’t know where the thing came from. In retrospect, I should have put my name on the homepage to inspire a bit of confidence.
If you’re interested in a more complex solution that also grants access to the Internet (where available), you can check out dedicated captive portal solutions, such as Nodogsplash and openNDS, but they were not needed for this project.


