
Rust on a Device
Rust is getting attention as a potential successor to C/C++. It claims to solve some memory safety issues while maintaining high performance, and it is now possible to write Linux kernel components in Rust. We look at Rust on embedded systems, where memory safety, concurrency, and security are equally important.
For decades, C and increasingly C++ have been the languages of choice for microcontroller development, with assembler reserved for optimizations and start-up code. Most vendors provide free development IDEs, and most of these use GNU compilers under the hood. Some of the IDEs come with initialization code and generate device configuration code (choosing I/O functionality, etc.), so a device can be configured in a point-and-shoot manner letting you concentrate on writing application code. Similarly, manufacturers of I/O devices such as sensors and wireless modules supply drivers and example code.
C/C++ is an easy-to-learn language, but it’s also easy to abuse and to write buggy code. Embedded code is expected to run unattended, often in hostile environments where code updates are difficult if not impossible. Increasingly, these devices are Internet-connected. While this means easier code updates, it requires a significant amount of extra effort to do well, and ironically this very connectivity lays the device open to nefarious access attempts. I know that there are tools available that help to minimize the risk of bad code getting into a product, and it is certainly not easy to consider rewriting large legacy codebases in another language, but I think that Rust has come far enough and has sufficient advantages over C/C++ to be considered for new code and for re-writing critical sections of existing code as a stepping stone to a full Rust implementation.
With that being said, this article is intended as a “getting started” guide: Adoption of Rust is a big step in a commercial environment, and one of the best ways to evaluate a new language is to try it! In today’s world of low-cost development boards and free software tools, all it takes is a little time and determination. Then you can base your decisions on some real-life experience.
There will be a lot of code in this article – many of the following listings have a filename – and you can get all those files from our download area.
Setting Up a Development Environment
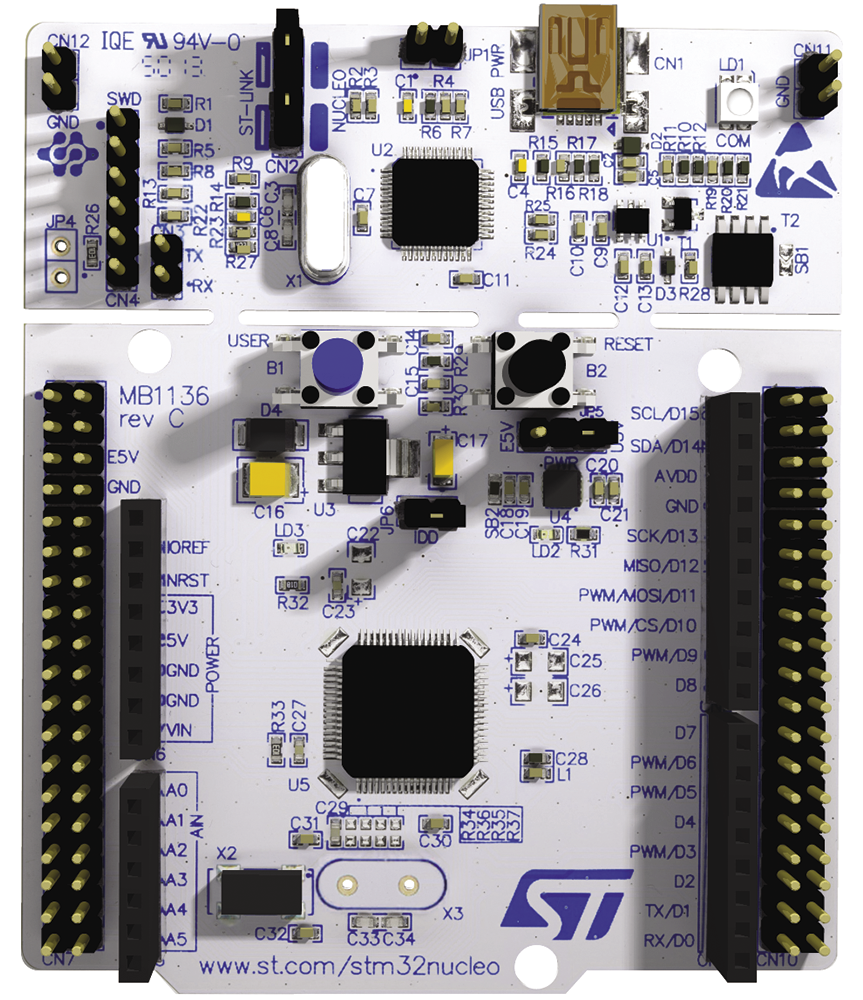
I’m going to assume you’ve installed Rust and its associated tools and got beyond a simple “hello world” program. If not, you can follow the instructions on the Rust website to get started. I’d encourage you to become familiar with the rudiments of Rust by writing code for your Linux platform before moving on to an embedded environment. I will use an STM32 development board, specifically the NUCLEO-L476RG (Figure 1), but you could use almost any development board, though it’s useful if the board has at least one LED and a push button. A little later, I’ll show how to check if Rust supports a particular processor and/or architecture. STM32 devices are ARM Cortex based, and Rust has excellent support for that architecture. This particular NUCLEO development board, in common with many such boards, has an on-board programmer (typically another microcontroller), so a USB cable hooked up to you Linux box is all you need to download, run, and debug code on the board.
Development in Rust requires only the Rust toolchain and an editor. I’m going to be using VS Code with the rust-analyzer plugin, as this has excellent support for Rust with code completion, syntax highlighting, and so on, but there are other solutions out there.
Cross Compiling
You’ll need the datasheet and reference manual for the chosen microcontroller. From the start, you can see that the microcontroller has an ARM 32-bit Cortex-M4 32-bit processor with hard floating-point support. You can use this information to tell Rust what to cross compile to. Visit ARM’s developer website for more details: specifically the ARMv7E-M architecture and Thumb instruction set. Armed (no pun intended) with this information, you can visit Rust’s platform support page and find the thumbv7 target support.
By default, your Rust installation only supports your host architecture, Linux. To add support for your target, simply type:
rustup target add thumbv7em-none-eabihf
Typing rustup show will confirm the supported targets. To start a project, type:
cargo new nucleo-l476rg-primerChange your directory to the directory created in that command and start VS Code by typing code . (with a dot for the current directory at the end). You should see a source subdirectory and a Cargo.toml file; you can ignore the other files and directories for now. Open the main.rs file in the source directory. You need to tell the compiler not to include the standard library and that your program does not have the usual entry point. We use the #![no_std] and #![no_main] directives for this. Later you will add another directive to tell the compiler where the entry point is, and that can be a function with any name of your choice (including, oddly enough, main).
At this point you need support from an external library. There is a registry of available libraries (known as crates in Rust). The cortex_m_rt crate provides support for the Cortex core and includes linker instructions to ensure our code is properly located in the target memory. You can add this crate as a dependency with
cargo add cortex-m-rtthis should add a dependency line to Cargo.toml.
Now you can add the entry-point directive and a function that never returns. Your code should look like this (main-01.rs):
#![no_std]
#![no_main]
extern crate cortex_m;
use cortex_m_rt::entry;

#[entry]
fn entry_point() -> !{
loop {
}
}
In order for the linker to know where to locate your code, you need to provide the cortex-m-rt crate with a memory layout file that it adds to the linker script. Looking at the memory map in the STM32L476 datasheet (page 103), you see that there is 128KB of internal RAM located at 0x20000000. Looking more closely at the datasheet (page 20), the SRAM is divided into 96KB mapped at address 0x20000000 (SRAM1) and 32KB located at address 0x10000000 with hardware parity check (SRAM2), so SRAM1 is the one you need. I will return to SRAM2 later.
There is also 1MB internal FLASH at 0x08000000. With some digging in the reference manual (at page 393), you can find that at reset the processor will jump to an entry in the interrupt vector table located at the beginning of FLASH. This is taken care of in the start-up code, so all you have to tell the linker is where to find the memory. Add memory.x with the following lines in the root of your project directory:
MEMORY
{
RAM : ORIGIN = 0x20000000, LENGTH = 96K
FLASH : ORIGIN = 0x08000000, LENGTH = 1024K
}
The linker also needs to know the target microcontroller so you need to add another file, config.toml, in a new .cargo directory:
[build]
target = "thumbv7em-none-eabihf"

[target.thumbv7em-none-eabihf]
rustflags = ["-C", "link-arg=-Tlink.x"]
This saves you from having to pass these arguments on the command line. The file link.x that rustflags refers to is generated by Cargo, and memory.x is included in it. If you attempt to control memory layout by adding statements to memory.x, they may clash with those in link.x and lead to some puzzling error messages. If you want finer control over memory layout, use the Rust flags to point to your own linker script.
To help VS Code’s Rust analyzer, you need to add a further configuration file, which will ensure that it applies checks to the target architecture instead of the host. Otherwise you will get some strange messages. In a directory called .vscode add the settings.json file from the source code file collection.
If you try to compile the code now with cargo build, you’ll get an error: The compiler will complain about a missing panic handler. As you may know, Rust may panic when something bad happens, such as an out-of-bounds array reference. In a desktop application, this would cause the program to terminate and print an informative error message. On an embedded system, that’s impossible, so for the moment, we’ll add a default handler which just stops the processor in an infinite loop. To add the handler, run
cargo add panic-haltand add the line
use panic_halt as _;
to main.rs immediately below the existing use statement. The code should now build without errors, and the binaries for your target should be in the target subdirectory. You can install some further tools to check their validity. Run the following commands:
rustup component add llvm-tools
cargo install cargo-binutils
This installs the standard LLVM tools and a wrapper that Cargo uses to call them. If you type
cargo size – -Ax
you will get some information about how the code is laid out in memory (see Listing 1). It shows that the vector table is located at the start of the flash memory, the program code (.text) 0x400 bytes later, and it’s all of 0x8c bytes in size. Any variables (.data) would be located in RAM, though in this case, with the program being so simple, the .data segment has zero size.
Listing 1: Output of “Cargo Size”
nucleo-l476rg-primer :
section size addr
.vector_table 0x400 0x8000000
.text 0x8c 0x8000400
.rodata 0 0x800048c
.data 0 0x20000000
.gnu.sgstubs 0 0x80004a0
.bss 0 0x20000000
.uninit 0 0x20000000
.debug_abbrev 0x11ab 0x0
.debug_info 0x223c7 0x0
.debug_aranges 0x1348 0x0
.debug_ranges 0x195f0 0x0
.debug_str 0x3b4da 0x0
.comment 0x40 0x0
.ARM.attributes 0x3a 0x0
.debug_frame 0x4154 0x0
.debug_line 0x1f26e 0x0
.debug_loc 0x29 0x0
Total 0x9cc75
Programming the Target
To program your microcontroller with this code, you need one further tool, cargo embed. This tool talks over USB to the companion processor on the target board, which in turn manages programming the microcontroller. You can no longer install cargo embed directly as it is now part of a project called probe-rs. Follow the instructions at the project website, which just amounts to running a curl command. Let’s first check that probe-rs supports our target:
$ probe-rs chip list | grep STM32L476
...
STM32L476RCTx
STM32L476RETx
STM32L476RGTx
...
The output shows it supports many variants of the STM32L476, including our target. Now connect the target board to a USB socket on your host. The power LED should light. Type probe-rs list and you should see that it has detected the target board. Your output may vary, depending on the exact configuration:
The following debug probes were found:
[0]: STLink V3 -- 0483:3753:0006002737U
56501320303658 (ST-LINK)
Let’s try programming the target:
cargo embed --chip STM32L476RGTYou should see an output similar to that in Figure 2 – success: Your code runs! Note that the proper launch command was cargo embed and not cargo run, which would attempt to run your program on the host.

To complete the project configuration, you can add the chip information to an Embed.toml file in the project’s root folder, so you don’t have to provide all the details every time:
[default.general]
chip = "STM32L476RGTx"

[default.rtt]
enabled = false

[default.reset]
halt_afterwards = false
Then typing cargo embed will be enough to program and run your code on the target.
Runtime Debugging
Before diving into programming the microcontroller’s I/O, I’ll deal with a debugging technique which allows you to print data back to your host’s console. The first step is to add another crate with
cargo add rtt-target(which provides a feature called real-time transfer, RTT) and a new statement to the program:
use rtt_target::{rprintln, rtt_init_print};Modify the Embed.toml file you created above, and set enabled to true in the default.rtt section. Then you can add some print statements to your code (see source code file main-02.rs). This will fail to link, producing an undefined symbol error. You can fix it by adding a feature to the cortex-m crate. Change the appropriate line in Cargo.toml to this:
[dependencies]
cortex-m = { version = "0.7.7", features = critical-section-single-core"] }
Modify main.rs so that it looks like Figure 3 (main-03.rs). This should clear your terminal and print a list of ascending numbers. As this data is exchanged via in-memory buffers, it is very fast. Embedded debugging is a whole topic in itself, and sometimes there is no substitute for a full gdb-type debugger, but print statements like this will answer many questions such as “did my code reach this point?” or “what is the value of this register?” without interrupting what can be time-sensitive code. Press Ctrl+C to return to the command line.
Configuring I/O Pins and Internal Clocks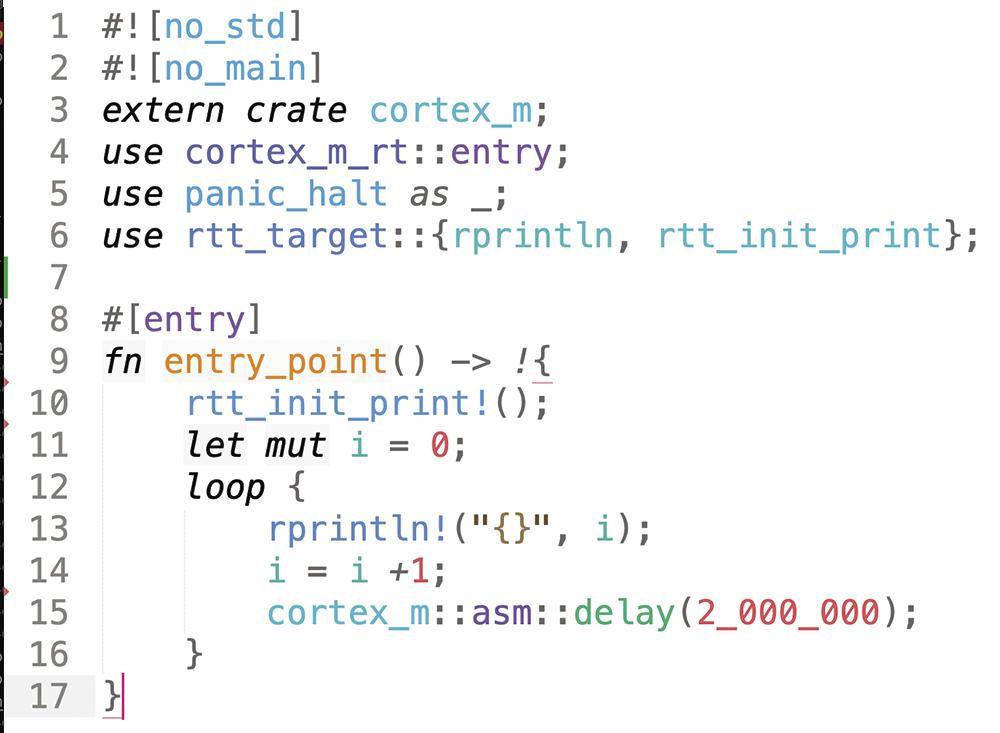
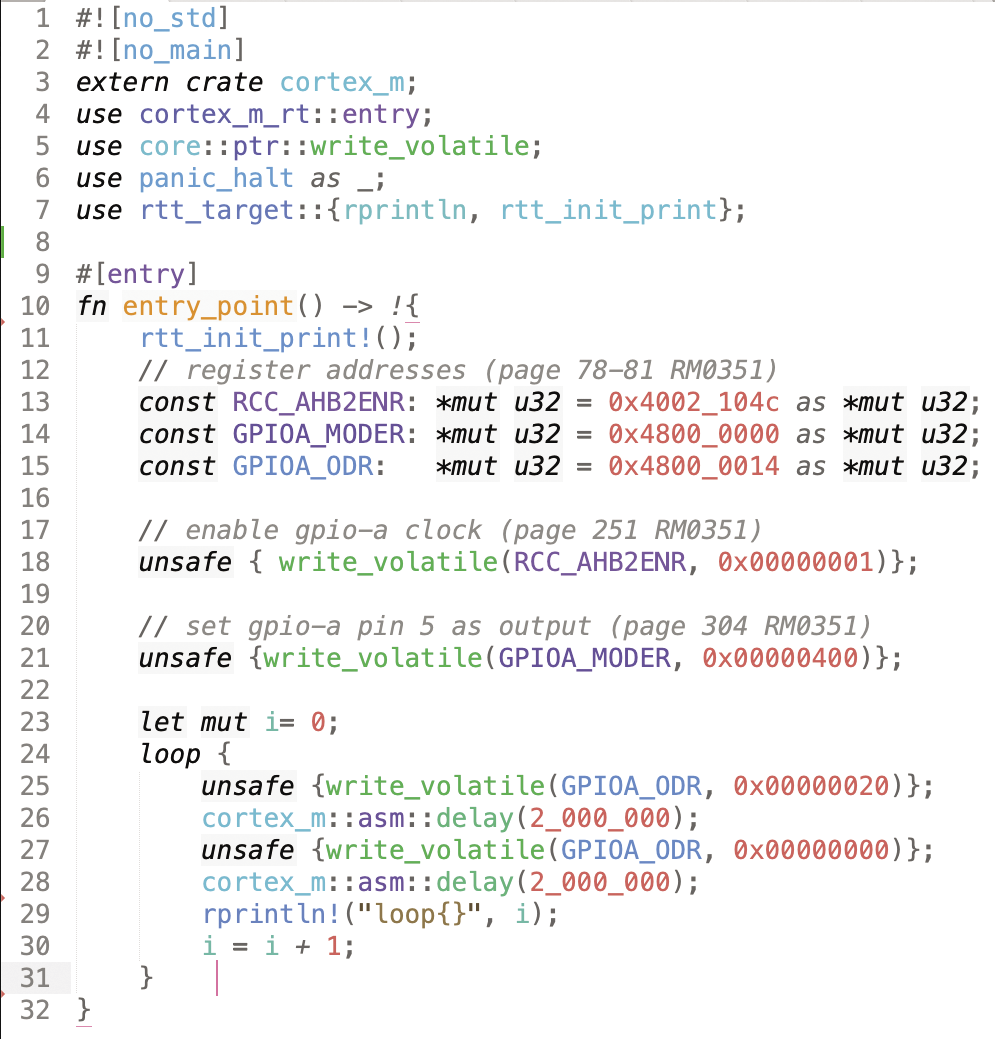
main-03.rs).With vendor IDEs, you configure I/O pins for a user interface. For instance, you can make port A pin 5 an output (it’s connected to an LED) and port C pin 13 an input (it’s connected to a push button). The IDE will generate the appropriate C/C++ code for you and add it to your project’s startup code. Rust doesn't offer this option, but of course, you can examine the microcontroller data sheet, figure out what values to write to what register, and dispense entirely with the IDE approach.
I’ve annotated the code in Figure 4 (main-04.rs) with references to the manual, to show how I found the values. I have now managed to make the LED blink using only direct register writes. If you are very familiar with this approach, possibly coming from an assembler or C/C++ background, this may work for you, though I think in all but the most trivial cases it’s tiresome and error-prone. That’s a matter of taste though.
main-04.rs).For a higher-level approach, like that provided by ST’s hardware abstraction layer (HAL), you have the choice of two levels available in Rust crates. For the current device, one popular crate is stm32l4 which you can add via cargo add stm32l4. Repeat the earlier test and make the LED flash using this approach. First modify your Cargo.toml file to specify the exact microcontroller in use. Change
stm32l4 = "0.15.1"to
stm32l4 = { version = "0.15.1", features = ["stm32l4x6"] }Then change main.rs to look like Figure 5 (main-05.rs). The stm32l4 crate sticks closely to the register names in the datasheet, so with a bit or careful study it should be clear what’s happening. For instance, odr is the output data register, so odr5 refers to bit 5, which is the bit that controls pin 5 of that particular port, in this case port A. For example, it should be clear what the following in line 27 is doing.
gpioa.odr.modify(|_, w| w.odr5().clear_bit())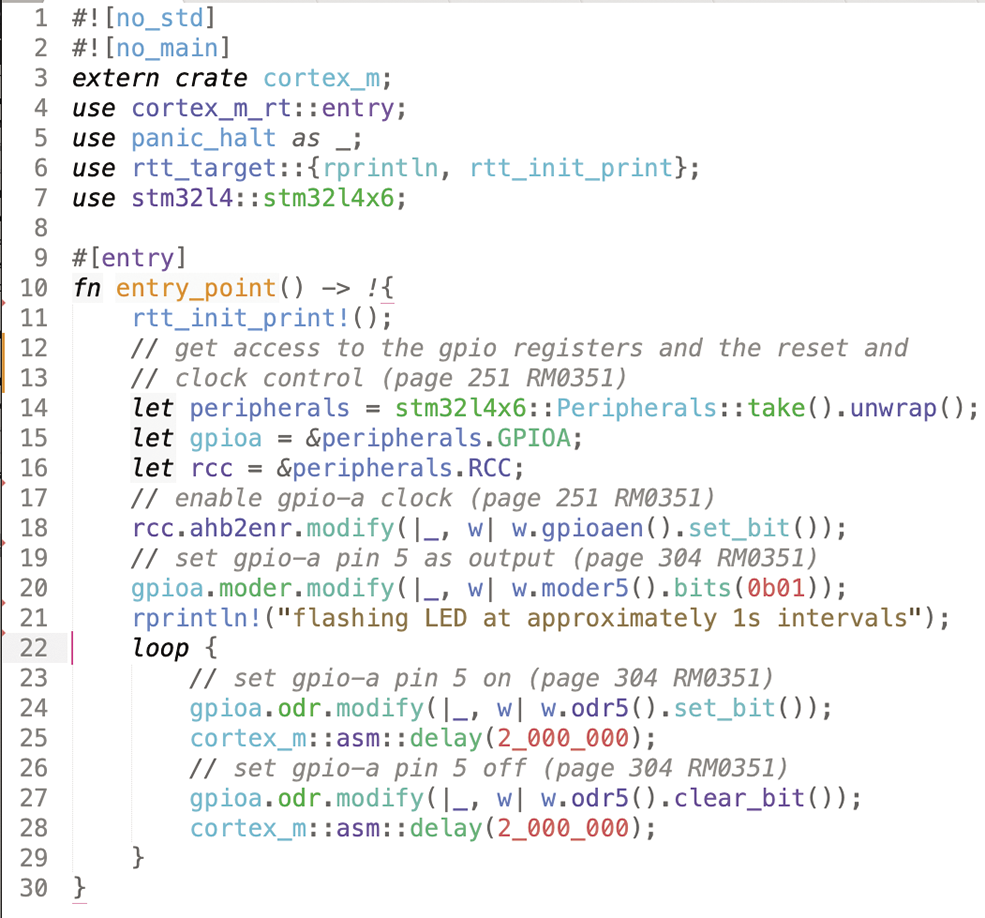
main-05.rs).You can step up a level and use a HAL crate. Run these commands:
cargo remove stm32l4
cargo add stm32l4xx_hal
cargo clean
Change Cargo.toml again, replacing
stm32l4xx-hal = "0.7.1"with
stm32l4xx-hal = { version = "0.7.1", features = ["rt", "stm32l476"] }Now change main.rs into the version in Figure 6 (main-06.rs). Compile and run it. I’ve added an input for a push button, but otherwise the result is the same – this code is more concise and easier to read.

main-06.rs).Setting Up the Microcontoller Clock Tree
By default, the STM32 processor runs off an internal RC clock at 4MHz, so you are not getting its best performance. The delays I’ve added are clock dependent. If you set up the clock correctly with
let mut flash = peripherals.FLASH.constrain();
let mut pwr = peripherals.PWR.constrain(&mut rcc.apb1
rcc.cfgr.sysclk(80.MHz()).freeze(&mut flash.acr, &mut(main-07.rs), the LED should blink much faster. This still uses the internal 4MHz clock, but via a PLL, which increases the system clock frequency to 80MHz. If your board has an external crystal (usually 8MHz), you can use that as the primary clock source, and your system clock frequency will be much more stable (see below). However, using cortex_m::asm::delay is clock dependant, so it’s time to use a proper delay mechanism that runs from sysclk. This is shown in Figure 7 (main-08.rs). In that version, the LED flashes at a more accurate one-second period.
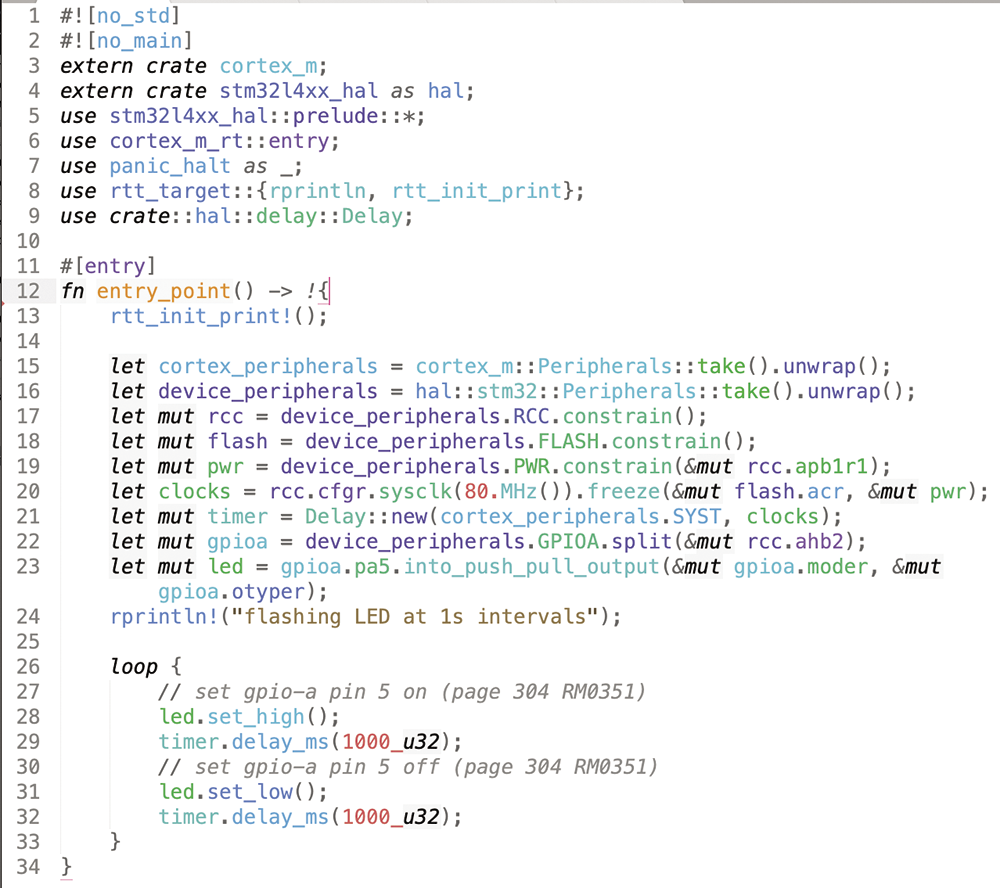
main-08.rs).If you set the clock to 40MHz, you’ll notice that the code does not run. What’s going on? Let’s improve our panic handling to see if there is a panic occurring. Replace the line
use panic_halt as _;with
use core::panic::PanicInfo;run
panic!("testing panic handler");
before the end of the loop, and add this panic handler at the end of the file:
#[inline(never)]
#[panic_handler]
fn panic(_info: &PanicInfo) -> ! {
rprintln!("{}", _info);
loop {}
}
The modified version outputs something like this
panicked at .cargo/registry/src/index.U
crates.io-6f17d22bba15001f/U
stm32l4xx-hal-0.7.1/src/rcc.rs:719:13:
assertion failed: pllconf.n >= 8
So you can see the the PLL configuration is not correct, and an assertion in the clock configuration has failed. There are limits to the frequencies that can be generated. If you set the clock frequency to 64MHz, the code will run again. Note that the LED period stays the same – this is all sorted out internally. If you want to use an external crystal (usually an 8MHz crystal), which is known as the HSE clock source, you can set it up as shown in Listing 2.
Listing 2: Setting Up an External Crystal
let clocks = rcc.cfgr.
hse(8.MHz(), hal::rcc::CrystalBypass::Disable,hal::rcc::ClockSecuritySystem::Disable).
pll_source(PllSource::HSE).
sysclk(80.MHz()).freeze(&mut flash.acr, &mut pwr);
Next Steps
So far, I have created a very simple Rust program running on a microcontroller. I’ve dealt with clock configuration and toggling an I/O pin. The stm32l4xx_hal repository has an examples folder demonstrating how to set up and use the various I/O facilities of the STM32, such as I2C, SPI, UARTS, and USB. The crate documentation is another good source for details on how to use this library. The “Working with Legacy Code” box shows how to integrate old C code.
It is often not a realistic prospect to rewrite a project from scratch in a new language. If you have an existing codebase that’s well tested and trusted, it may be better to retain this code in a library which is linked into new Rust code. Let’s look at an example library that I wrote some time ago. It consists of a single method that rewrites the rules of mathematics. Here’s the source code (
wonky_math_library.c):#include <stdint.h>int32_t wonky_add(int32_t a, int32_t b){return a+b+1;}To link this into your Rust code, you need to cross compile it for the ARM Cortex architecture. Create a directory off the root of your project called
wonky_math_library. From there, create wonky_math_library.c with the above code, and Makefile containing these lines:all arm-none-eabi-gcc -c -mcpu=cortex-m4 Uwonky_math_library.c -o wonky_math_library.o arm-none-eabi-ar rs libwonky_math_library.a wonky_math_library.oIf you don’t have these C compilers installed, follow the instructions online. You will need to add linker arguments to config.toml, so Rust knows how to link to the library:
[target.thumbv7em-none-eabihf]rustflags = ["-C", "link-args=-Tlink.x -Lwonky_math_library -lwonky_math_library"]In order to call your library from Rust, you must define its prototype:
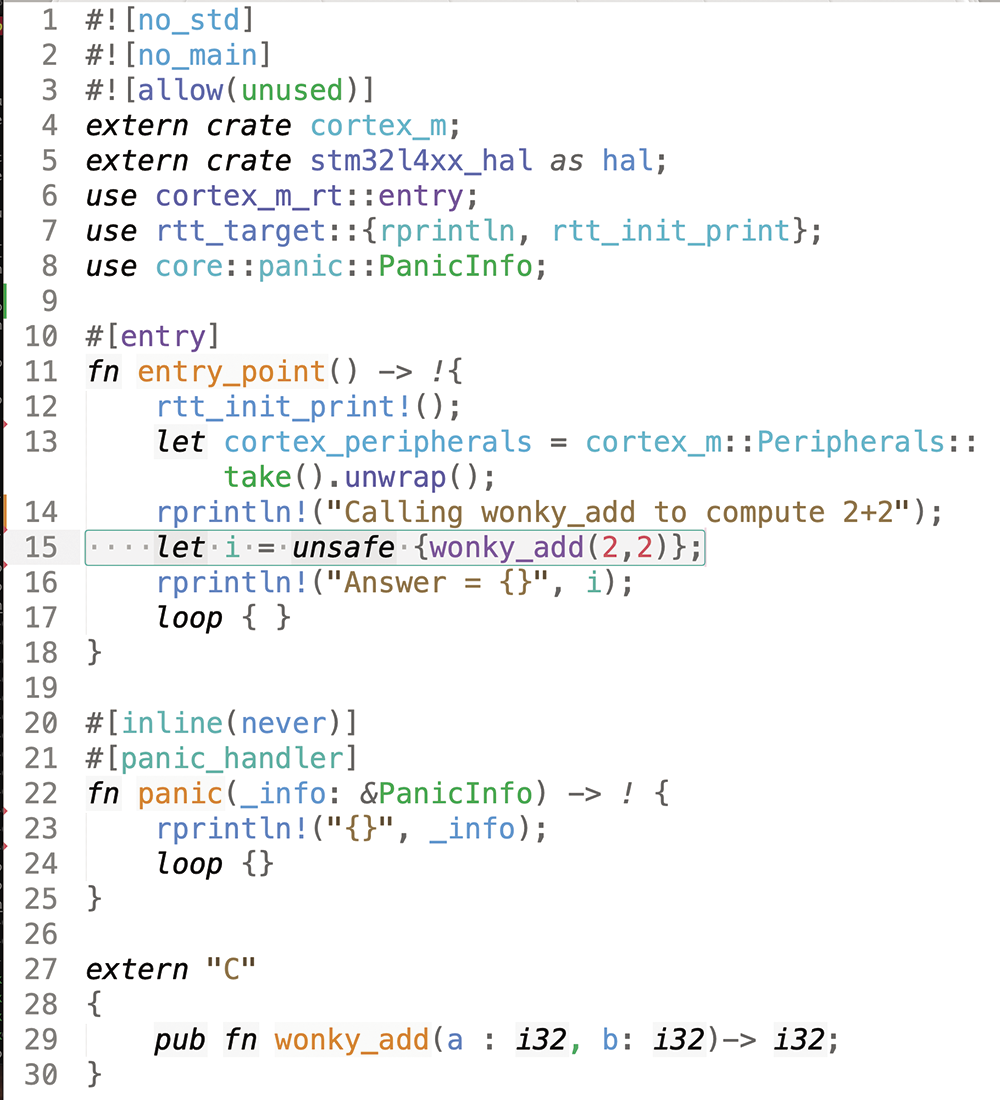
extern "C"{pub fn wonky_add(a : i32, b: i32)-> i32;}and then you can call it. Figure 8 shows a simple, complete program that demonstrates this; the output at the host terminal is “Calling wonky_add to compute 2+2. Answer = 5” – clearly, I have some work to do on my math library! Calling external functions is considered an “unsafe” operation, which explains the required use of the unsafe keyword in line 15.
For a more complex library, generating the prototype bindings by hand would soon get tedious. Thankfully, Rust provides a tool called bindgen that aids in this process. You can also automate building the C library from a Rust build script. Simply add build.rs with the following lines to the root of your project:
use std::process::Command;fn main() {Command::new("sh").arg("-c").arg("cd wonky_math_library && make").output().expect("failed to execute process");}Now, if you change your C file, it will be updated and linked with the Rust program.
main-10.rs).Memory Management
If you try to use a String or Vec type, you’ll notice they are not available, as they are part of the standard library and I have disabled it with #![no_std]. This leads to a thorny topic for embedded systems: memory allocation. Many projects avoid memory allocation altogether or restrict its use to initialization, as there is a risk of the heap becoming full or so fragmented that it cannot allocate any further space. In order to use strings and vectors in embedded Rust, you can use the alloc crate. This comes as part of the distribution, so there is no need to change Cargo.toml. However, if you use this crate and attempt to create a string like this:
extern crate alloc;
use alloc::string::String;
...
let s = String::from("I am a string allocated on the heap");
you will get a compile time error. You have to supply your own allocator, as the alloc crate only supplies the types, but no implementation of the heap allocator. The excellent Embedded Rust book shows how to implement a simple allocator that never frees up memory. Of course, that might cause problems in some circumstances, but if you carefully instrument the allocation, it may work for you. Alternatively, you can look for a more sophisticated allocator at crates.io. I’ll give the simple approach a try. First, modify memory.x so that it looks like in Listing 3 (memory-v2.x).
Listing 3: memory.x (Updated)
01 /* Define memory regions */
02 MEMORY
03 {
04 RAM : ORIGIN = 0x20000000, LENGTH = 96K /* Main SRAM */
05 RAM2 : ORIGIN = 0x10000000, LENGTH = 32K /* Additional SRAM */
06 FLASH : ORIGIN = 0x08000000, LENGTH = 1024K /* Flash memory */
07 }
08
09 /* heap */
10 _heap_start = ORIGIN(RAM2);
11 _heap_end = ORIGIN(RAM2) + LENGTH(RAM2);
The STM32L476 has a second RAM bank, 8K in size, so I’ll put the heap there. The allocator is a modified version of the one suggested in the book, which takes the heap location from memory.x. Copy allocator.rs from the source code collection to your source directory; it defines a public initializer function init_alloc() that you can call from your code. A minimal test program is shown in Figure 9. If you run it, you should see the following output:
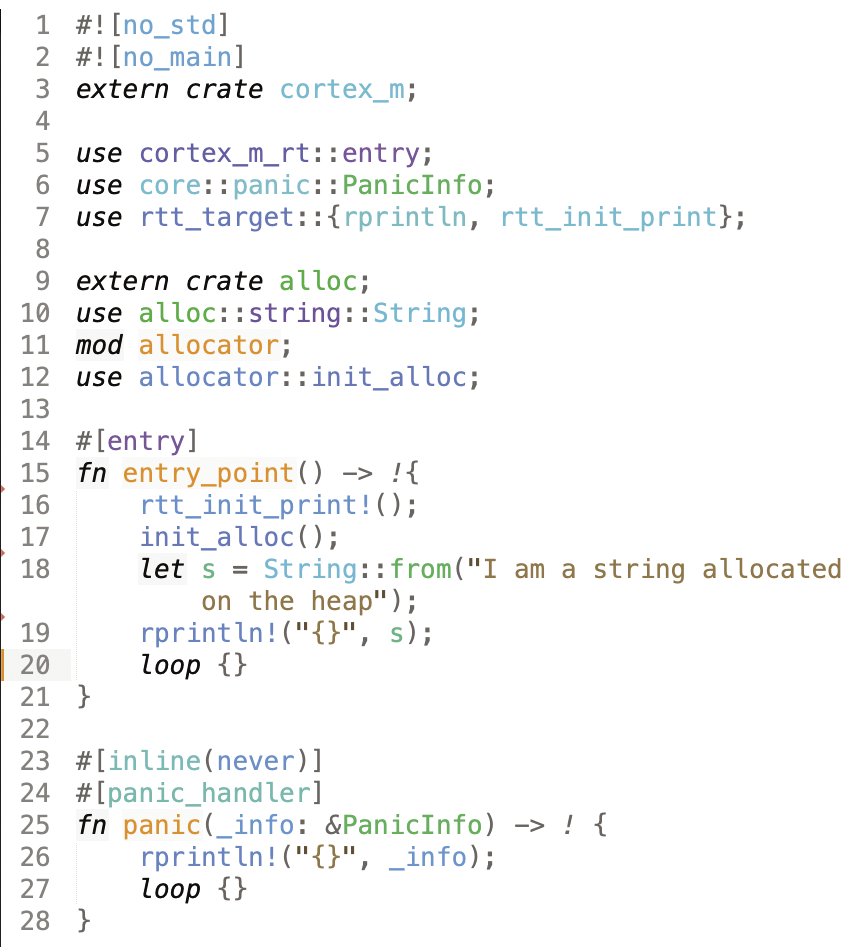
main-11.rs).heap start: 0x10000000
heap end: 0x10008000
heap initialised
alloc request of 35 bytes
I am a string allocated on the heapThis shows that the heap is located at the correct memory location, and each allocation is logged as it happens. If you restrict the size of the heap and try to over-allocate from it, you’ll get a panic, so at least the allocator will not die silently or corrupt data.
It’s important to note that variables are normally allocated on the stack. Some data types have new() factory methods, but the name is a little misleading as they don’t work in the same way as in C/C++. For instance,
struct Test {
data : u32
}

impl Test {
fn new() -> Test {
Test{data: 0}
}
}
simply returns an instance of Test on the stack that will be lost when it goes out of scope. Stack overflow is not addressed by the Rust language and remains a problem for embedded systems. The usual approach is to pre-fill the bottom of the stack with a known (canary) value and periodically check if that value has been overwritten (see stack-check.rs).
Wrap Up
I've shown how to write an embedded Rust program, load it to a device, and check that it runs. I’ve also covered Rust crates that assist with setting up the I/O peripherals, as well as shown how to catch and deal with Rust panics and, with RTT in place, report back problems to the host.
In production, a panic could log an error and reboot for, say, an illegal array reference. That’s preferable to the situation in C/C++, where these references might go undetected, corrupting data or causing other unwanted behavior. If your device is networked in any way, it presents an attack surface to potential bad actors, and here all the checks that Rust provides become even more valuable.
The current downside in adopting Rust is that it’s potentially a lot more work to build an equivalent application. Crates.io offers many helpful libraries, but they are not all highly developed. Vendors of sensor chips and the like will often provide drivers, but only in C/C++. So you have to either rewrite them in Rust, if that has not already been done, or use the mixed language facilities I have described. The more you do this, of course, the less effective the use of Rust will be in eliminating that class of bugs that occur in C/C++ code. Consider for example, a driver for an LTE (mobile) module, written in C/C++, a TCP/IP stack, and an SSH server, which might make up a communications feature for a remote data collector. It’s unlikely right now that you would find complete implementations of all of that in Rust, whereas in C/C++ you would have several to choose from. So, you would have to either write a large chunk of your application from scratch in Rust or settle for the mixed-language solution.