A beautiful web radio for a living room music system
An LCD in an unusual format, a self-designed housing, and matching software make a simple Raspberry Pi web radio the perfect centerpiece for any living room.
Special projects deserve special components, which is why a display with unusual dimensions acts as the basis for my living room music system. However, the path to the final version was fraught with challenges.
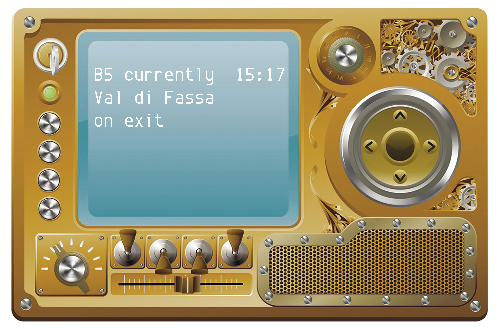
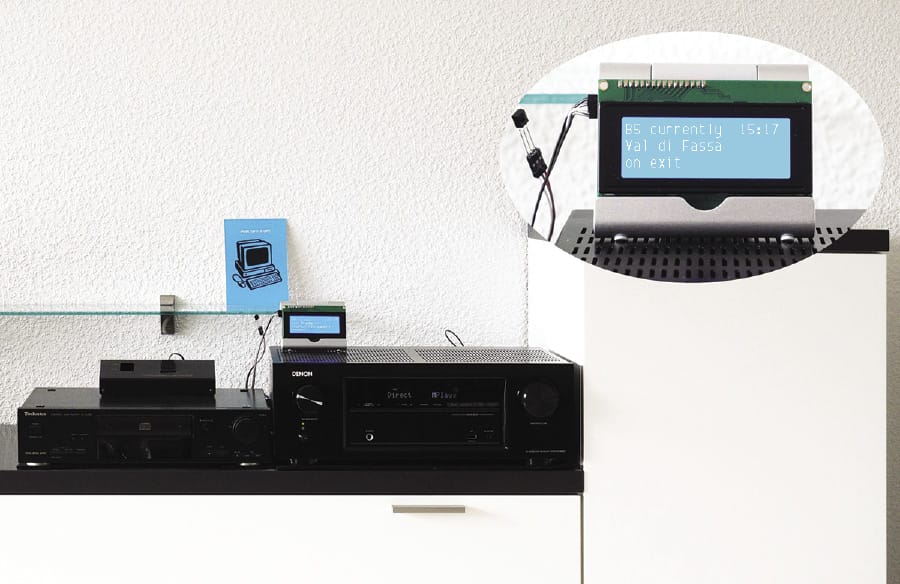
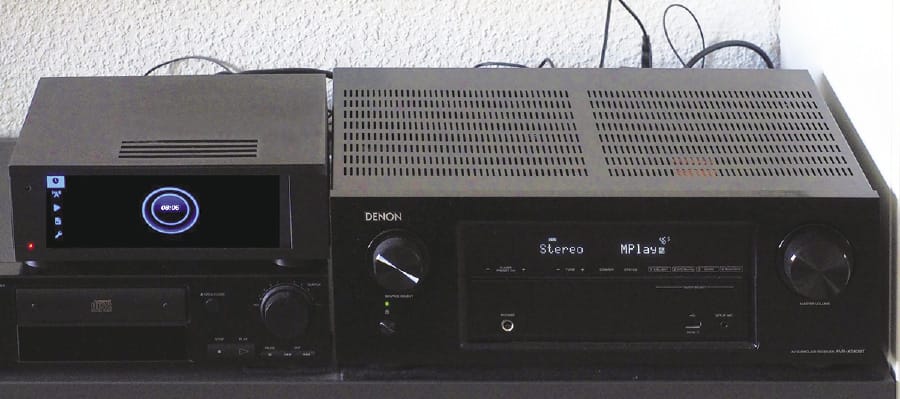
A web radio based on a Pi Zero (Figure 1) came to life in 2018 as a lightweight tinkering project with a keyboard, mini-speakers, and a small LCD screen. Now, however, it has found a permanent place on my audio/visual (AV) receiver (Figure 2). Today, it is no longer controlled by a keypad, but by an infrared remote control. This solution works well, but it has one obvious drawback: The display is simply too small for couch potatoes.

Therefore, a new version of the project has been in the pipeline for quite some time but has failed to materialize thus far because of the available display alternatives. In contrast to the current solution, which simply wires the display, the IR receiver, and the Pi Zero with a few jumpers, I wanted the next version to match the existing device landscape in terms of appearance. However, large displays have had a fairly off-putting format until now, and so the project didn’t really get off the ground.
Rare Beast from Waveshare
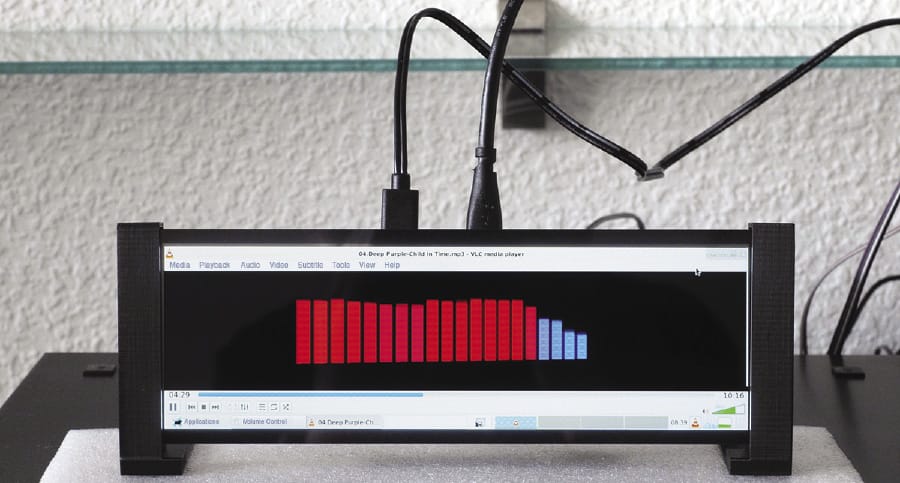
This situation changed all of a sudden when Waveshare launched a touch-enabled TFT display with a 1280x400-pixel (px) resolution (Figure 3). Waveshare is well known in the small-board computer (SBC) scene, because the company provides displays in many different sizes, not just for the Raspberry Pi, and it has good support in the form of a wiki and various GitHub repositories. The price of the display is a bit steep at EUR110 (~$126), but it promises to be an eye-catcher.
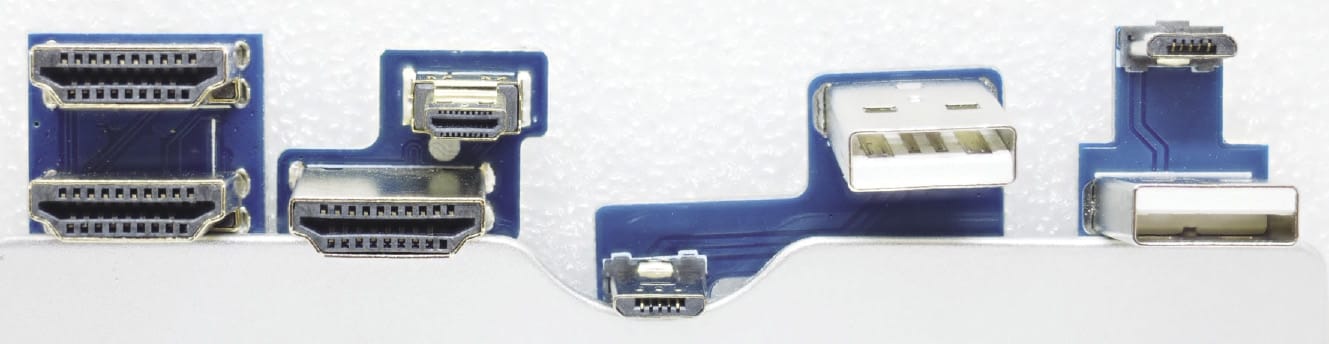
The package includes the display with an aspect of 19.1x6cm² (7.5x 2.3in²), some spacer bolts, a normal HDMI and USB cable, and various special adapters (Figure 4). The display’s bezel is 8.35mm (3.3in) wide on the left and right, but only 4.7mm (1.85in) at the top and bottom.
Thanks to the adapters, you can install an SBC directly behind the display; they support the Raspberry Pi 3 and 4 and the Jetson Nano. The installation is a bit tricky, because the adapters would have to be precision built for everything to fit – and they are not. In the end, mounting the Raspberry Pi with screws or spacer bolts proved to be the best solution, leaving a bit more space for the HDMI and USB adapters.
The display draws its power from the computer over USB; alternatively, it can be connected directly through a micro-USB socket. The touchscreen also uses USB and does not require a driver installation. The screen outputs its sound with a 3.5mm jack. For this to work, the Raspberry Pi has to switch the sound to the HDMI 0 output.
The display’s moderate power consumption is not a problem for the intended use. Even with the VLC media player running and visual effects enabled (Figure 3), the power requirement of a Raspberry Pi 4, including the display, is only 1,100-1,500mA. However, even the fourth generation of the Raspberry Pi has not yet learned how to turn off its peripherals after shutdown, which means the system still consumes 250mA when switched off. Although not much, it is annoying because it is so unnecessary. The system could not be marketed as is, because devices are only allowed to consume 0.5W in standby in most countries.
Gearing Up
The display works with a normal Raspberry Pi OS, but its unusual dimensions necessitate a number of settings, which the device wiki describes quite well. The (slightly adjusted) configuration of the first HDMI interface from the settings in the /boot/config.txt file is:
[HDMI:0]
hdmi_group=2
hdmi_mode=87
hdmi_timings=400 0 100 10 140 1280 10 20 20 2 0 0 0 60 0 43000000 3
display_rotate=3
The default orientation of the display is vertical; the display_rotate parameter changes that – but only for the pixel output, not for the touch orientation, which has to be done by the X server (more about this later).
Because the Raspberry Pi 4 has two HDMI outputs, all special configurations for the 19.1cm display are below the [HDMI:0] filter. You can easily connect a normal display to the other HDMI port and set up the computer this way. The 400px height of the Waveshare screen is not enough for some dialogs; the OK and Cancel buttons often disappear irretrievably at the bottom of the screen.
Later, when used as a web radio, the second HDMI port is not connected to a screen at all, but to the AV receiver. More settings are then needed:
[HDMI:1]
hdmi_group=1
hdmi_drive=2
hdmi_force_hotplug=1
hdmi_ignore_edid=0xa5000080
hdmi_force_edid_audio=1
hdmi_ignore_cec_init=1
config_hdmi_boost=4
In particular, they ensure that the output is configured correctly for audio output, even if the receiver is not yet running.
You can correct the touch orientation from the /etc/X11/xorg.conf.d/40-libinput.conf configuration file. Add a new Section with the lines from Listing 1 (to match the rotation from /boot/config.txt). The X server’s input framework then controls the orientation with CalibrationMatrix. The Waveshare wiki provides the correct values.
Listing 1: Touchscreen Configuration
# Match on all types of devices but joysticks
#
[...]
Section "InputClass"
  Identifier "libinput touchscreen catchall"
  MatchIsTouchscreen "on"
  Option "CalibrationMatrix" "0 -1 1 1 0 0 0 0 1"
  MatchDevicePath "/dev/input/event*"
  Driver "libinput"
EndSection
[...]
The Raspberry Pi 4 offers three options for the sound output: analog output through the jack socket and two digital outputs via HDMI. The commands
$ pactl set-default-sink 1
$ pactl set-card-profile 0 off
$ pactl set-card-profile 2 off
give you the correct configuration for the PulseAudio version used by Pi OS as the default. You can also do this in the graphical user interface (command pavucontrol), but it is not so easy on the touchscreen. Annoyingly, many applications remember the output channel you use, so it is important to set up the configuration as early as possible.
With a working screen and sound output, the purely technical side of commissioning is now finished, but a nice screen with a mess of tangled cables is not something you would want in your living room.
In the Box
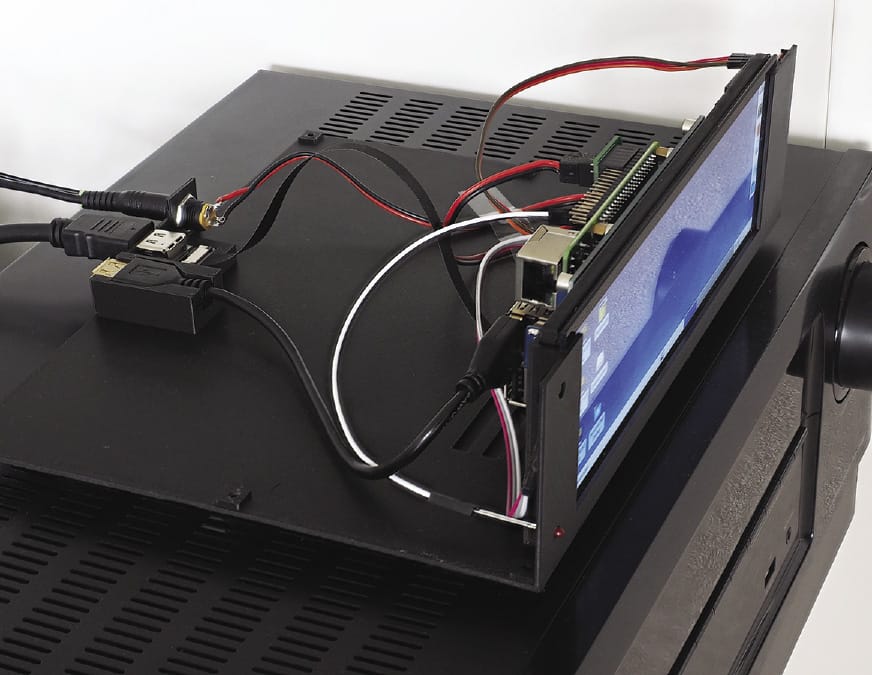
One of my goals for the project was, as I said earlier, to create a device suitable for the living room. And that means investing in a case; because I have access to a 3D printer, this is theoretically not a big problem. However, some pitfalls lurk compared with the basic setup of the operating system, as you can easily see from Figure 3, where the power connector and the HDMI cable for the sound output are jutting out vertically from the screen.
Preferably, all of the Pi’s ports would be on the back of the case, but because USB and HDMI ports have to be installed “inside” the display, this is not possible by design. The problem has been around since the very first Raspberry Pi, independent of the Waveshare display. A Raspberry Pi in a larger case always makes for a tricky install, because the important ports (if you count the SD card) are distributed over three sides.
Fortunately, some simple solutions are available. For example, I have never had a microSD card die on me. Once installed, it just gets on with its job and does not need to be accessible from the outside. Moreover, the LAN is not needed for the web radio, but if you do need the connection, simply buy a network coupler for a little money. On the inside, you need a short patch cable to the coupler.
The power supply is easy to solve, because you can also power a Raspberry Pi over pins 2 and 4 (5V) and 6 (GND), bypassing the built-in protection mechanisms with acceptable risk. Depending on your preference, a micro-USB, USB-C or barrel jack is then connected to the back of the case, which you connect to the pins with cable on the inside.
When it came to USB, I decided to go for a mini-extension (plug to socket) on the back of the case. Because this presents four USB ports, two are free for other purposes (e.g., an internal hard drive). A socket at the front wouldn’t be bad either, but the 3D printer I have access to doesn’t give me the scope to do that; the screen itself is 19cm wide, and with 3cm of margin on each side, this fully utilizes the printer’s available width. In Figure 5, you can see the chassis base plate with the connectors.
The second HDMI port ultimately turned out to be the biggest challenge. It is only possible to route the cable out neatly to the back with a suitably angled plug. Because I have a Bluetooth-enabled receiver, I don’t actually require the connection to send tracks, but the Raspberry Pi has never had a reputation for a stable, automatic Bluetooth connection, which is why this solution is a backup at best.
Finally, I found what I was looking for on BerryBase: HDMI cables that you can assemble yourself, including sockets and plugs and even angled versions (Figure 6). A regular socket was attached to the other side of the ribbon cable, but it does not have mounting holes. Precise 3D printing dimensions without play then ensure that the jack is held to the back of the case. The construction does look a bit untidy, because the ribbon cable is not shielded at all. My Denon receiver, which is otherwise extremely sensitive and refuses to cooperate with various cables, fortunately had no problem with that.

Finishing Touches
A button on the case for the on/off switch would not be a bad idea and is not much trouble if you are happy with something basic. The solution is simply to connect a button to GPIO3 and GND and add the line dtoverlay=gpio-shutdown to /boot/config.txt. Of course, this minimal version does not resolve the problem of standby power draw, but if you have a switchable power strip anyway, this worry can also be avoided.
Besides the button, the case also has an infrared receiver and a power LED. Both are optional, but useful, especially because my existing web radio software already supports the infrared remote control. In the meantime, the push button has been replaced by a touch sensor, but the interaction with GPIO3 then only works with an inverter in the middle.
All in all, the case design consumed a lot of time, and because of the size, the Prusa MK3S 3D printer I used also reached its limits. For example, printing takes up almost the entire area of the print bed (20x25cm of 21x25cm), so I had problems with warping at the corners – the bed heater doesn’t work optimally at the edges. Printing the two case parts took more than 10 hours each. Thanks to targeted test prints of critical parts, however, one print run each was sufficient for the final version.
I provide full details of the system configuration and the case models in my project repository, but because of the tight tolerances and matching to the available components, anyone who wants to take on the design certainly has some work ahead of them.
Software
The hardware is now neatly configured and has found an attractive home. Next, I introduce the software for the web radio, with some adjustments that not only concern the change from a 4x20cm display to the large Waveshare screen, but that also relate to basic operation. After all, the idea is not only to operate the web radio from the touchscreen in the device itself, but to use a matching remote and a fancy web interface.
The software presented here, although intended for the luxury living room appliance (Figure 7) with Waveshare’s touch-enabled widescreen, also does its job independently of this particular hardware. Implemented in Python, it runs on any Linux system, from desktop to Pi Zero. With a few minor hacks, it should also be possible to run the program on Windows; the only requirement would be a working audio configuration for the sound output.
Before I get started with the installation and configuration, I’ll take a look at some of the technical details of web radio.
The Longest MP3 in the World
Web radio, aka Internet radio, transmits (streams) a seemingly infinite MP3 file over the Internet. Instead of storing the file and then playing it back, the player accepts the stream directly and plays the audio data.
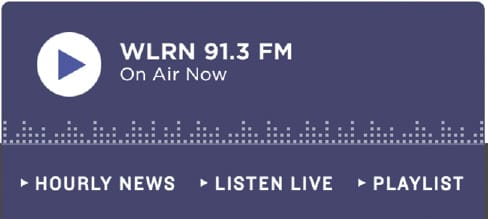
The player software can therefore be anything that calls up URLs and plays the received data directly, especially a web browser. Because virtually every radio station is now available on the Internet, you will often find a button for live playback of a program displayed prominently on the site (Figure 8).
The simplest web radio comprises a device with a browser (e.g., a retired smartphone) and a collection of links to your favorite stations. You don’t even have to compile and maintain the link collection yourself because many portals on the web take care of this detail and also offer apps for iOS and Android. Because many AV receivers can also receive music as a Bluetooth stream, an almost complete solution in the simplest case is for the smartphone to pass the received stream to the receiver by Bluetooth.
Totally Happy?
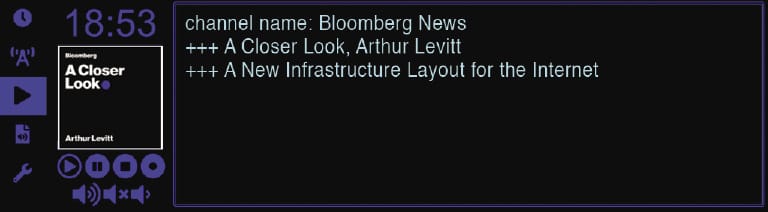
The solution outlined above has some disadvantages. First, portals look to earn money and therefore regularly treat users to advertising spots. Second, many stations also transmit interesting additional data about the tracks and artists, which a plain vanilla music player does not reproduce (Figure 9). Thirdly, the portals usually offer only very limited options for recording their programs.
In principle, the solution consists of its own collection of links that bypasses portal and station websites and taps directly into the music source. Everything else about program logic is only for convenient control and navigation, as well as the appealing display.
A little research on the web turns up a number of web radios for the Raspberry Pi. The most comprehensive collection is provided by a web radio connoisseur named Bob Rathbone. Besides the software, the project provides a 340-page document that explains the installation and configuration of various hardware and software components on the Raspberry Pi down to the minutest detail. Even if you have never owned an SBC like this, you can build a web radio without any problems, provided you separate the wheat from the chaff, which is not so easy.
However, Rathbone’s solution relies on difficult-to-install software with a less than appealing interface, which ultimately pushed my decision in favor of designing a DIY solution.
Installation
For an initial test you will want to use a new, freshly installed Raspberry Pi OS – make sure you have the latest version (at the editorial deadline, this was “Buster”). A Pi Zero with the Lite version is perfectly okay for the project, unless you want an additional screen for the browser, as in the living room radio presented here. You also need the normal desktop version of the operating system and at least a second-generation Raspberry Pi, preferably later, because the graphical interface on the earlier versions is a little rough.
The installation commands are as follows:
$ sudo apt-get -y remove pulseaudio
$ git clone https://github.com/bablokb/pi-webradio.git
$ cd pi-webradio
$ sudo tools/install pi
$ sudo systemctl enable pi-webradio.service
$ sudo systemctl start pi-webradio.service
You only need the first call for desktop systems, because PulseAudio, which is installed there by default, does not support audio output from a background service. If the default user on your system is not named pi, you also need to add the appropriate user to the installation command (command 4), who needs to be a member of the audio group and have sudo rights. After the install, activate and start the service (last two commands). After doing so, you can access the web controls in a browser.
To get a landscape aspect, I optimized the responsive interface. On typical desktops, smartphones, and tablets, the system can be operated in portrait format without any problems. By the way, the web server built into radio software delivers exactly one web page to the browser once only. After that, the server and browser only exchange small blocks of data; the web browser takes over the display completely, ensuring that the server part of the software will run without problems, even on SBCs like the Pi Zero. A few details relating to the technical implementation can be found in the “Under the Hood” box.
The Pi web radio software is based on Python 3 and uses the
mpg123 command-line tool to play the audio data. The program provides a remote control mode with the -R option. You can easily try this out by callingmpg123 -Rat the command line and then typing h – the program will then display all commands.
The web server used here is Flask, a micro-framework that goes about its task in many Python application servers. The web radio uses only a few of its functions, because the web server just passes API calls like
radio_play_channel to the appropriate Python class, of which there is only one per task (e.g., Radio, Player, or Recorder). Some auxiliary classes are available, as well.The web interface uses CSS3 and JavaScript; jQuery acts as an auxiliary library. The application doesn’t go all out to support all possible browsers, but today’s crop of web browsers all offer what it takes.
Configuration
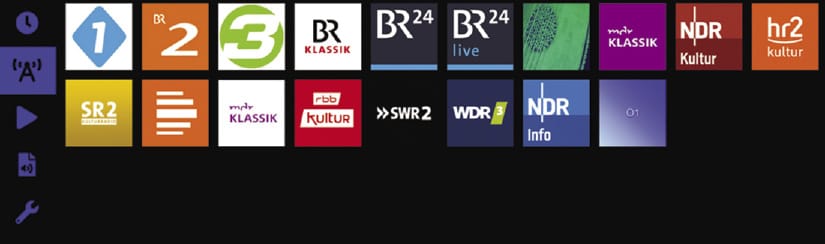
By default, the tool already supports a number of German stations, but for copyright reasons you do not get to see the station logos on launch (Figure 10). The broadcasters probably don’t care, but dubious lawyers take every opportunity to earn money, and I don’t want to give them any reason to sue me. It takes some configuration work to make the web radio serve your musical tastes and also present the station selection in a visually appealing way.
The channel list itself can be found in the /etc/pi-webradio.channels file. It stores the name, a URL, and a logo (without path) for each channel. After clicking on the desired station, you can download and save the logos by right-clicking. The files in JPEG or PNG format belong in the /usr/local/lib/pi-webradio/web/images/ directory; you then need to enter the names of the logo files in the station list.
You need a bit more detective work for a broadcaster’s URL, because not all broadcasters publish them, and those that do obfuscate the info as well as they can on their websites. The IT horizon of some broadcasters obviously does not go beyond their own web presence. If you can’t find the URL despite an intensive search, you can still use the developer tools in your browser. First, navigate to the radio station page that supports live listening, but do not click the play button.
First launch the developer tools from the menu or by pressing F12. Another window opens, in which you navigate to the Network tab. Then press the live play button. The page now fills with all the URLs that the browser retrieves (Figure 11).
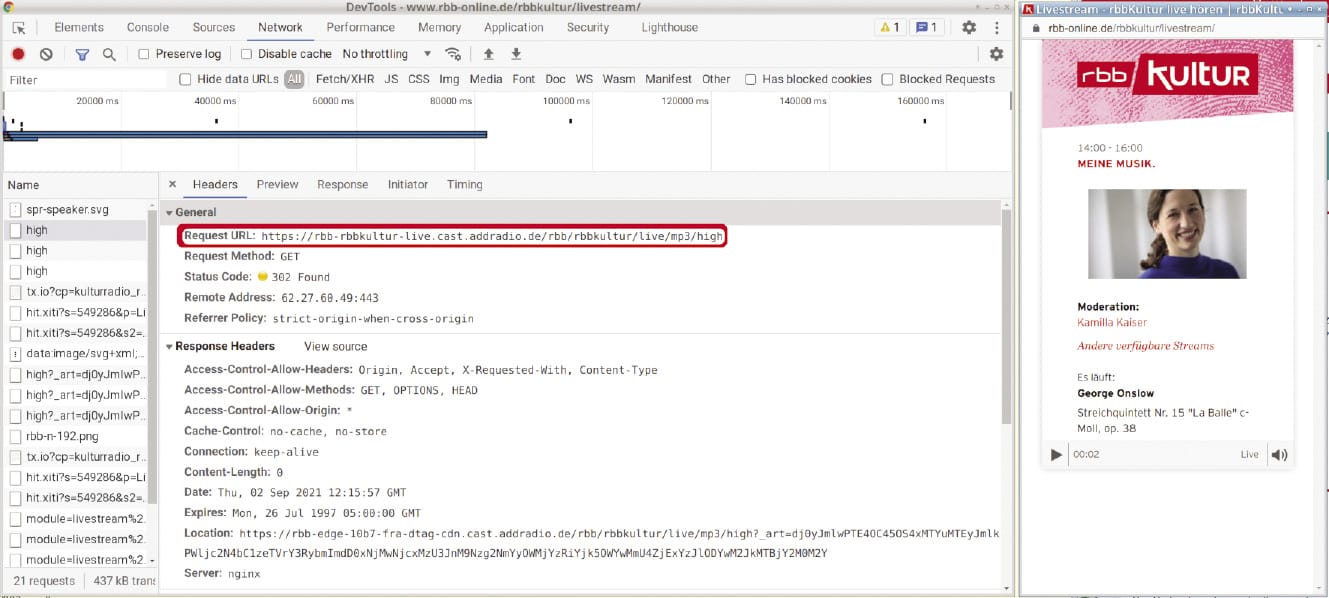
When you get there, search for a URL containing mp3, m3u, stream, icecast, or shoutcast. The list is not exhaustive, but almost always takes you to the target. Copy the URL and start the playback with mpg123 <URL>. The mpg123 playback program does not handle encryption, so you need to replace a leading https in the URL with http up front. If you enter the correct URL, you should now hear the station playing. Press Q to cancel the playback.
Besides the /etc/pi-webradio.channels file, in the /etc/pi-webradio.conf configuration file you can change the port for the web server (default=8026), for example, or specify the directory in which you will be storing any recordings.
Operation
After configuring the stations, restart the service by typing,
sudo systemctl restart pi-webradio.servicethen navigate to the address http://<Host>:8026/ in the browser. If the browser runs on the same system as the service, replace <Host> with localhost; otherwise, enter the IP address or name of the corresponding Raspberry Pi.
Operating the web radio is largely self-explanatory. On the left side, icons let you toggle the time, player, station selection, file selection, and tools views (see Figure 9). The Tools page is where you can stop the application, reboot, or shutdown the system. The File selection lets you play MP3 files.
The application can also record broadcasts on the fly if you press the Record button (far right in the buttonbar below the station logo). The recording will then run as long as you specified in /etc/pi-webradio.conf. In addition to spontaneous recordings, web radio also supports scheduled recordings, even independent of the Pi web radio service. To do this, install the at package and schedule the recording with a one-liner:
# echo /usr/local/bin/pi-webradio.py -r 4 120 | at 20:00 31.10.2021
The command records channel 4 for 120 minutes. The at daemon takes care of starting on time. The atq command will show you the recording queue, and atrm <number> lets you delete jobs. You might want to define regular recordings in the crontab or as systemd timers if you prefer a more modern approach.
Challenges
An integrated solution with a server and browser on one system (Figure 7) poses a few additional challenges. First, is the issue of starting the browser as an application (i.e., without the usual frames, menus, and buttons of a normal web browser). Also, you want the program to launch in kiosk mode, which prevents the user from exiting; for example:
$ chromium-browser --app=http://localhost:8026/ --kioskTo run the browser at boot time, copy the desktop file from Listing 2 to the $HOME/.config/autostart/ directory. The name does not matter, but the file needs the .desktop extension. The call to the browser is scripted in line 4; the script also terminates the browser later when you stop the radio server from the Tools page.
Listing 2: Desktop Autostart File
01 [Desktop Entry]
02 Name=Pi-Webradio
03 Comment=Webclient (Chrome) for Pi-Webradio
04 Exec=/usr/local/bin/webradio_chrome.sh
05 Terminal=false
06 Type=Application
07 StartupNotify=false
08 X-GNOME-Autostart-enabled=true
Another challenge is to hide the mouse cursor. To do this, you need the unclutter package, which takes care of the appropriate call in the startup script. The script also disables any power-saving options that would cause the screen to switch off.
Alternative Hardware
Not every piece of hardware in the Raspberry Pi universe is suitable for a web browser, which is why the Pi web server also provides a simple web API for control. The program webradio_cli.py allows complete control from the keyboard – or remotely, if desired.
The project also provides a minimalist control program for Pimoroni’s Pirate Audio HATs with four buttons and a miniscreen (Figure 12). The HATs are available in different versions, among others with mono speaker or with headphone output. All variants come with a 240x240px screen and four buttons.
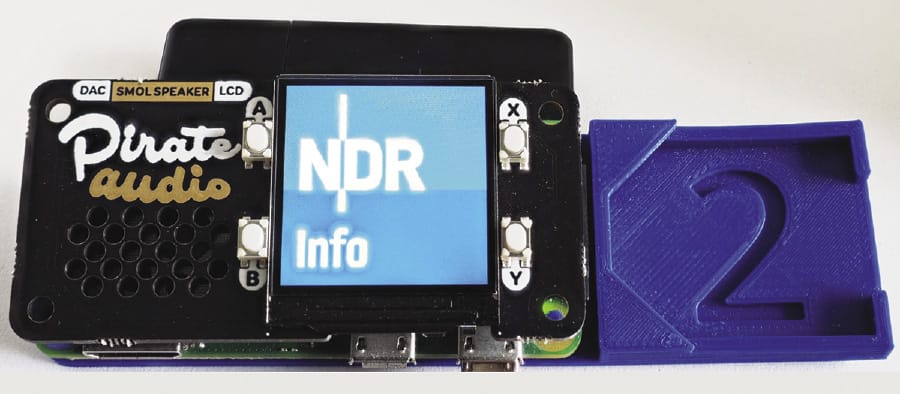
Again, the server and the client run on the same hardware. The client monitors the four buttons and uses them to change the station and volume. The display shows the logo of the current station. If you change the station from the web interface (e.g., from a smartphone), the client also notices this and updates the image.
The program for the Pirate HAT is a good starting point for DIY projects with other hardware, such as classic 4x20cm LCDs. More info can be found in my project repository.
Conclusions
Today’s displays are increasingly coming with HDMI connections, even in small form factors, which not only simplifies configuration, but future-proofs your projects, because they do not require any manufacturer-specific special drivers. The touch feature also works without any worries thanks to the Raspberry Pi’s comprehensive set of drivers.
Because of its special format, the Waveshare display presented here is suitable for more than use as web radios. It also cuts a fine figure as a control panel, oversized remote control, or system monitor. In the case of the web radio project, however, the experience is typical of the Raspberry Pi: The peripherals often cause you more work than the actual hardware. Whether the Raspberry Pi or the monitor, the building blocks are not developed with a big picture in mind. Thanks to 3D printing technology, though, it is now far easier to create a suitable case than it used to be.
The Pi Web Radio software itself is quick to install and get up and running. If you value a special appearance, a bit more work is involved – the device shown in Figure 7 kept me busy for several months. On the website run by Bob Rathbone, which I mentioned earlier, you will find a gallery of neat looking radios as inspiration for your own hardware projects.