
Turbocharge your ebook reader with KOReader
KOReader offers enough features to give your humble ebook reader new powers and completely transform your reading experience.
At first sight, KOReader looks disappointingly bare bones. But behind its unassuming interface hides a powerful application with an impressive array of features, from extensive gesture support to a built-in SSH server. Combined with a handful of hacks and a bit of creative thinking, you can use KOReader to unlock the full potential of your ebook reading device.
Installing KOReader
Although KOReader is available as an Android app and a Linux desktop application, its natural habitat is e-ink devices. How you install KOReader depends entirely on the ebook reader you have. Fortunately, the project’s wiki provides detailed installation instructions for all supported devices. Normally, installing KOReader requires copying files in the appropriate directories in the ebook reader’s filesystem, so the process requires neither deep technical knowledge nor effort.
First Things First
While KOReader comes with sensible defaults, there are several settings you’ll want to tweak for an optimal reading experience. The first thing to do is add custom fonts to KOReader, which is a rather straightforward affair. KOReader supports TrueType fonts (TTF), so all you have to do is to copy a folder with .ttf files to the koreader/fonts directory on the ebook reader. To enable any of the added fonts, open KOReader, tap on the upper edge of the screen to open the top bar, and choose Document | Font (Figure 1). To set the desired font as the new default, long tap on the font’s menu entry and tap the Set as default button.

Long tap on a configuration option prompt to set it as default. For example, long tap on the desired value of the Line Spacing option in the bottom menu, and tap Set as default. Speaking of the bottom menu, by default, activating the top bar also opens the bottom menu. While it’s probably meant as a convenience, it becomes a nuisance rather quickly. To disable this option, open the top bar, choose Settings | Taps and gestures | Activate menu, and disable the Auto-show bottom menu option (Figure 2).

By default, when you launch KOReader, it opens the file manager, so you have to manually select the book you want every single time you launch KOReader. Making KOReader automatically open the last viewed book when the application starts is more practical in most situations. Open the top bar and switch to the file manager. Tap on the top header to open the main menu, switch to the file manager section, and select Start with | Start with last file.
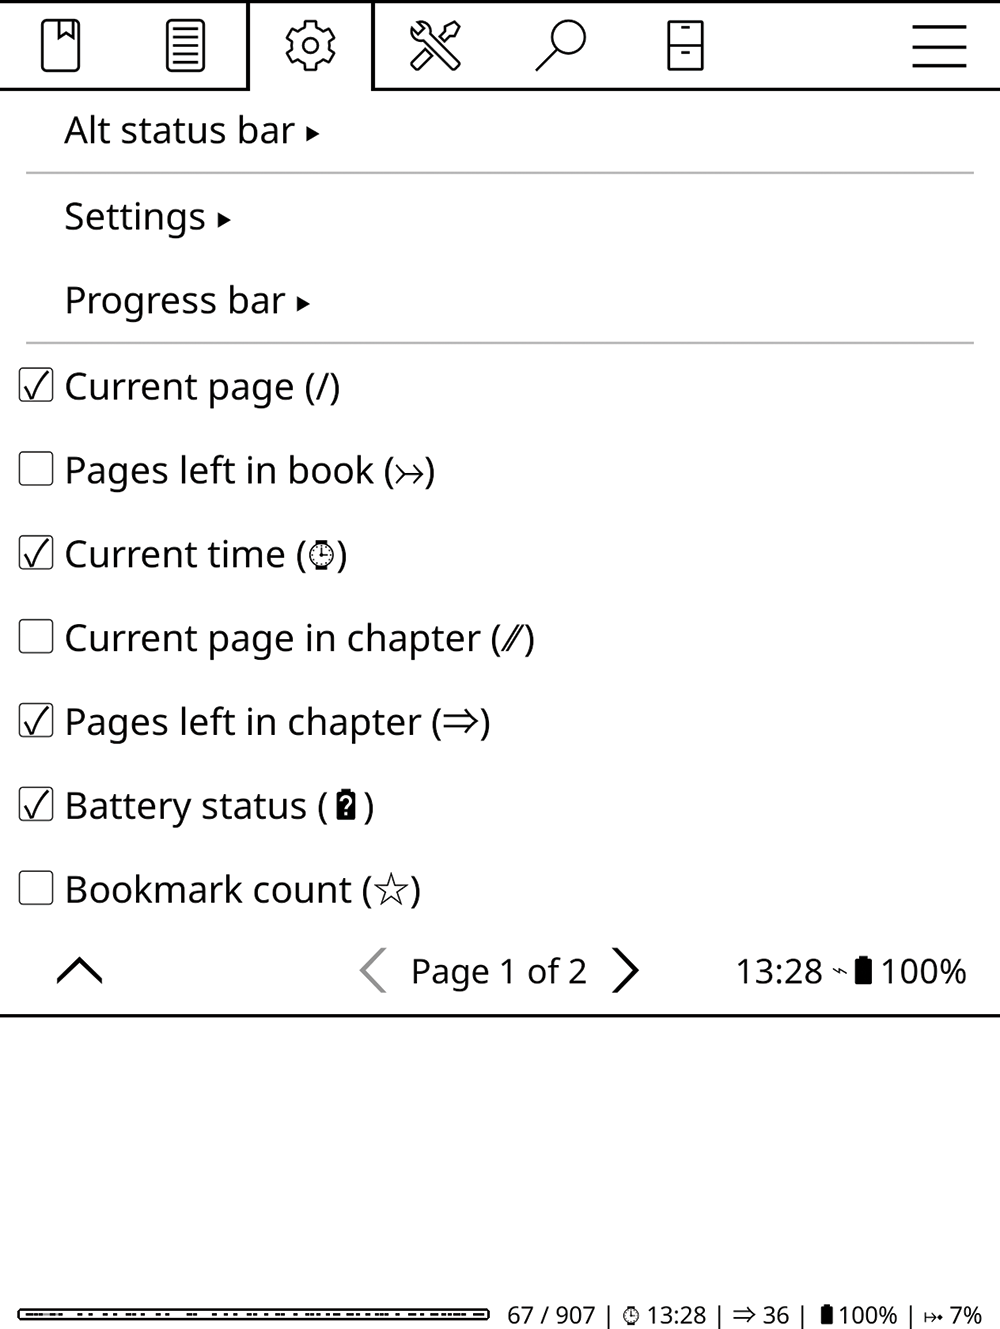
The status bar at the bottom of the screen provides useful information, such as reading progress, time, etc. By default, you can cycle through the available views by tapping on the status bar. But you can also squeeze all the information you find useful into a single view. To do this, open the top bar, choose Settings | Status Bar | Settings, and enable the Show all at once option. Return to the Settings | Status Bar menu and toggle the desired options (Figure 3).
While an e-ink display doesn’t require a screensaver, there is nothing wrong with replacing the plain Sleeping message with something more informative, such as the current book along with your reading progress. Open the top bar, choose Settings | Screen | Screensaver, and enable the Use last book’s cover as screensaver option. Enable Add message to screensaver, then choose Settings | Screensaver message, and specify the Page %c of %t message to show the current and total page count (Figure 4).

Going Further
With the basic settings sorted out, it’s time to explore what else KOReader has to offer. Using KOReader’s profiles functionality, you can create multiple reading configurations and quickly switch between them. For example, you can create a dedicated profile for night reading, with specific front light settings (brightness and color temperature), night mode enabled, etc. And you can create a daytime profile with both the front light and night mode off. To create a profile, open the top bar and choose Tools | Profiles | New, configure the desired settings, and you are done. To enable the created profile, long tap on it.
Like any reading application worth its salt, KOReader supports highlights, and it can export them as HTML, JSON, and plain text files. If you happen to use Joplin as your preferred note-taking application, you’ll be pleased to learn that KOReader can push highlights directly into it. The initial setup process requires some work, but once it’s done, transferring notes to Joplin is easy.
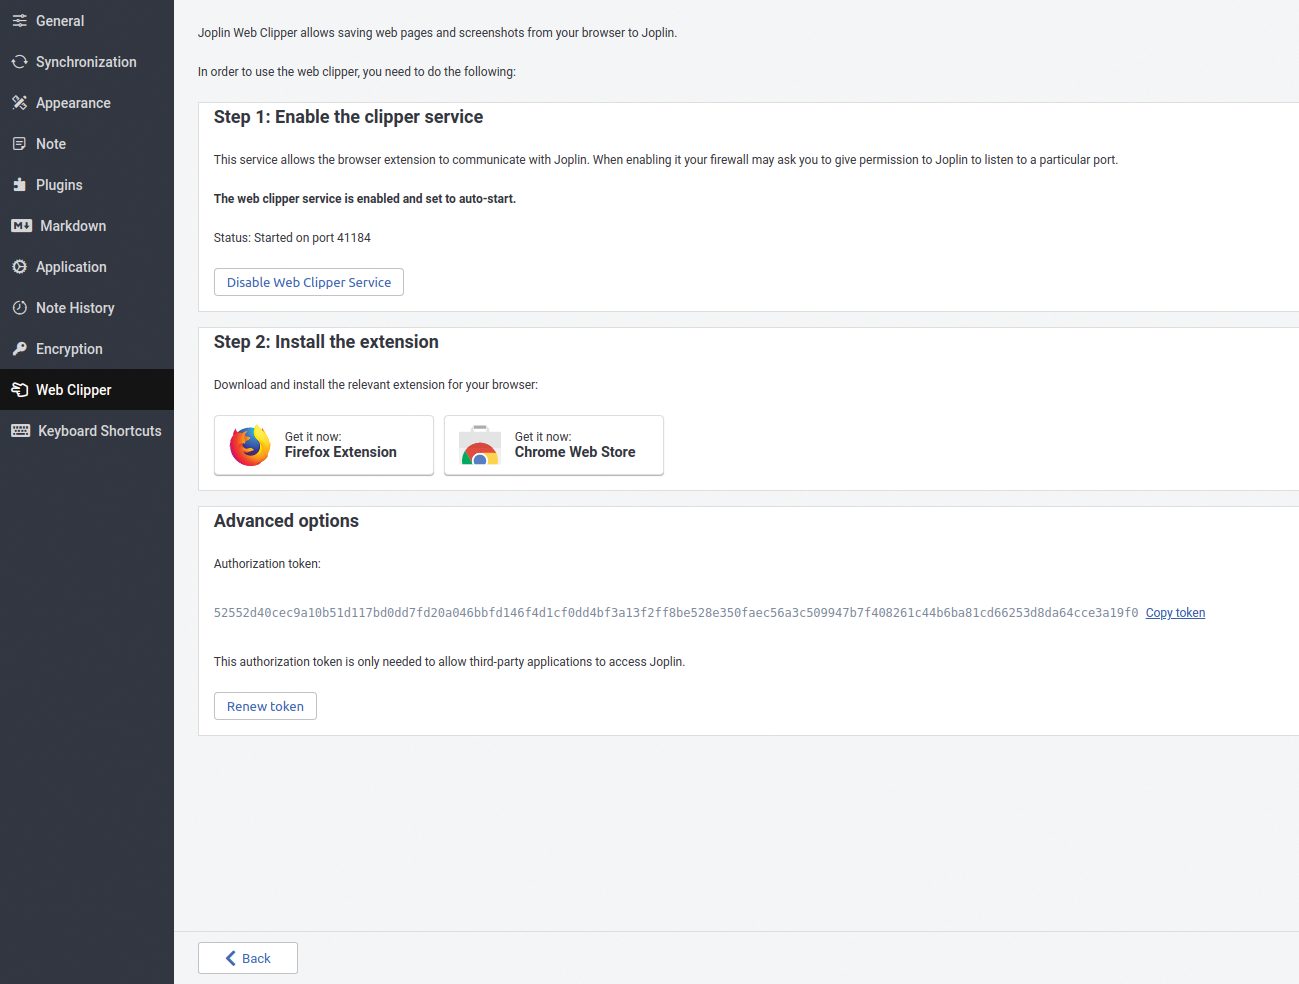
First, you need to configure Joplin. Launch the application, choose Tools | Options, and switch to the Web clipper section. Press Enable Web Clipper Service and copy the automatically generated authorization token (Figure 5). Leave Joplin running.
Install the socat package. To do this on Ubuntu and Linux Mint, run the command:
sudo apt install socatConnect your e-reader to the machine, enable Start USB storage in KOReader, and open the koreader/settings.reader.lua file for editing. Locate the ["exporter"] section and add the following entries to it (replace 127.0.0.1 with the actual IP address of the machine running Joplin, and replace authorization_token with the copied token):
["joplin_IP"] = "127.0.0.1",
["joplin_token"] = "authorization_token",
["joplin_port"] = 41185,
["joplin_export"] = true,
Save the changes and safely disconnect the e-reader. On the machine running Joplin, open the terminal, and run the following command:
socat tcp‑listen:41185,reuseaddr,fork tcp:localhost:41184
In KOReader, open the top bar, choose Tools | Choose formats and services, make sure the Joplin option is enabled, and tap either Export all notes in this book or Export all notes in your library.
Unlike any other available ebook reading applications, KOReader comes with a built-in SSH server. Enable it, and you can connect to your ebook reader from any machine on the same network. Not only can you move books to and from the device, but you can also have full access to its filesystem. To enable the SSH server in KOReader, open the top bar, switch to Settings | Network | SSH Server, enable the Login without password option, and start the SSH server.
Once the SSH server is running, KOReader displays a dialog with connection information. Note the IP address of the e-reader. Using a machine on the same network, establish an SSH connection to the e-reader using the following command (replace 127.0.0.1 with the actual IP address of the e-reader):
ssh ‑p 2222 root@127.0.0.1
On most Linux distributions, the default file browser can handle the SSH and SFTP protocols. So you can access the e-reader’s filesystem by specifying its address in the location bar of the file browser. For example, ssh://root@127.0.0.1:2222.
The easiest way to connect to KOReader via SSH is to enable the Login without password option. The easiest approach is also the least secure one, as anyone on the same network can get root access to the e-reader. So it’s a good idea to allow SSH access only to authorized devices. To do this, you need to generate an SSH key pair on the device you want to connect from to your e-reader.
To generate an SSH key pair on a Linux machine, run the ssh‑keygen command in the terminal. Follow the prompts, but skip specifying a passphrase. Run the command
cat .ssh/*.pub
and copy the key. Connect the e-reader to the machine and create the authorized_keys file in the koreader/settings/SSH directory. Open the file for editing, paste the copied key in it, and save the changes. From now on, you don’t have to enter a password when you connect to the e-reader from the authorized machine.
Backing Up KOReader’s Data
For each book, KOReader creates a metadata file that contains book settings, notes, current position, etc. While you can sync the current position and export notes, it also makes sense to keep a backup of all the important data. To make it easier to manage both the content and metadata, use a dedicated directory on your e-reader for storing all ebooks (for example, Library). This way, you can back up everything by syncing the directory and its entire contents using rsync. There are two ways to do that.
The simplest approach is to connect the e-reader on a machine that has rsync. Most Linux distributions automatically detect and mount a connected e-reader. Then it’s a matter of running the appropriate rsync command. For example:
rsync ‑avh ‑‑delete /path/to/ereader/Library/ /path/to/backup/dir
Replace /path/to/ereader/Library/ with the actual path to the Library directory on the mounted e-reader and /path/to/backup/dir with the path to the directory for storing backup data.
A slightly more technical but versatile approach is to install rsync on the e-reader so you can run backup operations directly on the device itself. To install rsync on a Kobo device, download and install the KoboStuff package. Launch KOReader, open the top bar, switch to Tools | More tools | Terminal emulator, and tap Open terminal session. Run the rsync command that syncs the content of the Library directory to a Linux machine. Here’s an example command you can use to back up the data to a Linux server running on a local network:
rsync ‑avhz ‑‑delete ‑P ‑e "ssh ‑p 22"
  /mnt/  onboard/Library/ user@127.0.0.1:/path/to/library
Instead of typing long rsync commands using the built-in keyboard, you can speed up the process by adding the desired commands to the koreader/.ash_history file. Alternatively, you can write a shell script to automate the task. Create a text file named backup.sh in the koreader/scripts/ directory and add the following code (adjust the examples as needed):
#!/bin/sh
rsync ‑avhz ‑‑delete ‑P ‑e "ssh ‑p 22" /mnt/ onboard/Library/ USER@127.0.0.1:/path/to/library
rsync ‑avhz ‑‑delete ‑P ‑e "ssh ‑p 22" /mnt/onboard/.adds/koreader/clipboard/ USER@127.0.0.1:/path/to/export
Save the file and make it executable using:
chmod +x /koreader/scripts/up.sh
To launch the script in the e-reader, open the terminal emulator and run the koreader/scripts/backup.sh command.
If you happen to use a second e-reader, and you want to download the saved settings and data, all you have to do is to create a shell script that runs the following commands:
rsync ‑avhz ‑‑delete ‑‑no‑g ‑‑no‑o ‑P ‑e "ssh ‑p 22" USER@127.0.0.1:/path/to/library/ /mnt/onboard/Library
rsync ‑avhz ‑‑delete ‑‑no‑g ‑‑no‑o ‑P ‑e "ssh ‑p 22" USER@127.0.0.1:/path/to/clipboard/ /mnt/onboard/.adds/koreader/clipboard
Every time you run the scripts described above, you'll be prompted to enter the password twice, which can quickly become a nuisance. To fix this, generate an SSH key pair in KOReader, and add the public key to the list of authorized keys on the remote machine.
To generate an SSH key pair, launch the terminal emulator in KOReader and run the ssh‑keygen command. Follow the prompts, but skip specifying a passphrase. This generates a key pair in the /usr/local/niluje/usbnet/etc/dot.ssh/ directory. To make sure that the keys are there, run:
ssh‑agent sh ‑c 'ssh‑add; ssh‑add ‑L'
Copy the /usr/local/niluje/usbnet/etc/dot.ssh/id_rsa.pub file to a Linux machine, and use the command below to add it to the authorized_keys file on the remote server:
cat id_rsa.pub | ssh USER@127.0.0.1 "mkdir ‑p ~/.ssh && cat >> ~/.ssh/authorized_keys"From now on you can run the shell scripts (or any commands and actions that require an SSH connection to the remote machine) without a password.
Wrap Up
You don’t have to stop here, because KOReader has so much more to offer. Dive into its gesture controls, and you’ll discover that you can control practically every aspect of the application via gestures. Once you’ve configured gestures to your liking, explore KOReader’s reading statistics. In short, you’d be hard pressed to find a better and more powerful reading application. And if you are willing to put some effort and time into learning its functionality, you’ll be rewarded with a reading experience you never thought was possible.