Raspberry Pi automated fish feeder
Whether at work or on vacation, every pet lover worries about how to take care of their little roommates in their absence. What aquarium owners need is an automatic feeder.
Aquarium feeders have been around for a long time, but after my recent research, none of the devices really seemed practical to my mind. Very few devices provide feedback about malfunctions, which could be a nasty surprise when you return home. I created this automatic feeder project for my aquarium for peace of mind.
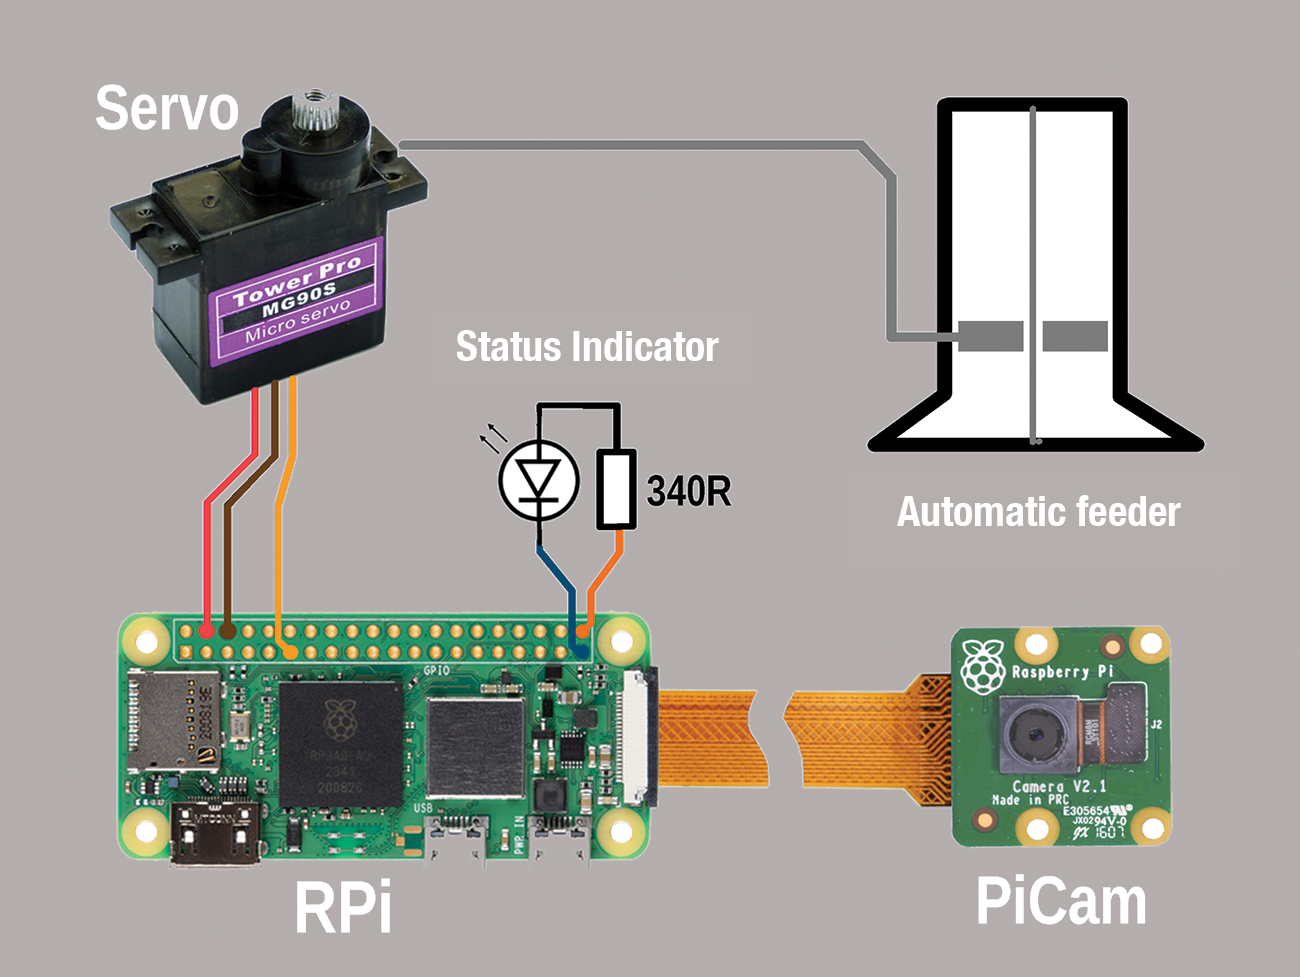
A Raspberry Pi Zero is a good choice as a control center for a fish feeder: It comes with everything you need to control the mechanical system and to grab images with a Pi cam (Figure 1). It is also compact enough to fit in a small housing. Integrating a Pi Zero W with your wireless home network will allow you to post various captured images online while you are on the road.

The goal was a simple setup that was not prone to errors. Therefore, the mechanical control system only uses one small servomotor. The circuitry of the electronics is just as simple. A DIY control system ensures a certain level of convenience. Two feeders add variety and are quite sufficient to bridge an absence of time equivalent to a three-week vacation.
Getting Started
To get the Zero W up and running, you need to download a new Pi OS image and transfer it to a microSD card. After plugging in a screen and keyboard, you can configure the boot options and network settings. With no need for a desktop later, you can choose automatic login over the command-line interface (CLI) and enable the SSH server and the camera interface. After enabling SSH and with wireless access to your home network, you don’t need to connect any peripherals to the Zero W, and you can access it right away from another computer on the network. All further settings can then be configured in a terminal window on the other computer.
The Pi needs a hostname that reflects its task; in this example, it is named feeder. The next step is to create a separate scripts/ folder for the project files in your home directory, where you will later put the feed.py control script written in Python 3. Instead of loading it as a memory-resident program when the Zero W is started, it is called repeatedly at defined intervals by cron.
All in Good Time
The schedule for the feedings is set in the Zero W’s crontab (cron table), which is the file that manages scheduled task processing. The plan for the feeder is shown in Listing 1, which you can create with crontab ‑e.
Listing 1: crontab
# m h dom mon dow command
# Sunday till Friday
0:*17 * * 0‑5 python3 /home/pi/scripts/feed.py 1
# Saturday
0:*17 * * 6 python3 /home/pi/scripts/feed.py 2
# Every minute
*/1 * * * * python3 /home/pi/scripts/feed.py 0
Crontab specifies feeding every day at 5pm. On Saturday, the script starts with the 2 option on the command line, which releases an alternative feed from the second slot of the vending machine once a week. The third entry in the cron table with option 0 starts the operation display (the on-board LED flashes once a minute) and is used to read remote control codes from the web – but more on that later.
What You Need
Commercial feeders often rely on relatively complicated mechanics, such as a carousel of loadable compartments. In contrast, I want this feeder system to be as simple as possible, with a view to the DIY system remaining manageable and working safely during periods of absence from home. That said, I did want a certain level of convenience, both in terms of operation and functionality and for the benefit of my stay-at-home pets. Therefore, at least two feeder tubes are available for different feeds (Figure 2).
Other considerations were how to ensure – from a distance – that my pets really were receiving their meals. Trouble-free operation from a computer perspective does not give you any feedback as to whether the feed is getting into the aquarium, so I got the idea to record the fish feeding with a camera and serve up a snapshot on the web.
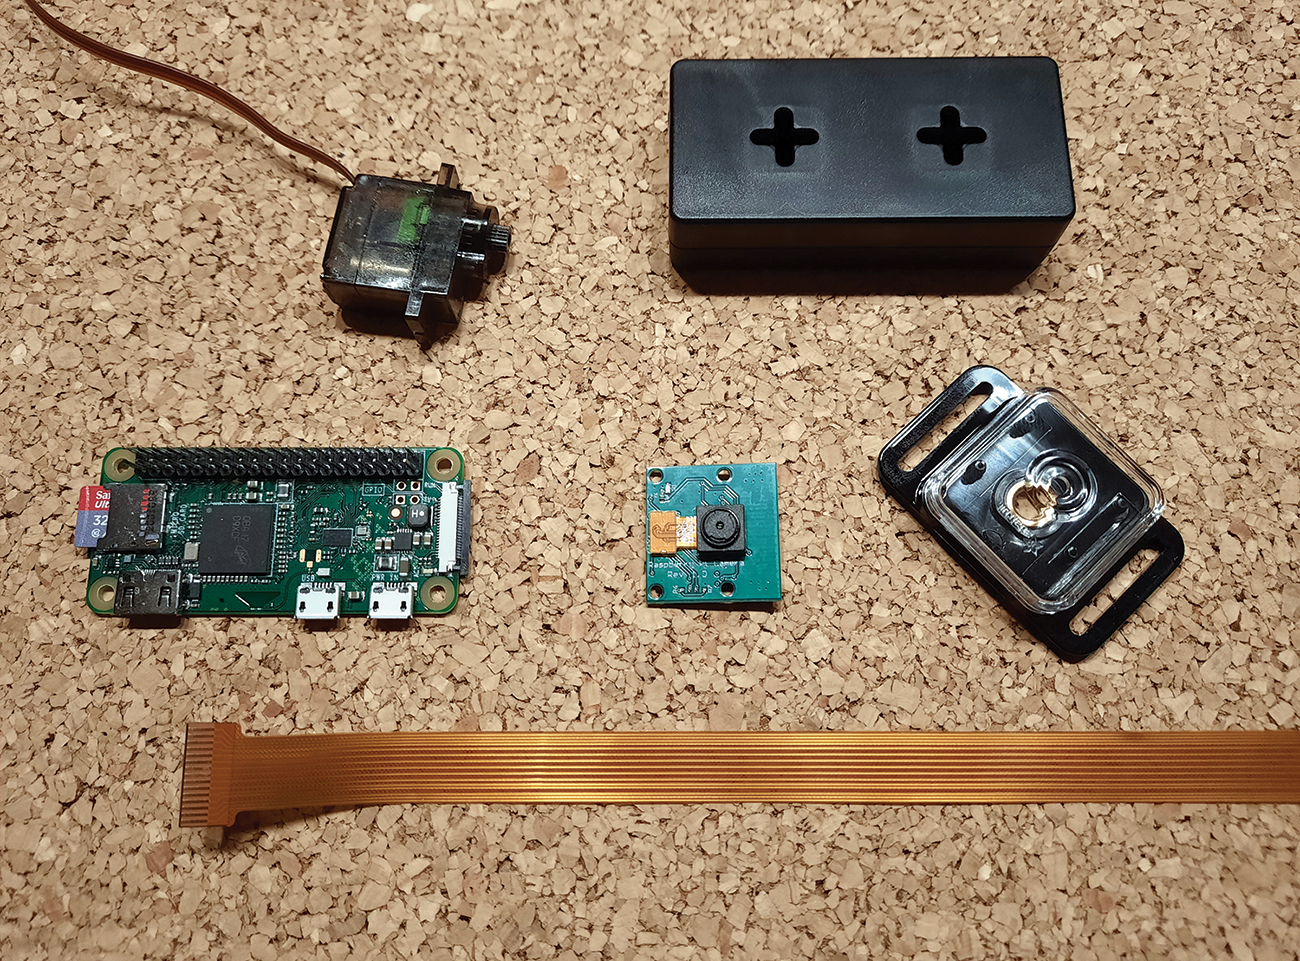
The Zero W comes with on-board tools to accomplish this task, and you can connect a Pi camera to capture an image a short wait after feeding. All you need is a view of a section of the aquarium where the vending machine sits. For protection, the Raspberry Pi and camera are each housed in a small case. The number of other parts in the project is manageable (see the “Parts List” box).
• Raspberry Pi Zero W (1/2)
• Pi camera rev 1.3 or higher
• Case for the Pi and Pi camera
• Camera connection cable
• Mini servo (MG90 or comparable)
• Prototyping breadboard (PCB breadboard)
• Two push buttons
• LED
• Various resistors
• DIY feeding tower
Construction
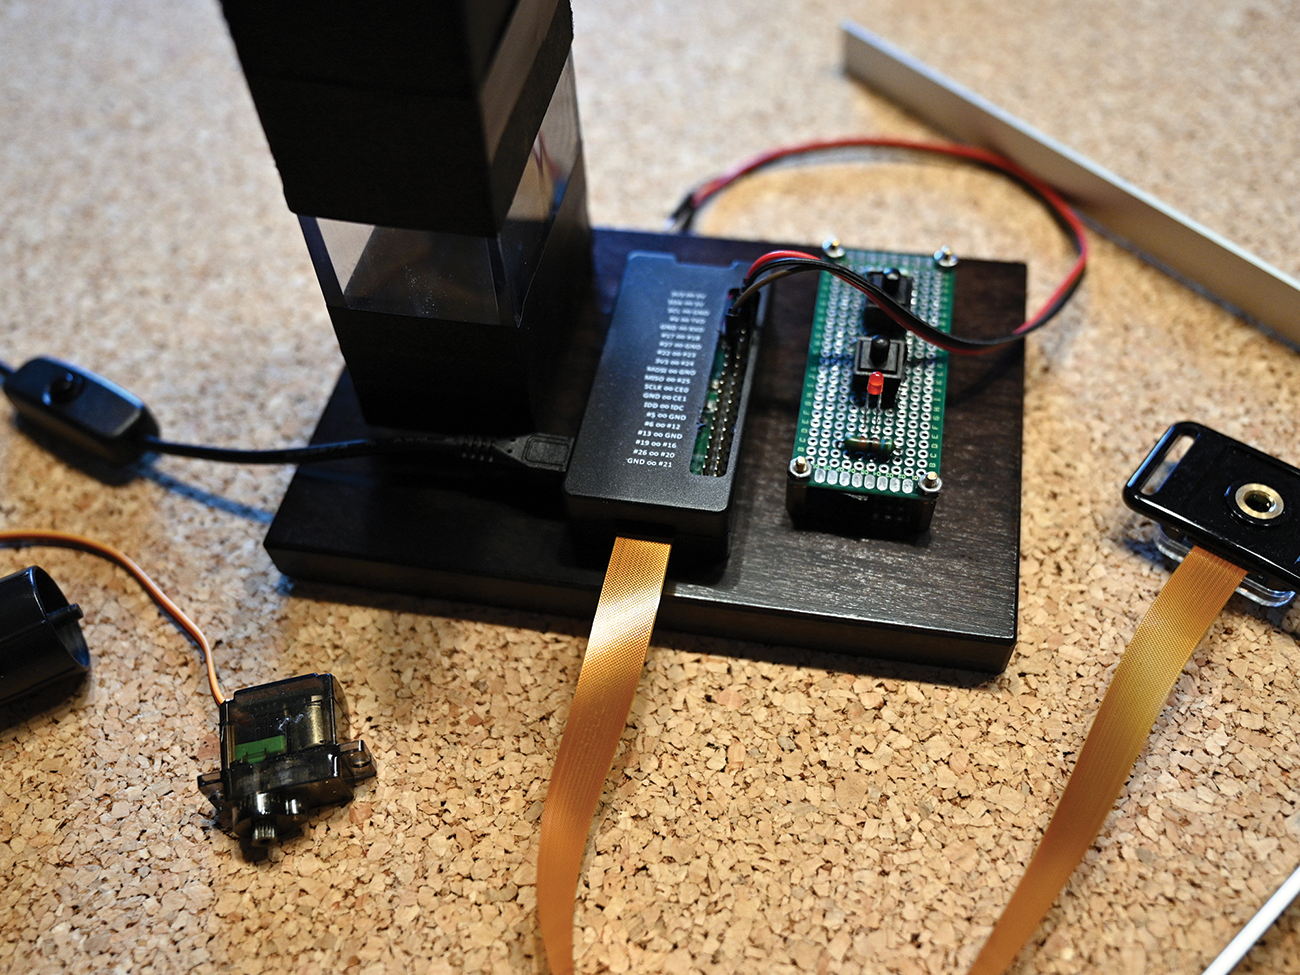
In the solution I had in mind, the feed is provided by a small storage tower that drops the food from the top with a little help from gravity through an opening in the aquarium cover. You can build a feeder tower like this with parts from your local hardware store or order the materials online from craft stores. In my case, a desk pen holder served as a starting point; this part is readily available in many stores and are often made of transparent plastic, which is ideal for monitoring the fill level.
Now it’s time to saw and drill holes. After that, I added the servo and the mechanical system. The whole thing was then mounted on a base plate, which also bears the Zero W and a small circuit board with a status LED and control buttons (Figure 3).
The feed outlet is operated by a specially developed mechanism. Depending on the direction of rotation of the servo, one of the two tubes of the pen holder opens. For this purpose, a straight shaft passes through both tubes, with a closure for each of the two openings sitting on the shaft.
Because of the angular offset, only one of the two shafts can open at any given time during a short left or right turn, and it is closed again automatically a short time later. Small paddles act as the closures to avoid a shaft remaining permanently open and ensure that the desired amount of feed is delivered (Figure 4).
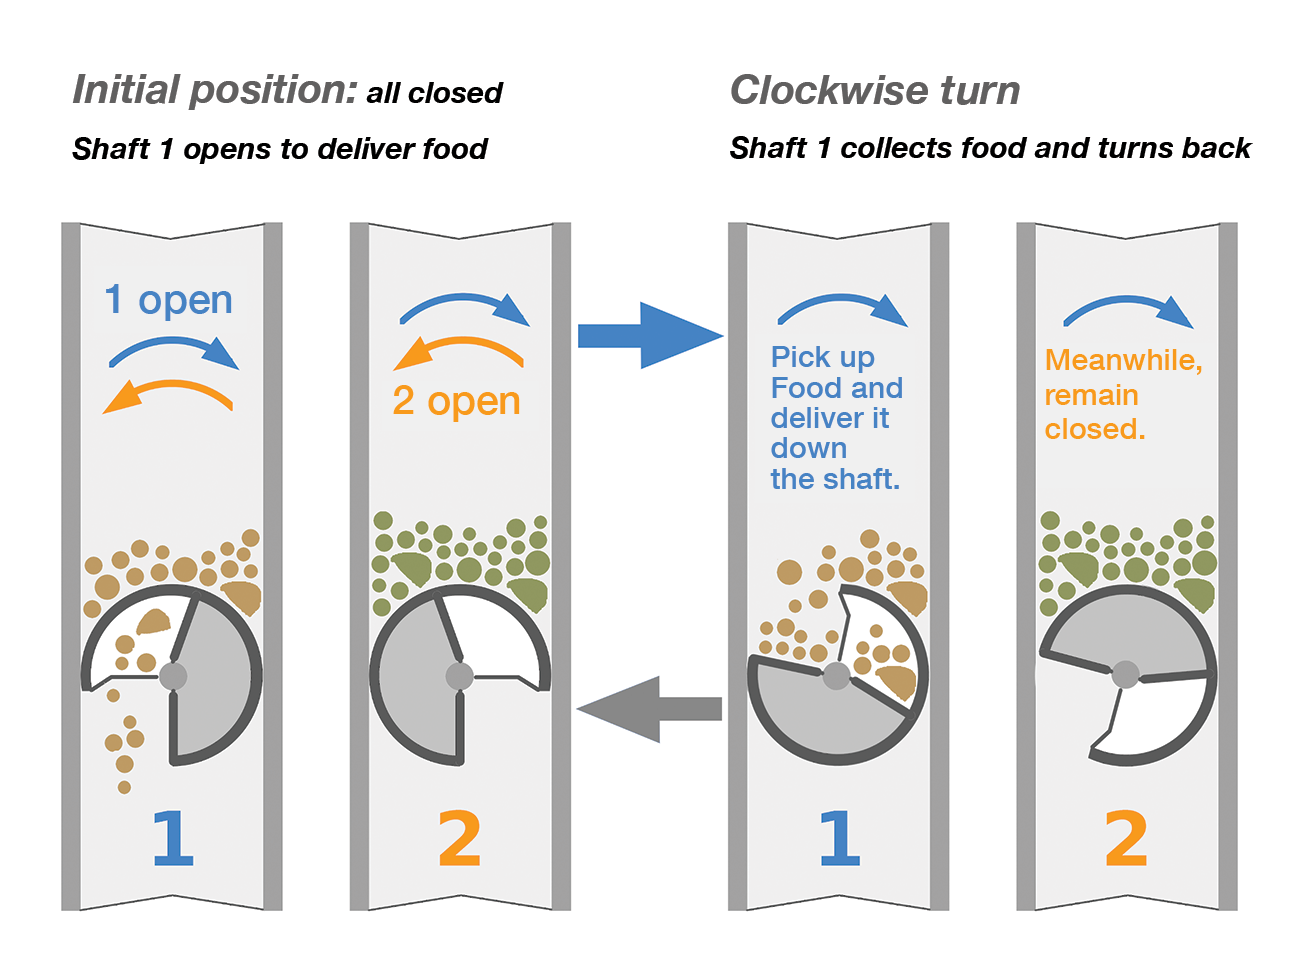
The 160-liter aquarium with low fish stock levels does not need more than a heaped teaspoon of dry food every day. The supply in the vending machine will be fine for a three-week vacation. If you need a larger reserve, adjust the setup to your needs in terms of diameter and height of tubes.
Control
The feeding process starts automatically after applying the supply voltage. As specified in the Raspberry Pi crontab, the vending machine feeds the fish once a day. On Saturdays, feed is taken from the second shaft by rotating the servo at the same angle, but in the opposite direction. Once a minute the housing LED flashes a visual ready signal. To track all events on the device, the LED uses various flash codes (Table 1).
|
Signal |
Status |
|
1x long |
Live, flashed every minute |
|
1x medium |
Shaft 1 opening (plus photo) |
|
2x medium |
Shaft 2 opening (plus photo) |
|
3x short |
Single snapshot |
|
3x very short |
Shutting down |
What you can’t see in the circuit diagram (Figure 5) are the two push buttons on the case, which are connected to the Zero W general purpose input output (GPIO) pins to trigger a feed in the first shaft and for a controlled system shutdown.
Because the feeder is on the local network, it can be maintained over the network, as well. To do so, log in to a terminal over SSH with:
ssh pi@feederYou can then make changes to the crontab or control script. If needed, you can disable the automatic feeder by calling:
python3 /home/pi/scripts/feed.py 4The 4 option tells the device to enter maintenance mode without any further actions.
Observations
One interesting and positive side effect is the ability to see whether the fish are getting any feed from the feeder. The control script triggers a snapshot through the aquarium glass with a delay of 10 seconds after operating the servomotor. The simple Pi Cam Rev 1.3 serves this function well. Because I only need to grab an image of a section of the front of the aquarium, image quality is secondary.
The connection from the vending machine on the top of the aquarium to the Pi cam on the front of the aquarium requires a long camera cable (about 30cm for my setup) that depends on the height of the aquarium cover. A narrow aluminum plate fixes the small camera housing a few centimeters in front of the screen.
To get sharp images, you need to set the shortest possible focal length on the Pi cam. To do this, turn the adjustment ring of the small lens very carefully with a tool and grab a few test images to check the setting.
The connection to the network is primarily designed to post the image grabbed after feeding, so I can check it online. It also opens up some possibilities for remote operation. This setup requires an HTTP server on the Zero W. The installation of the lean lighttpd web server and PHP on the Raspberry Pi is well documented online, so I will not go into further detail here.
The feeder’s web page (Figure 6), where you can check the last feeding image and trigger a feeding along with a snapshot with three buttons, is implemented in PHP and resides in the Raspberry Pi’s www directory. The code for this and the Python script to control the feeder is on the project’s GitHub page, and an English version is on the Linux Magazine download site for MakerSpace 03 2023.
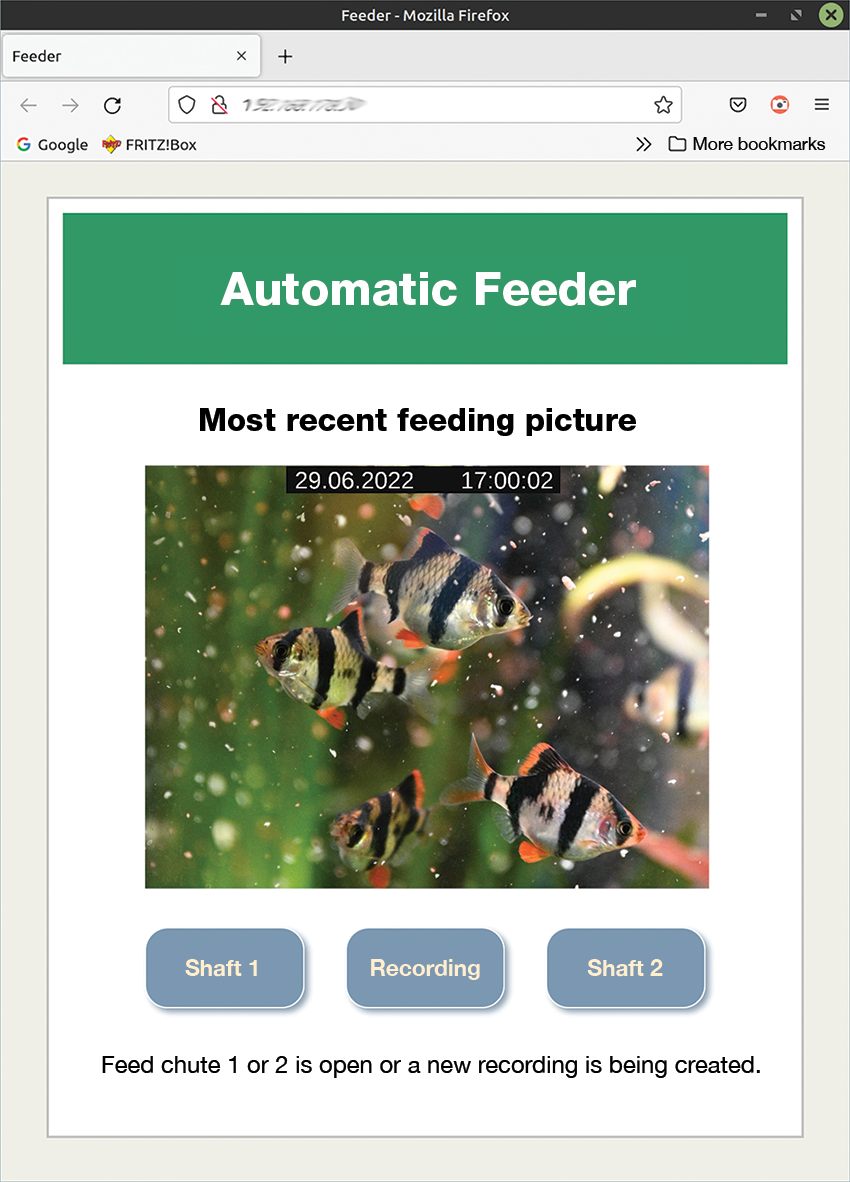
To access the web interface on the local network, simply enter the local IP address of the Zero W in a web browser. To monitor the system remotely while on vacation, you need to enable the server on the Zero W in your router for the web and assign a permanent IP. However, if you already use a website with FTP access, you can alternatively upload the current feeding image to your own web space and view it there.
Conclusions
The automatic feeder has already fed my fishy friends without any glitches during two short trips. My goal was a DIY solution from the outset, so competing with commercially available solutions was never important. Instead, I wanted to build a device optimally adapted to my own needs: one that worked reliably and allowed me to check how it was working. I definitely did not want to compromise on the care of my pets.
However, even the best Internet-based feedback is of little use if you have no one onsite who can intervene in an emergency. It’s always great to have the support of your family or neighbors to water the flowers or even take care of the pets in your aquarium if you’re in a pinch.