On the Table
The combination of a web camera, Raspberry Pi, and simple software facilitates miniature tabletop photography.
Photographers often rely on tabletop photography to take product photos for advertising campaigns or illustrations for magazines. Even a digital camera or smartphone is up to this task, but you have good reasons to look into USB and web cameras, as well. Armed with a 4K USB camera, a focus distance of 3cm, an integrated zoom function, and a Raspberry Pi with USB 3.0 ports, tabletop photographers can embark on their mission.
Raspberry Pi Cameras
Currently, the Raspberry Pi Foundation officially supports the V2 camera module (also available in the NoIR variant) and the Pi High Quality (Pi HQ) camera. The V2 module was introduced as the successor to the V1 module in 2016. The predecessor was based on an OmniVision 5647 sensor with a resolution of 5 megapixels (Mpx). In contrast, a Sony IMX219 sensor with 8Mpx is used in the V2 camera. In contrast to the regular module, the NoIR camera lacks an infrared filter but otherwise has the same features.
The cameras have a fixed focus starting at a distance of about 70cm to the subject and with a fixed focal length. They are connected to the computer with a ribbon cable via the camera serial interface (CSI). The multimedia abstraction layer (MMAL) and Video4Linux (V4L) APIs are then used for access. You can control the cameras directly with console commands, and you have an extensive Python library for camera control with the picamera package.
The Pi HQ camera lets you attach C- or CS-mount lenses with the appropriate adapter. The sensor is a 12Mpx Sony IMX477R chip. The sensor measures 7.9mm diagonally and features a resolution of 4056x3040px. The 6mm lens covers the close-up range nicely, thanks to the short focus distance. However, the manual focus and aperture settings have a disadvantage.
An extensive repertoire of lenses from macro to telephoto is available for both the V2 modules and the Pi HQ. Moreover, the Raspberry Pi cameras offer solutions for a wide range of video applications. I look into what you can achieve with USB cameras in the field of still images, paying special attention to miniature photography.
Web and USB Cameras
Modern webcams stream their signals to a computer over USB and range from inexpensive, entry-level models to high-quality cameras for industrial image processing. All serve their purpose, but good image quality has its price.
In experiments I conducted, the Microsoft LifeCam Cinema, the C920 HD Pro (full high definition, FHD), and the Brio (4K) from Logitech showed good results. The Brio is perfectly suited for the intended application, with its high resolution and is therefore used here. Other products are definitely also suitable for macro photography, but you need autofocus switched off, a short focus distance in the centimeter range, the ability to zoom, and compliance with the USB video class (UVC) standard, a specification for devices that stream video data over USB.
Webcams typically meet the UVC requirement and do not require a special driver to operate on a computer. Instead, a unified UVC driver serves devices from different manufacturers.
V4L, or the second version V4L2, is a collection of device drivers and programming interfaces already integrated into the Raspberry Pi’s operating system and also supported by the Open Source Computer Vision (OpenCV) library of algorithms for automated image processing and artificial intelligence for face or gesture recognition. Working at the command line, you can control UVC devices with the v4l2-ctl command. The command
$ v4l2-ctl --list-devices
HD Pro Webcam C920 (usb-3f980000.usb-1.2): /dev/video0
shows which device file belongs to which device. For the Logitech Brio, the device is /dev/video0, as shown in the output.
Adding the --list-ctrls option tells v4l2-ctl to output information on the configurable controls (Listing 1). You need this data for your own application software. The output shows the value ranges and defaults for the camera and exposure.
Listing 1: Reading the Controls
$ v4l2-ctl -d /dev/video0 --list-ctrls
brightness 0x00980900 (int) : min=0 max=255 step=1 default=128 value=128
contrast 0x00980901 (int) : min=0 max=255 step=1 default=128 value=128
saturation 0x00980902 (int) : min=0 max=255 step=1 default=128 value=128
[...]
zoom_absolute 0x009a090d (int) : min=100 max=500 step=1 default=100 value=500
led1_mode 0x0a046d05 (menu) : min=0 max=3 default=0 value=3
led1_frequency 0x0a046d06 (int) : min=0 max=255 step=1 default=0 value=0
The gv4l2 tool and Guvcview webcam application, which you can install with your package management system, provide graphical interfaces that are helpful for fine-tuning the desired camera settings.
Tabletop Photography
A table, some paper as background, LED lighting, a few clamps, and a tripod are all the hobbyist needs as an improvised tabletop studio. A scene with interesting objects and unusual positions can give you attractive images. Tabletop plays a significant role in product photography and advertising. Amateur photographers use this technique for collectibles or for selling on online portals.
Macro photography refers to image scales greater than 1:1. In other words, an object is depicted on the sensor larger than in the original. The definition comes from the analog age. Smaller image scales belong to the close-up range, but if everything fits on the table, it is tabletop.
Whether you use bellows extensions, macro lenses, or extension rings, a photo’s range of sharpness at close range is limited. Photographers therefore use the focus bracketing technique and compile an image from a series of shots with different depths of field. This stacking technique is already integrated in the firmware of modern digital single-lens reflex (DSLR) cameras.
Smartphones also use the Dynamic Depth format for 3D photos, which are popular on Instagram and the like. The technology makes it possible to create images with smartphones where, for example, the background of a portrait appears blurred, much as DSLR cameras with fixed focal length lenses depict a person with an open aperture. The series of photos taken with a webcam is sent to a stacking tool such as MacroFusion for postprocessing.
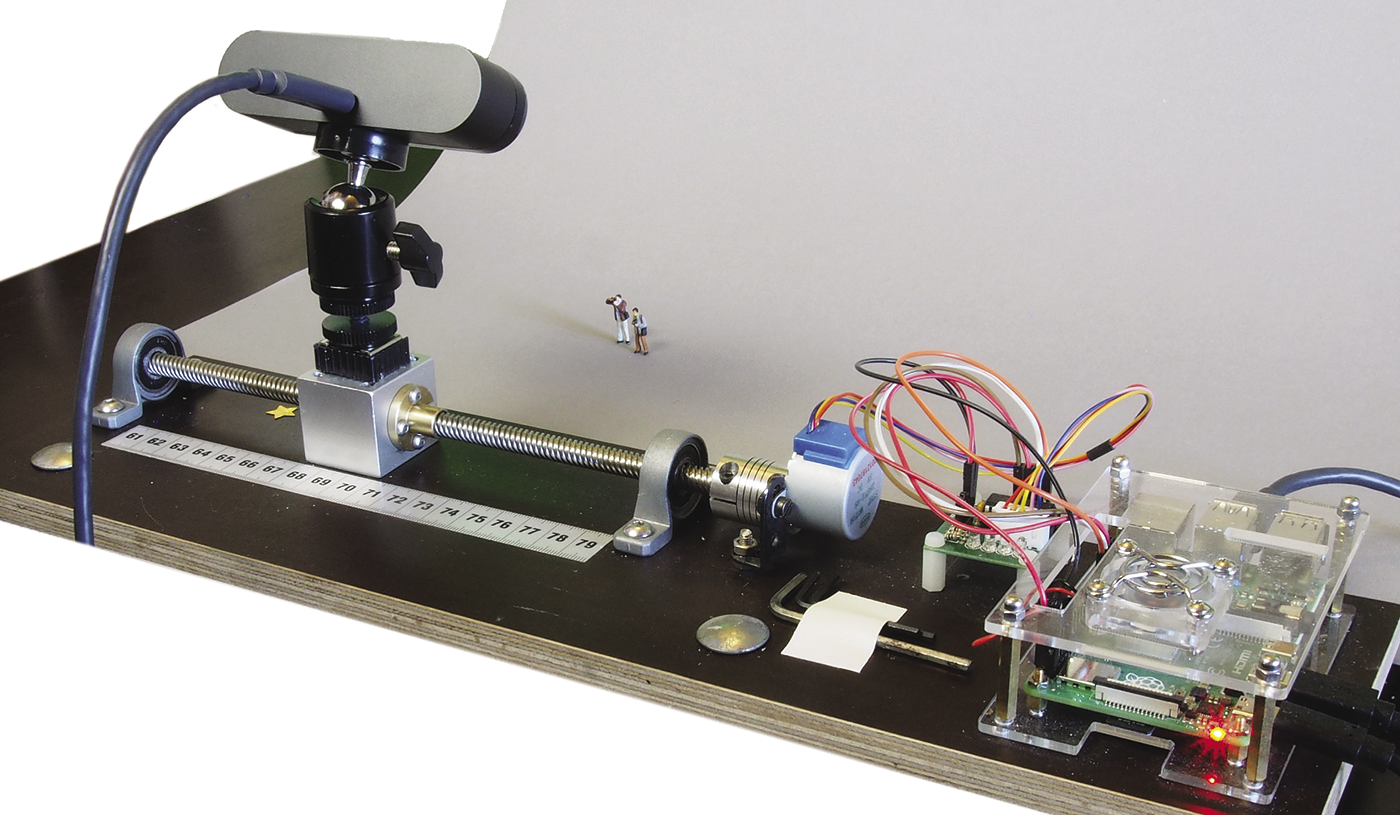
For the shoot in this article, the setup additionally relied on variable camera positioning. The camera was mounted on a linear drive and, driven by a stepper motor, moved to different positions under program control (Figure 1), which enabled, for example, video and continuous shooting, lenticular images (images that change depending on the viewing angle, giving the impression of movement), and stereo imaging.
Occlusions in the miniature scenes can be controlled by minimal camera movements. A typical scene of miniature photography, with model figures in 1:87 scale built with tweezers, is shown in Figure 2. The camera can move past the set to find the most favorable position. In software terms, this is one more loop, and the Raspberry Pi hardware is perfect for this task.
Continuous Shooting
Programs like Guvcview are suitable as a test tool but cannot control specific processes, which means you need your own software with a graphical user interface (GUI). The programming language of choice is the object-oriented Python 3 with its numerous practical libraries for designing graphical interfaces, such as the guizero library, which is easy to use. The stepper motor is controlled by the Python RPi.GPIO module, whereas OpenCV takes care of capturing and saving the images.
The software’s self-made GUI is located in the usbCamMover.py file and comprises two panels: one for exposure settings and one for camera settings, including zoom and focus (Figure 3). I will not go into the programming in detail here; the software, which is still a bit of a hack, can be found on the here.
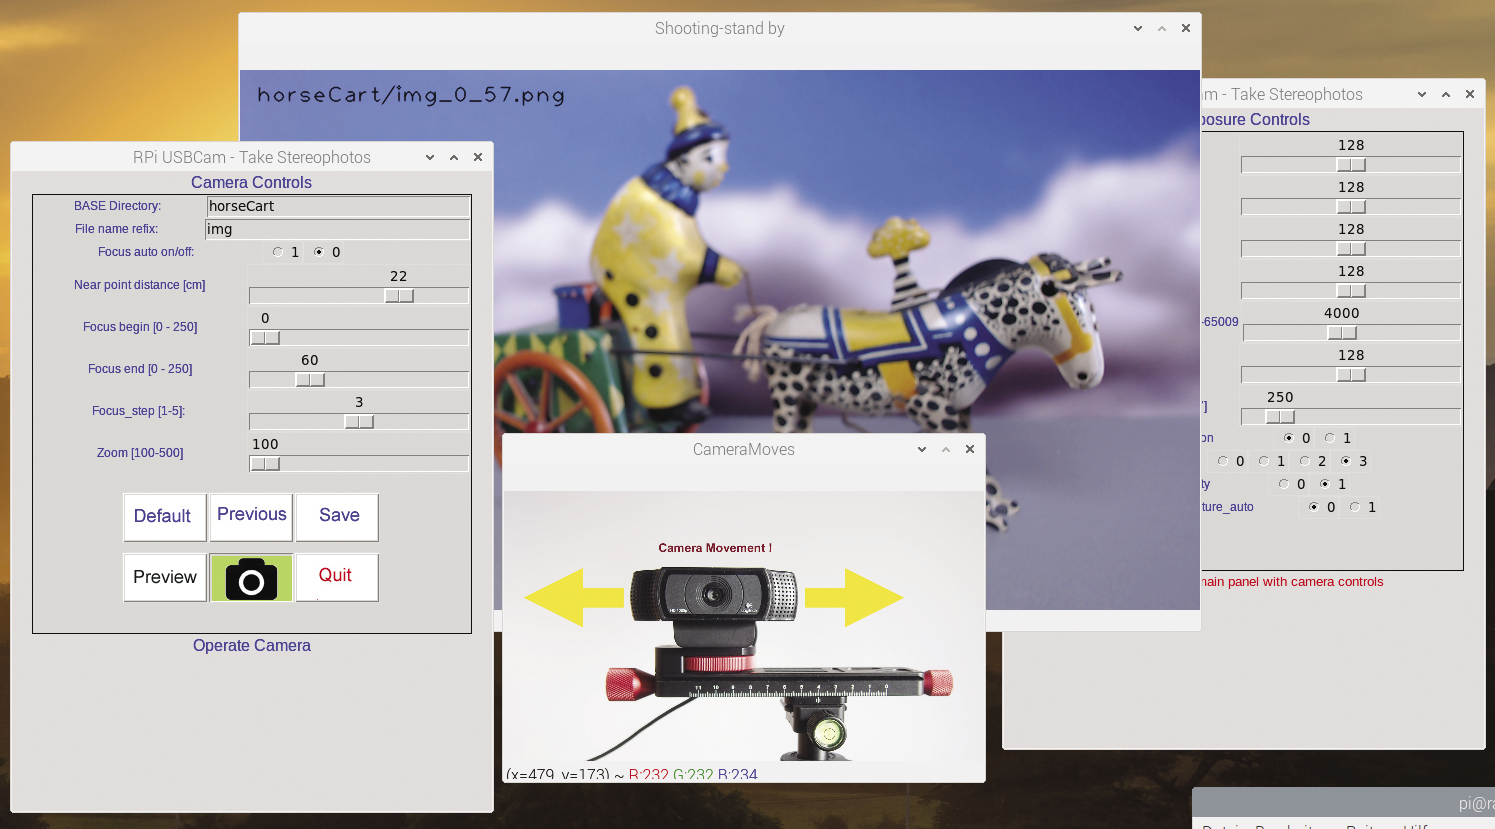
Camera Control
The settings in the Camera Controls dialog influences the image geometry. The field of view (FoV) is limited by the Zoom factor. The number of shots required depends on the focus range and its step size. The horizontal camera position is controlled by the distance of the camera to the object. A list of factors for the travel distance is embedded in the program.
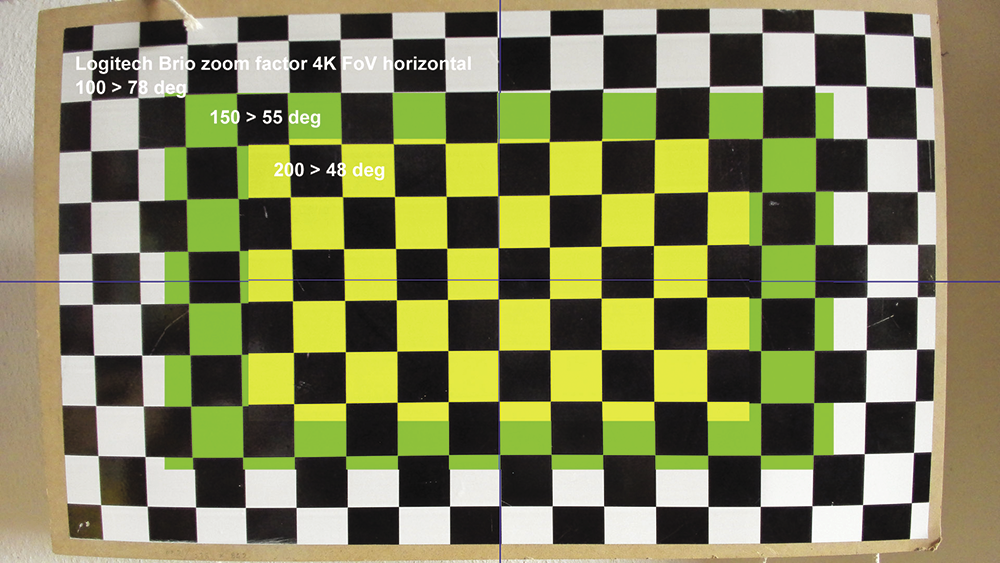
The accepted Zoom factor for the Brio is between 100 and 500 with a given step size of 1. At 4K resolution (i.e., 3840x2160px), a horizontal field of view between 78 and 43 degrees can be achieved. However, zoom factors larger than 200 no longer have an effect at ultra-high definition (UHD) resolution.
The UHD resolution of the Logitech Brio is only offered with the MJPEG pixel format. For this, the code in Listing 2 adapts the initialization with the variables width and height to suit the connected camera.
Listing 2: usbCamMover.py – Initialization
[...]
cam0.set(6, cv2.VideoWriter_fourcc('M', 'J', 'P', 'G')) # setting MJPG codec
#width = 1920 # HD
#height = 1080 # HD
width = 3840 # UHD (Brio, USB3)
height = 2160 # UHD (Brio, USB3)
cam0.set(3,width)
cam0.set(4,height
[...]
The zoom factor in FHD resolution (1920x1080px) is different. With factors up to 200, the FoV changes to the same extent as with the higher resolution, but if you go beyond that, it can narrow the angle by up to 18 degrees (zoom factor 500). Figure 4 compares the image crops at 4K resolution.
At full FoV, a high lens distortion is noticeable in the peripheral area, which might need to be corrected by optical inspection or mathematically with the camera’s calibration data. Even a low zoom factor reduces the extreme distortion.
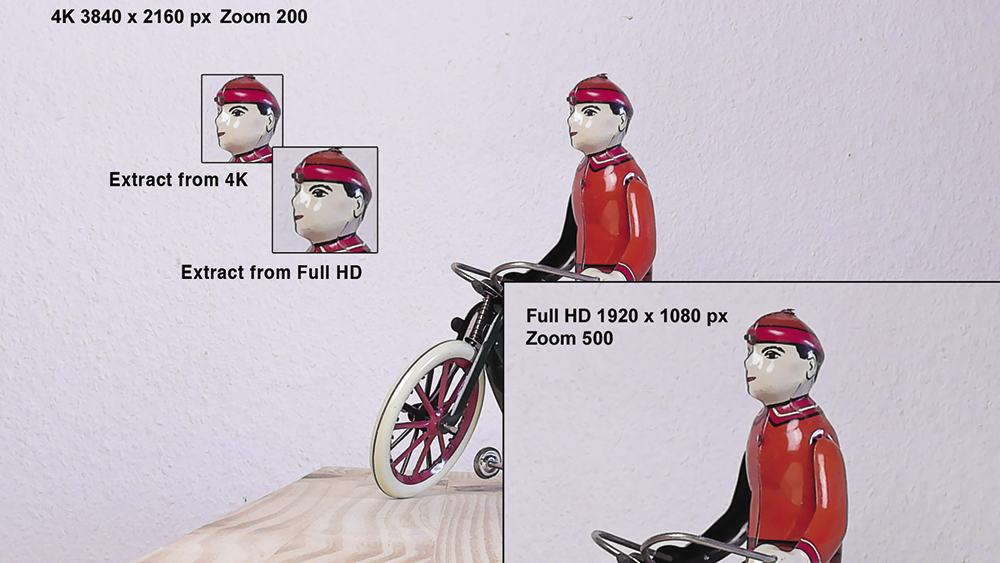
The HD, FHD, and UHD camera resolutions each result in an image in 16:9 format. The relevant image area does not always fill this format, so you often work with image crops in postprocessing. Therefore, it is necessary to weigh between object distance and zoom factor the extent to which optimum resolution can be achieved.
If you can get close enough to the object, it’s best to opt for 4K resolution. If you need to get farther away, consider the crop factor. If necessary, switch to 2K resolution with a smaller FoV.
For example, in Figure 5, only the cyclist’s face is of interest. With 4K resolution and zoom factor 200, you capture too much unneeded information. At an identical shooting distance with 2K resolution, a smaller section can be captured with a zoom factor of 500, resulting in a higher resolution for the image area of interest. In general, however, the USB camera is only significant for still images with the 8Mpx sensors.
Focus Range
Another aspect of the rational image acquisition technique is the focus range. The parameter values are between 0 and 250 with a default step size of 1. Too many exposures would overload the stacking software, so it is best to limit the range and thus sensibly minimize the number of shots.
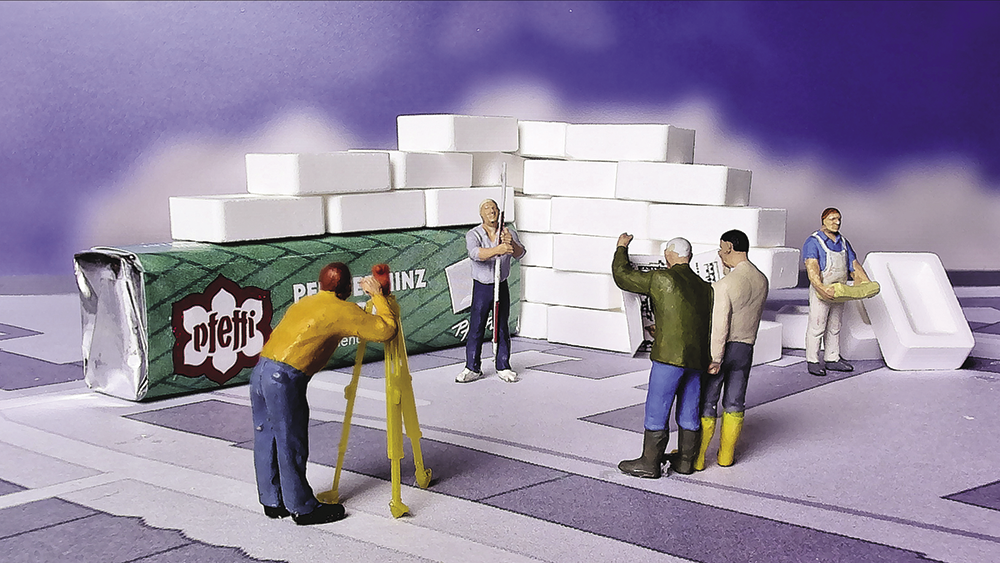
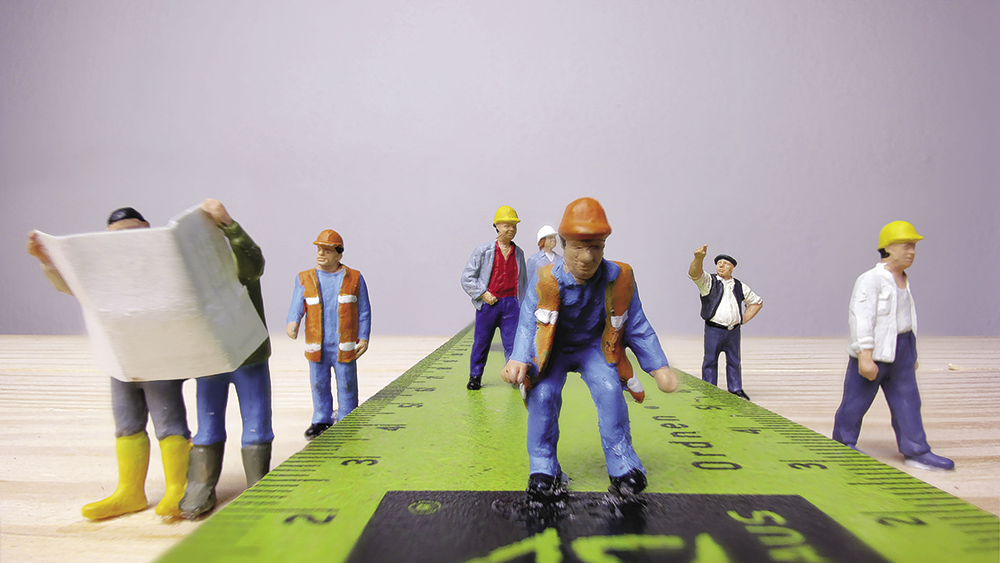
An example about 2cm (close-up range) from the object and focusing with a value of 220 becomes interesting, whereas a parameter of around 110 is useful up to about 8cm. With a step size of 5, 22 exposures were created for the builders in Figure 6 in the close-up range. The figure shows the results after stacking.
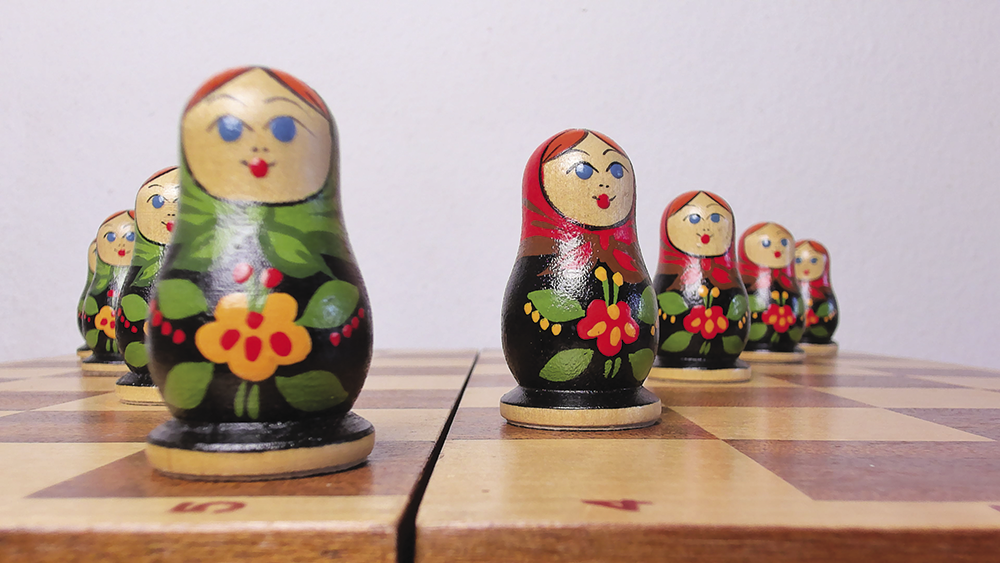
If you increase the distance to the subject to about 10-40cm, focus settings from 40 to 100 on the right side are recommended. In Figure 7, the first red doll was focused with a value of 79 and at a distance of about 17cm. A range of 40cm therefore translates to about 200 focus units; given a step size of 5, this corresponds to 40 exposures. You therefore have a defined design framework that you can validate in a preview.
Exposure Control
In conventional photography, exposure is controlled by aperture, ISO, and shutter speed, plus white balance and color palette. Tabletop photography is mostly about static scenes, so you do not need to influence exposure time directly.
Despite the webcam’s good adaptation to ambient light, you will want to use several light sources to ensure optimal illumination of the scene. You can do without the automatic mode, especially for continuous shooting. If possible, leave brightness, contrast, saturation, and gain (comparable to ISO) at medium values.
Color adjustment is mainly achieved with white balance; make sure you do not tweak the settings too quickly. Gradual, small changes will give you the best results. Figure 8 shows an example of the differences between automatic and manual white balance.
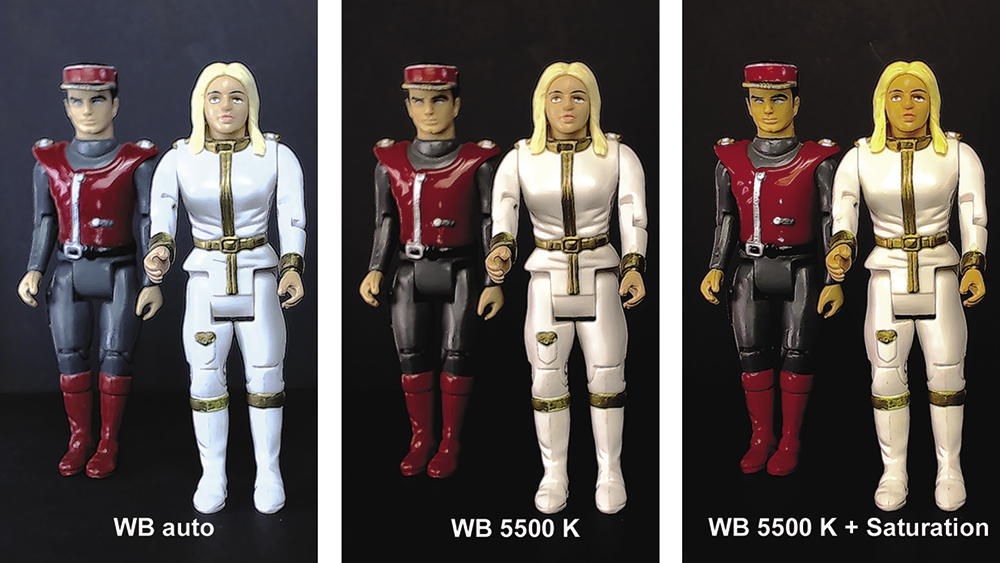
The automatic white balance delivers very cold colors, and the break in the background can still be seen. A color temperature of 5500 Kelvin improves the white areas in particular. The background is also now evenly black thanks to the manual white balance. Some caution is required with saturation; otherwise, you can easily go too far.
Processing Continuous Shooting
After you have completed the image settings, let the camera do its work. In the example, I used a webcam with rolling shutter, which streams to the USB port. The image data is buffered for transfer. For a still image, the application reads individual frames from a buffer area (Listing 3).
Listing 3: usbCamMover.py – Saving Frames
[...]
for i in range(4): # Read buffer
cam.grab()
ret, frame = cam.read() # Take a picture
cv2.imwrite(img_name, frame) # Save image
[...]
The image is saved, the focus setting is updated, and the next image follows. An inner loop iterates through the focus range, whereas, in an outer loop, the program moves to the capture positions. Finally, it returns the camera to the starting point and asks how to proceed. The file references comprise the directory name, the project name, a prefix, the camera position, and the focus value, followed by the image format. This way, each image can be mapped uniquely.
You can run the program on the Raspberry Pi with HDMI and a mouse as a standalone setup, but it is better to use VNC on the host. You would be transferring the image directories to the host anyway with an FTP client so you can run an image processing program for stacking.
Conclusions
The first webcams transmitted images of a coffee machine at Cambridge University in 1991 and went online starting in 1993. The now world-famous coffee machine was auctioned off in 2001, repaired by the manufacturer, and on the web until 2015. Today, people prefer to stream urban situations, or participants in an online conference put themselves in the picture.
Now that webcams deliver a resolution of 8Mpx and many industrial applications work with USB cameras, you can give them a try in photography. Miniature and tabletop photography with continuous shooting are options; easy handling, program control, and a decent image quality make the venture seem promising. A Raspberry Pi 4 controlling the setup rounds off the tabletop scenario.