
A New Route
If you have an old router lying around, you can put it to good use with a few easy projects and learn something along the way.
There are some fun and interesting projects that can be done by repurposing an old home router. If you don’t have an old router lying around, you can usually find one for about $5-$25. These routers are easy to reflash, so a new programmer doesn’t have to worry about messing things up too badly.
In this article, we will look at three projects to get some extra life out of an older router. The first project uses the router’s USB port to connect to third-party devices. The second project collects microcontroller and internal data, and the final project displays the data on the router’s web page and on a Raspberry Pi.
Selecting a Router and Firmware
A number of open source firmware solutions can breathe new life into an old router. OpenWRT and DD-WRT are the most popular packages, but there are other options. You need to determine if one of these firmware packages supports your old router. Keep in mind that many older routers only have 4MB of flash and 32MB of RAM. These routers may not run or only marginally run OpenWRT or DD-WRT. We recommend that you choose a router with a minimum 8MB of flash and 32MB or more of RAM.
You also need to consider whether the router has USB support. A router without USB support can still be used as a web or application server, but it will be missing external hardware integration.
For our router project, we used OpenWRT because of our experience using the Arduino Yún modules.
Getting Started
Loading new router firmware will vary based on the make of your router. For this step, you’ll need to check the manufacturer’s directions and the router specifics from the OpenWRT or DD-WRT websites.
After the new firmware has been loaded, the router should be disconnected from your home LAN, and a PC needs to be wired to one of the router’s LAN ports. The router will have a default IP address of 192.168.1.1, and the PC needs an IP address in the 192.168.1.x range (e.g., 192.168.1.10).
Once the router and PC are wired into their own small network, the router can be powered up, and the OpenWRT web interface (LuCI) can be used to configure the new router settings.
There are many possible router configurations. Most importantly, you must ensure that the repurposed router does not effect the main router on your home LAN. Typically, you’ll want to disable routing features on the repurposed router before it is connected to the home LAN. In the OpenWRT web interface, software services such as the firewall, DNS (dnsmasq), and DHCP (odhcpd) also should be disabled (Figure 1).
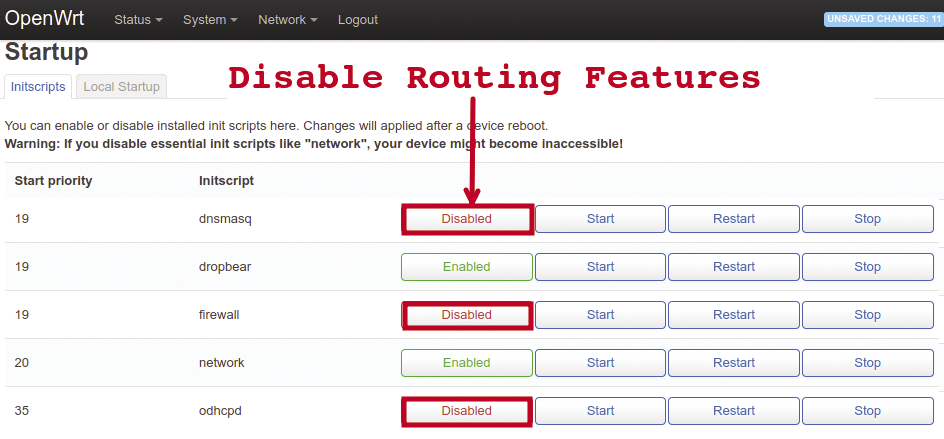
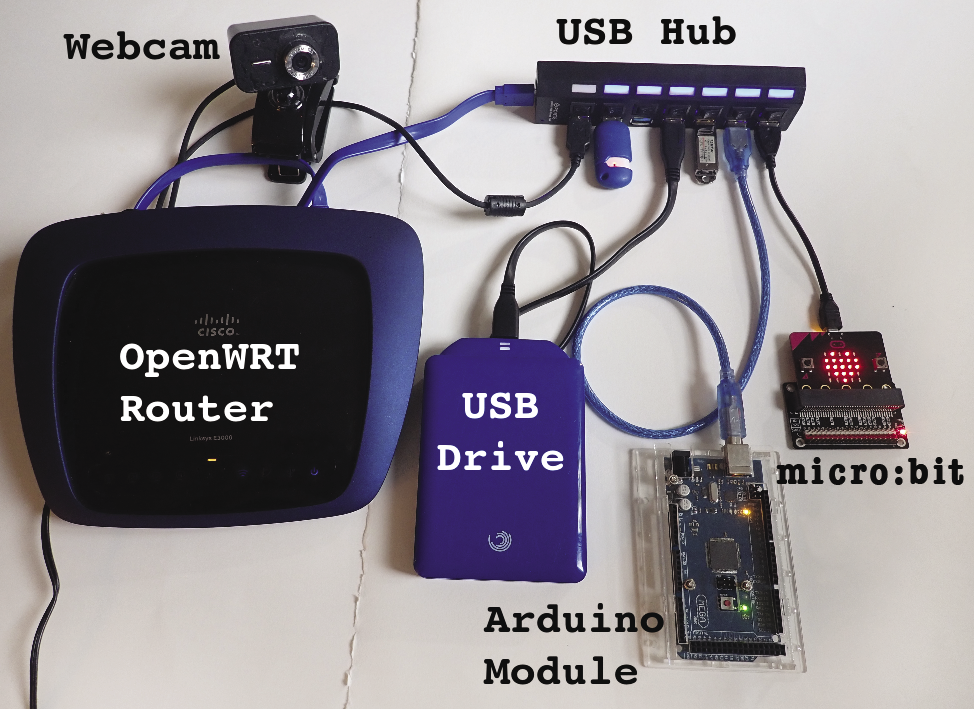
dnsmasq, and odhcpd in the OpenWRT interface.For our setup, we used a USB hub so that we could connect a variety of different devices (Figure 2).
Software
Routers don’t have a lot of memory, so the default firmware is fairly lean on extra features. Consequently, you will need to add software packages.
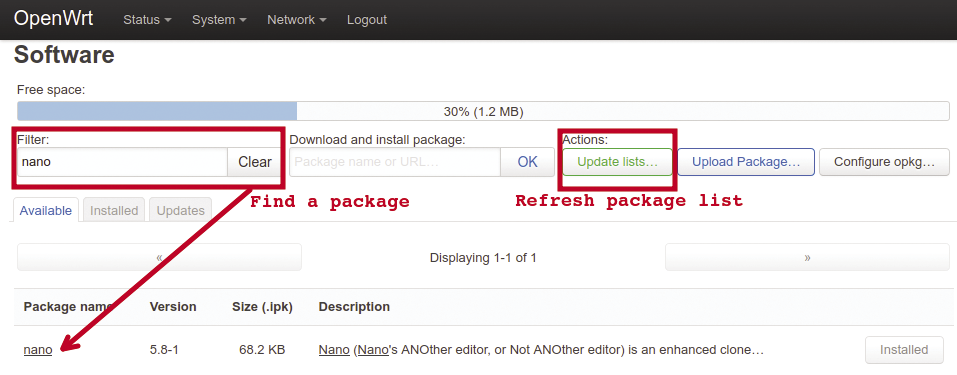
OpenWRT uses opkg, the OpenWRT package manager, to find and install software packages. After the router is connected to the Internet, software can be added either through the LuCI web interface (Figure 3) or manually in an SSH shell.
USB Drives
To add USB drives, remotely SSH into the router and enter the code from Listing 1. After the USB packages are loaded, reboot the router.
Listing 1: Adding USB Drives Remotely
## update okpg is required to get info on new packages
opkg update
## get packages for USB2/3 and ext4 type devices
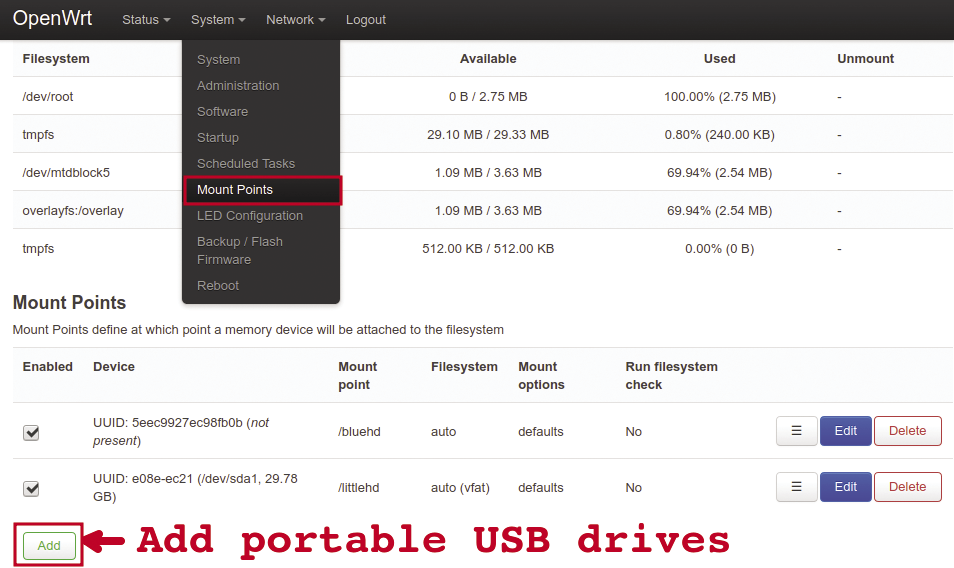
opkg install block-mount e2fsprogs kmod-fs-ext4 kmod-usb-storage kmod-usb2 kmod-usb3Under the System menu, you will now see the Mount Points item has been added to the LuCI web interface. This option allows for easy addition and removal of portable USB drives (Figure 4).
Adding USB drives to a router opens up the possibility of a number of interesting projects, such as a SAMBA file/printer server, an FTP server, or a Network File System (NFS).
USB Webcam Project
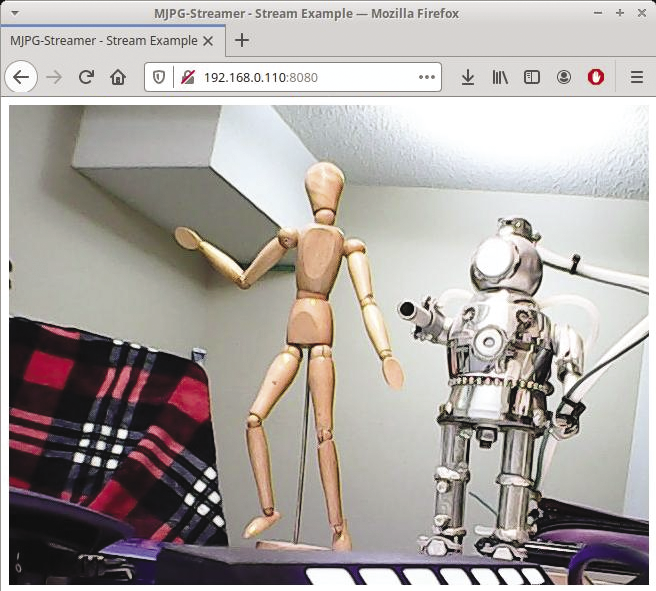
For a fun router project, you can connect a USB webcam and start a video-streaming service. A number of excellent USB video solutions are available, but you need to ensure that the router’s small memory size can accommodate the video package and all its dependencies. A good lightweight USB video option is mjpg-streamer, which can be installed with the code in Listing 2.
Listing 2: Installing mjpg-streamer
## install video streaming software and nano editor
opkg install kmod-video-uvc mjpg-streamer nano
## enable video service
## edit config file, and set "option enable '1'
nano /etc/config/mjpg-streamer
Once you’ve installed mjpg-streamer, you need to start the video service:
## to start the service:
/etc/init.d/mjpg-streamer start
## to enable the service to start on boot
/etc/init.d/mjpg-streamer enable
You can access the USB webcam as a web page from the router’s IP with the default port of 8080 (Figure 5).
USB-Serial Connections
A router doesn’t have external General Purpose Input/Output (GPIO) pins like a Raspberry Pi or an Arduino, but USB ports can be used to pass data.
Because there aren’t a lot of USB sensors available, a good workaround to this problem is to use an older microcontroller. Low-end modules such as the Arduino Nano, littleBits Arduino Bit, or a BBC micro:bit can be directly connected to sensors, and the data can be passed with the USB-to-Serial interface.
To start the video service, you need to enable USB-to-Serial communications in OpenWRT:
## add USB-Serial packages
opkg install kmod-usb-serial kmod-usb-acm
## add terminal config package
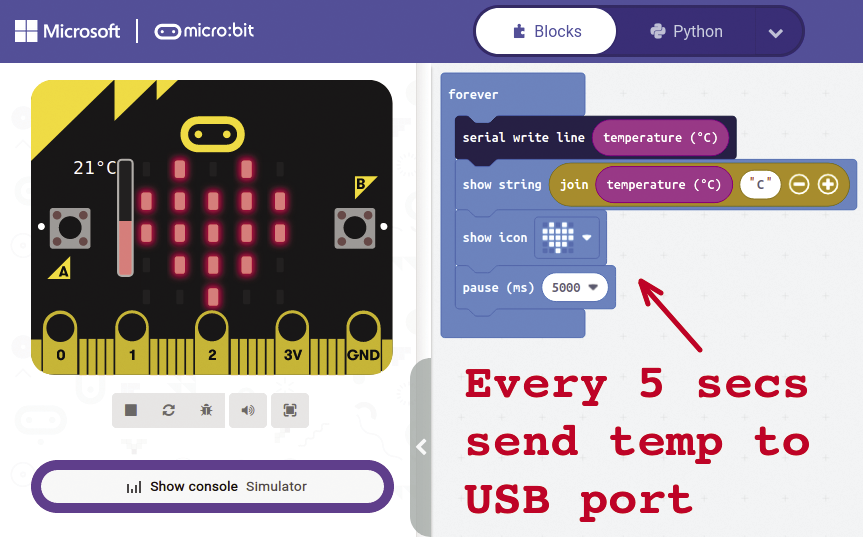
opkg install coreutils-sttyFor our project, we used a BBC micro:bit, which is very user-friendly for coding: It only took five blocks to send the on-board temperature reading and to show the value on the front panel (Figure 6).
The OpenWRT firmware runs a light version of the Bash shell called Ash. The Ash script in Listing 3 connects to the micro:bit USB port and prints out the temperature data.
Listing 3: Reading USB-Serial Data
#!/bin/ash
#
# microbit.sh - reads microbit temperature
#
# set terminal speed
stty -F /dev/ttyACM0 115200
# read USB-Serial device (/dev/ttyACM0)
while read -r line < /dev/ttyACM0; do
  echo " Temp: $line DegC"
done
Viewing Router Data
Next, we want to create a simple Common Gateway Interface (CGI) Ash web page to view custom router data and pass the data to another device, such as a Raspberry Pi Node-RED server (Figure 7).

For this project, it’s best to use dynamic data. If you don’t have external data, then dynamic data from the router’s system load data can be used (Figure 8). The command-line statement
cat /proc/loadavg
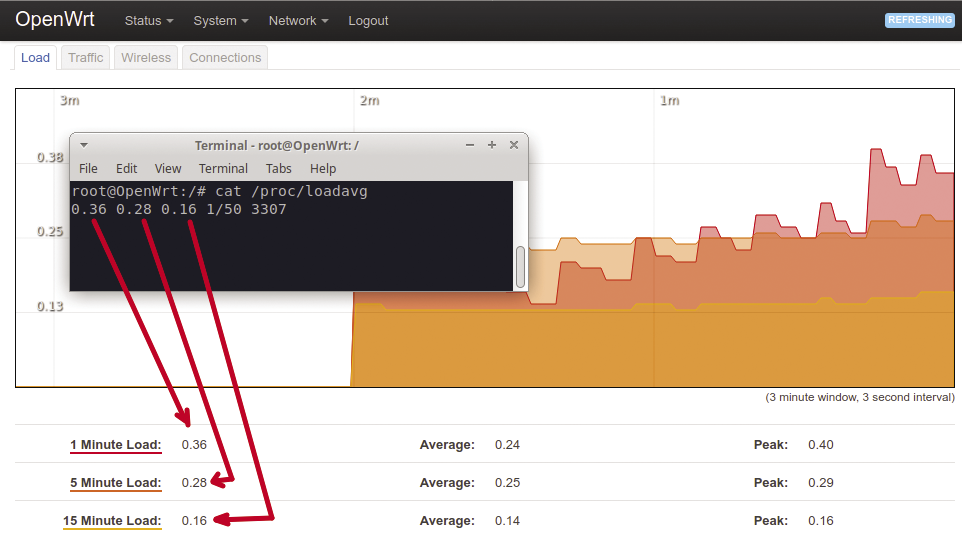
will show the router’s one-, five-, and 15-minute load averages.
By adding some AWK code, you can extract each of the data points directly. For example, to get the first data value, enter the following code:
## Show router load averages
cat /proc/loadavg
0.36 0.28 0.16 1/50 3307
## get the first data point
cat /proc/loadavg | awk '{print $1}'
0.36
Custom Router Web Page
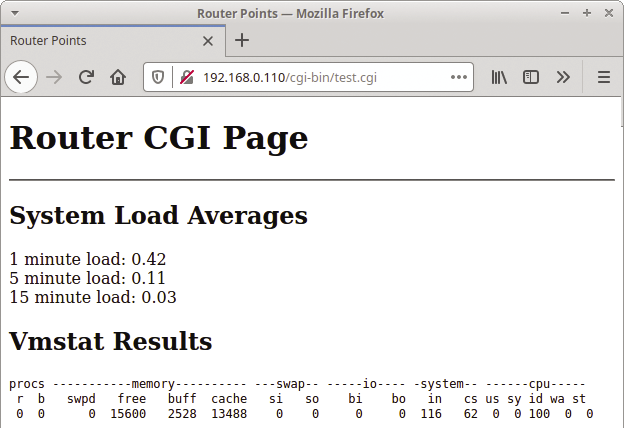
OpenWRT runs the uHTTPd web server for its router configuration. This web server can also be used for custom CGI web pages that can use Ash scripting. You will find the OpenWRT custom CGI pages in the /www/cgi-bin directory. Listing 4 shows an example CGI page, test.cgi. This example shows the previous load average values along with some system summary information from the Linux monitoring tool vmstat.
Listing 4: Router Web CGI Example
01 #!/bin/ash
02 #
03 # test.cgi - show system load averages and vmstat
04 #
05
06 echo "Content-type: text/html"
07 echo ""
08 echo "<!DOCTYPE html>
09 <html>
10 <head><title>Router Points</title>
11 </head>
12 <body>
13 <h1>Router CGI Page</h1><hr>"
14
15 # -- show router system load averages --
16 echo "<h2> System Load Averages </h2>"
17 echo "1 minute load:"
18 cat /proc/loadavg |awk '{print $1}'
19 echo "<br>5 minute load:"
20 cat /proc/loadavg |awk '{print $2}'
21 echo "<br>15 minute load:"
22 cat /proc/loadavg |awk '{print $3}'
23
24 # -- show vmstat -- use <pre> formatting
25 echo "<h2> Vmstat Results </h2> <pre>"
26 vmstat
27 echo "</pre></body></html>"
CGI web pages use Ash/Bash echo statements to output HTML code. It is important to start the page by echo-ing out "Content-type: text/html" with an added new line (lines 6-7). For this example, including HTML heading tags such as <h2> in the echo string improves the presentation (lines 16 and 25).
The output from Ash/Bash statements such as
cat /proc/loadavg |awk '{print $1}'will be shown directly on the web page.
Using the HTML <pre> tag provides a pre-formatted fixed format for the output from the vmstat monitoring utility (lines 25-27).
After creating the CGI page, the final step involves setting the file’s execution rights as follows:
chmod +x test.cgiYou can now access your custom web page at http://router_ip/cgi-bin/test.cgi. Figure 9 shows the test CGI web page.
Connecting to a Raspberry Pi
For our final project, we want to pass the data from the router to a Raspberry Pi. You could modify this project to pass data to a Home Assistant node or any PC on your home network.
The simplest protocol for passing data is to use TCP sockets. This approach doesn’t require any added software to be loaded on either the router or on the Rasp Pi.
You can use the Bash nc (or netcat) to both send and receive TCP messages. To create an nc test, open two terminal windows: one on the router and the other on the Raspberry Pi (Figure 10).

To set up a listener on the Rasp Pi, define the Rasp Pi’s IP address with a port (1234 in this example). The -l option sets listening mode, and -k will keep the connection open for multiple messages.
On the router sender side, an echo message is piped to the nc command with the Rasp Pi’s IP address and port.
Next, you need to periodically send dynamic data out via TCP. Listing 5 shows an Ash script file that uses our earlier Ash/AWK code to get the router’s load averages and then pipes the values to a TCP listener every two seconds.
Node-RED is a great visual programming environment that comes preinstalled on the Raspberry Pi Raspbian image. To get TCP messages from the script in Listing 5 into Node-RED, two tcp in nodes can be configured with the required port numbers. To show the data graphically, two dashboard ui_gauge nodes can be connected to the outputs of the tcp in nodes. Figure 11 shows the Node-RED logic and web dashboard for the two router load average points.
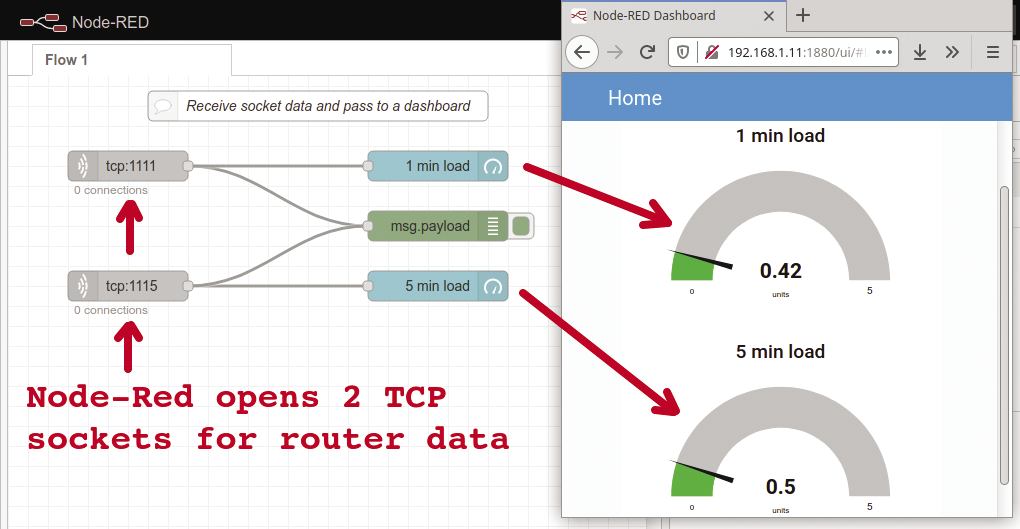
Listing 5: Sending Router Data to a TCP Socket
#!/bin/ash
# send_loadavg.sh - Send Router Load Averages via TCP
# - send 1 min avg to port 1111
# - send 5 min avg to port 1115
while true
do
  cat /proc/loadavg | awk '{printf $1}'| nc 192.168.1.11 1111
  cat /proc/loadavg | awk '{printf $2}'| nc 192.168.1.11 1115
  sleep 2
done
Un-Bricking a Router
When we started reflashing and reconfiguring our router for these projects, we made lots of mistakes. We locked up or “bricked” our routers about a dozen times. If you’ve made a simple mistake, often all you need to do is reset your router and then connect directly to a LAN port to redo your configuration. If this fails, check the OpenWRT blog for any recommendations for your specific router model. There are some excellent custom solutions such as nmrpflash for Netgear routers, which offers an almost 100 percent guaranteed un-bricking solution.
If resetting the router doesn’t work and there are no custom solutions, then the next step is the 30-30-30 Hard Reset rule. The following will work for almost all routers:
• Press the reset button for 30 seconds.
• While pressing the reset button, unplug the router for another 30 seconds.
• Plug the router back in while still holding the reset button for a final 30 seconds.
• Release the reset button, and try to reconfigure.
Unfortunately, there are cases where even the 30-30-30 Hard Reset rule won’t un-brick a router. This happened to us when we loaded an incorrect firmware version.
Summary
In our tasks for these projects, we found that using shell scripting in Ash rather than Bash wasn’t an issue. However if you are moving code between OpenWRT and Raspbian, you’ll need to toggle between #!/bin/ash and #!/bin/bash.
If you would rather use MQTT instead of TCP to pass data, the Mosquitto sub/pub command-line tools can be installed on the router using opkg.
Overall, we would recommend repurposing an old home router. It offers a lot of interesting projects with a small price tag.
You can find listings here.