Heavy Metal
A tailor-made image like GalliumOS “Bismuth” will keep your Chromebook healthy after its expiration date.
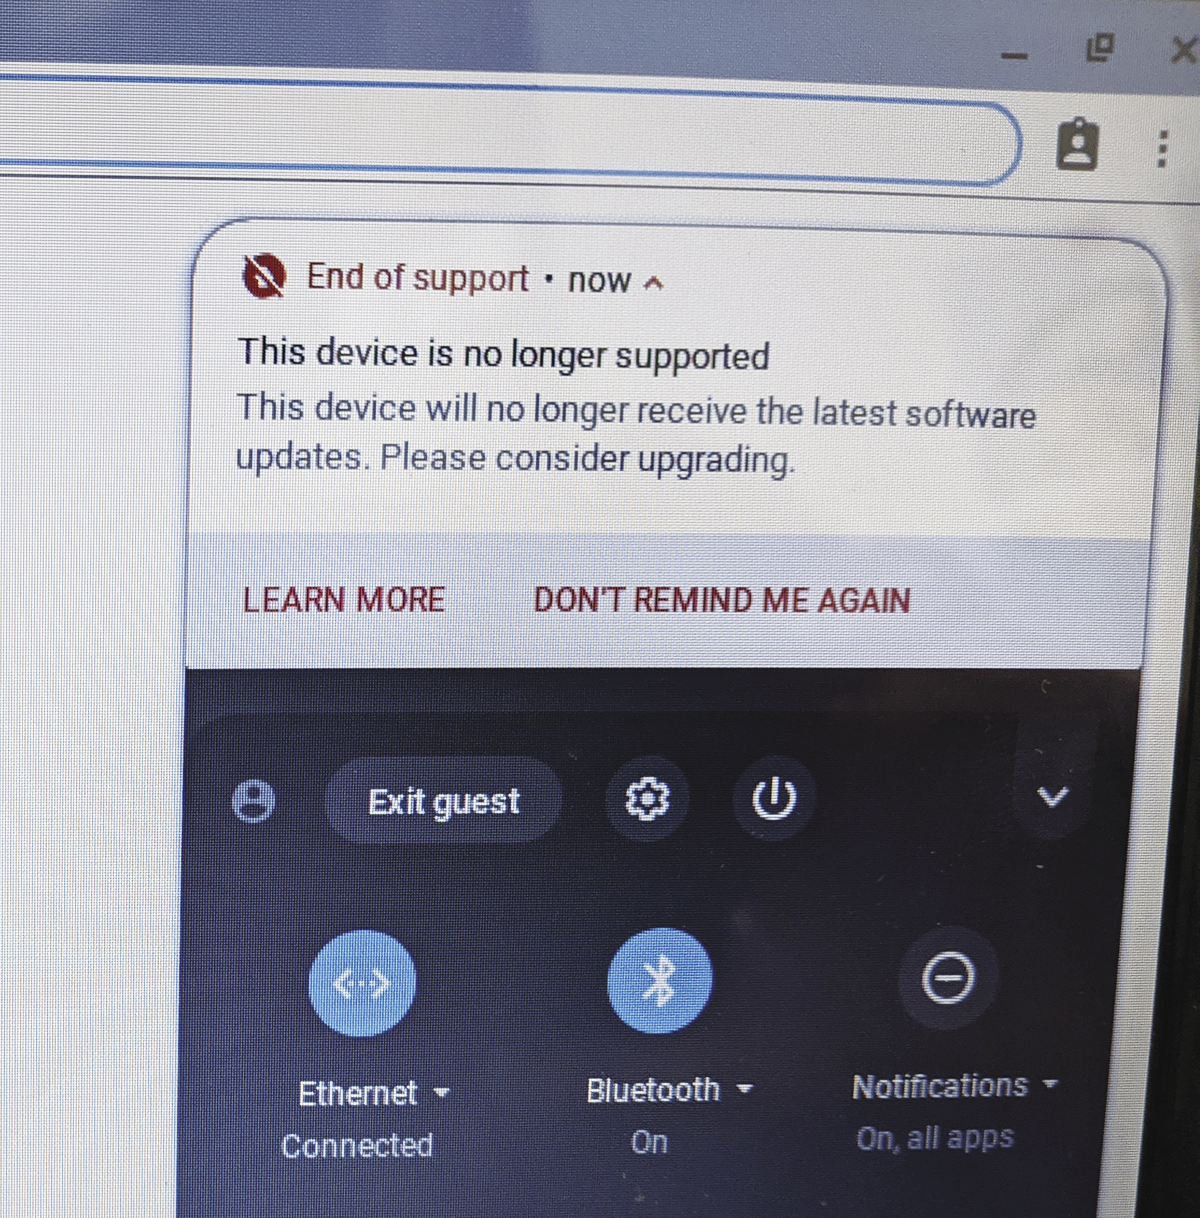
Every computer user is familiar with the scenario. Your favorite piece of hardware tells you “End of Support – sorry, this device is no longer supported” (Figure 1) or “This device will no longer receive software updates,” followed by the laconic advice to “Please consider upgrading.”
No software is supported forever. The continual task of coding updates and bug fixes takes time and energy, and after some predetermined support interval, the vendor just stops providing patches for old versions in order to focus on later systems.
With Chrome OS and Chromebook computers, the task of providing support is even more complicated. The term Chromebook does not define a single hardware system. Instead, Google contracts with several different hardware vendors to produce Chromebooks, including Samsung, HP, Toshiba, Asus, Dell, and many others. Google must maintain separate ISO images for each hardware system. Every Chromebook has a published expiration date, known as the Auto Update Expiration (AUE) date, which defines the last date when the operating system will receive an update. In theory, you could continue to operate the Chromebook after the AUE, but the system will be insecure, and the fact that Chromebooks are so heavily reliant on the Internet makes it even more dangerous to operate the system without security updates.
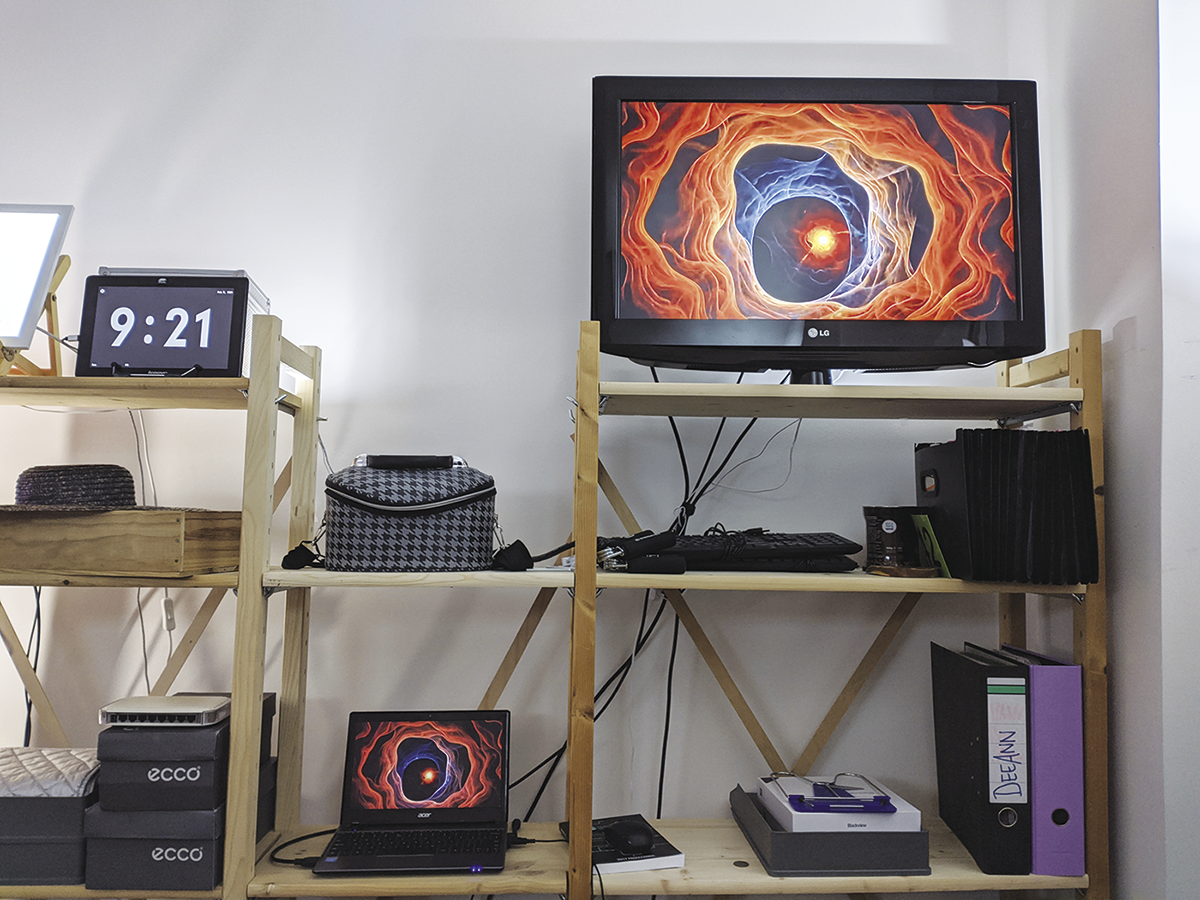
I bought my little Acer Chromebook C710 at a Walmart in 2014, and it has been a special companion ever since: under shady trees in California, on the icy Westfjords of Iceland, or in a tiny Prague hotel room the size of a double bed. Today, my Chromebook acts as a kind of media station that plays videos from YouTube, as well as from media libraries and various portals on a 40-inch HD-ready TV (Figure 2). Hard disk space or battery life are no longer important. (See Table 1 for Acer C710 hardware specs.)
|
CPU |
1.1GHz Intel Celeron 847 (dual-core) |
|
RAM |
2GB DDR3 SDRAM |
|
Hard disk |
SSD (16GB) |
|
Display |
1366x768, HDMI, VGA |
|
Webcam |
1 megapixel |
|
Network |
Broadcom BCM57785 (Gigabit Ethernet), Qualcomm Atheros AR9462 (802.11 a/b/g/n), Foxconn T77H348.02 (Bluetooth) |
|
Miscellaneous |
3 USB 2.0, SD card reader |
|
Price |
New: ~$200 (2013) |
When I got the message that the system had reached its AUE and would no longer be supported, I resolved to find another solution that would keep my Chromebook alive. All this took me quite quickly to GalliumOS, which is specially tailored for Chromebook users and offers images for all processor families (Listing 1). Installation is simple and makes no special demands. A recovery image of Chrome OS is available in case you need to revert to the previous system at any time.
Listing 1: GalliumOS Images by CPU Type
../
TORRENTS/ 22-Dec-2019 22:17 -
CHECKSUMS-galliumos-3.1.gpg 22-Dec-2019 22:00 3364
galliumos-3.1-apollolake.iso 22-Dec-2019 20:16 1231513600
galliumos-3.1-baytrail.iso 22-Dec-2019 20:16 1231521792
galliumos-3.1-braswell.iso 22-Dec-2019 20:16 1231521792
galliumos-3.1-broadwell.iso 22-Dec-2019 20:16 1231513600
galliumos-3.1-haswell.iso 22-Dec-2019 20:16 1231523840
galliumos-3.1-kabylake.iso 22-Dec-2019 20:16 1231513600
galliumos-3.1-samus.iso 22-Dec-2019 20:16 1231697920
galliumos-3.1-sandyivy.iso 22-Dec-2019 20:16 1231513600
galliumos-3.1-skylake.iso 22-Dec-2019 20:16 1231521792
galliumos-generic-coreimage-3.1.tgz 16-Dec-2019 03:29 1160948557
GalliumOS is based on Xubuntu and uses Xfce as its desktop, which sits well with the aged Acer Chromebook and its meager hardware resources. GalliumOS for Chromebooks in version 3.x goes by the name of “Bismuth” – like chromium and gallium, bismuth is a metal in the periodic table. Version 3.1, which I use in this article, is a maintenance update.
Depends on the Hardware
The steps for installing GalliumOS on a Chromebook depend heavily on the hardware. In the simplest case, Chromebooks behave like full-fledged PCs and let you boot from a USB stick. In that case, you could install GalliumOS or any other Linux variant in much the same way you would install Linux on any computer. However, some models (like my trusty Acer, for example) require a firmware update. Check out the GalliumOS hardware compatibility list to determine if your Chromebook will need a firmware update.
A sticker on the underside of your Chromebook should provide system hardware details. You can also enter the local URL chrome://system or check the menu Settings | About Chrome OS | Google Chrome OS.
Look for the model number and hardware ID, which you can use to find your device in the GalliumOS hardware compatibility list. Dual boot, virtual machine (VM), or complete replacement are possible options, but every option might not be available for every device.
ISO and Recovery Image
The first thing to do is to download the appropriate ISO file from the Gallium FTP directory and drop it onto a USB stick, either using dd (Listing 2) or an alternative disk tool such as the SUSE Studio Imagewriter, Ubuntu’s Startup Disk Creator, or a Windows tool like Rufus.
Listing 2: Onto the USB Stick
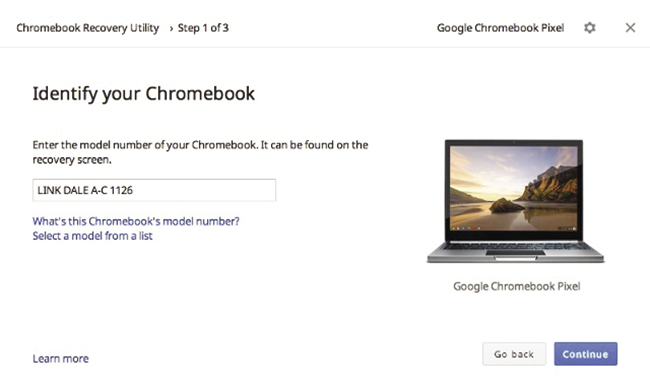
$ dd if=/home/dlittle/Downloads/galliumos-3.1-sandyivy.iso of=/dev/sdb1 status=progressThe second step is to create a backup and a recovery image. Back up any important files by moving them to a USB stick or to the cloud. Several methods are available for creating a recovery disk. Linux users can take the long route via a shell script provided by Google; however, it is better to install the browser Recovery Extension and follow the steps. Both methods have their advantages; however, keep in mind that the Chrome OS browser extension is only available if the Chromebook is still fully functional (Figure 3).
Firmware Update
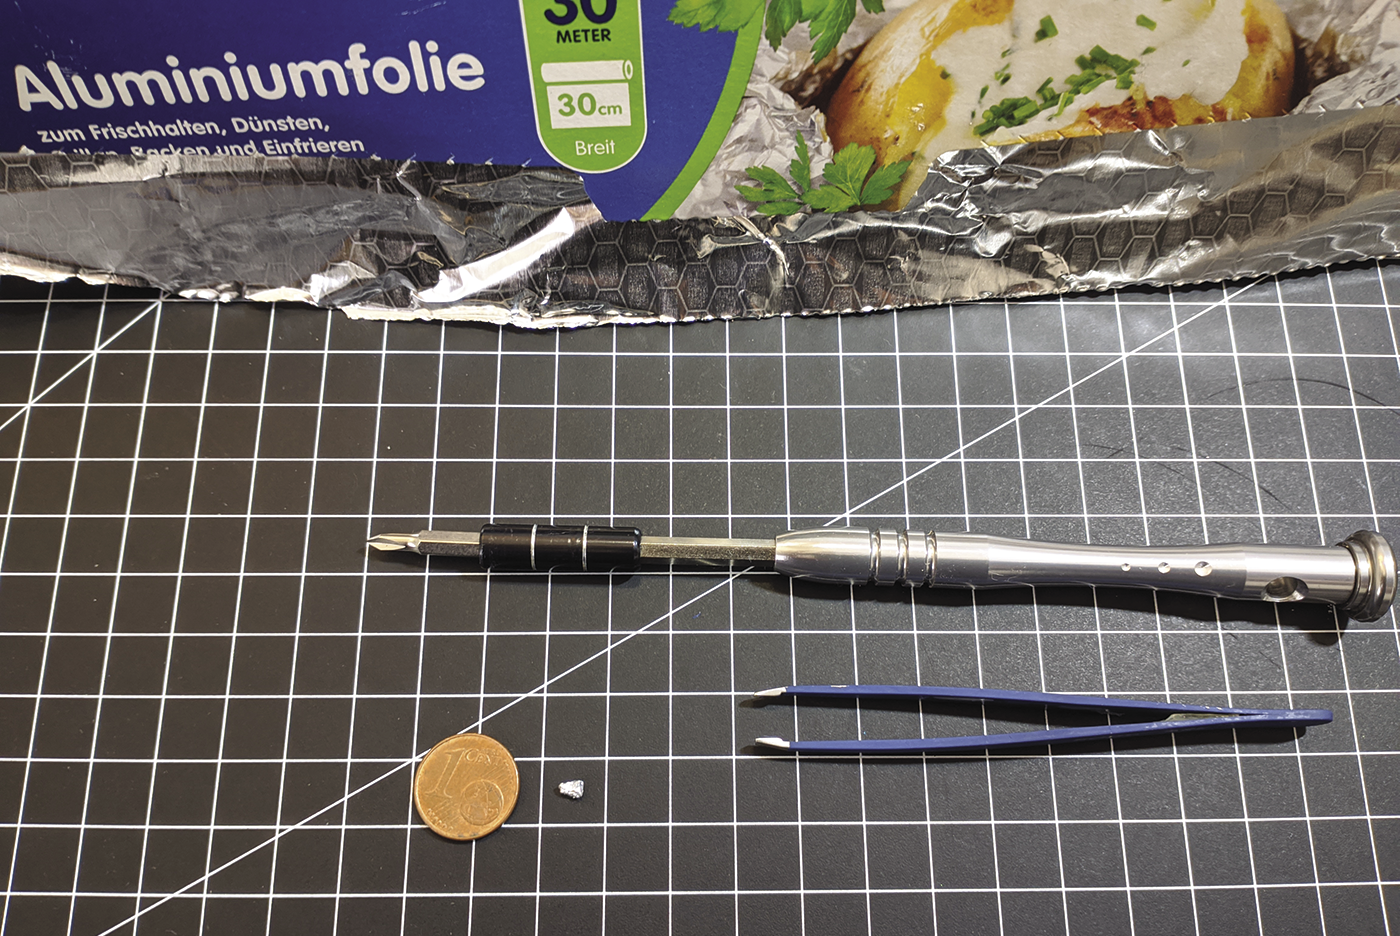
The steps for replacing the firmware can vary depending on the hardware. On some systems (such as the small Acer), changing the firmware even requires bridging a write-protect jumper. If you don’t have a suitable cover for the jumper, you can use aluminum foil and tweezers. I found a YouTube video with the necessary steps for my system. Be sure you read the instructions for the firmware and device – any wrong procedure can brick your cherished hardware. Detailed documentation describes both the recovery and developer modes.
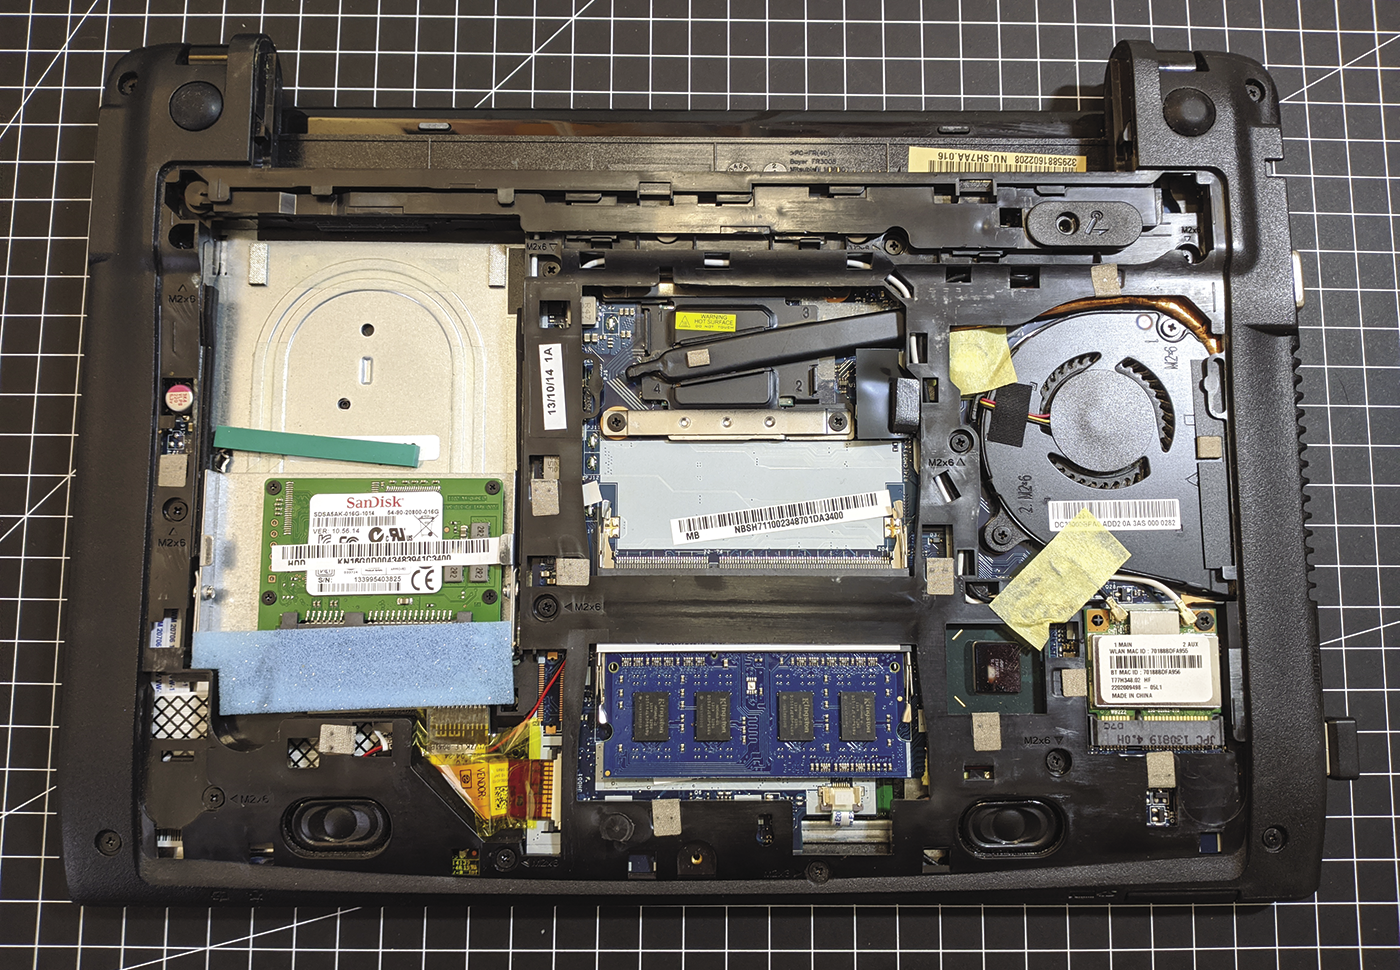
The tools you need are a Phillips screwdriver, tweezers, and a strip of aluminum foil (about 3 centimeters long and 1 centimeter wide) (Figure 4). First, switch off the Chromebook and disconnect it from the mains. Then you have to remove the battery (the Acer Chromebook has a small lever for this) and unlock the cover at the bottom (only one screw) and pull it out. Usually, the screw is located under the sticker for the long-expired warranty (“Warranty void if seal broken.”) The jumper is found under a plastic cover (Figure 5).
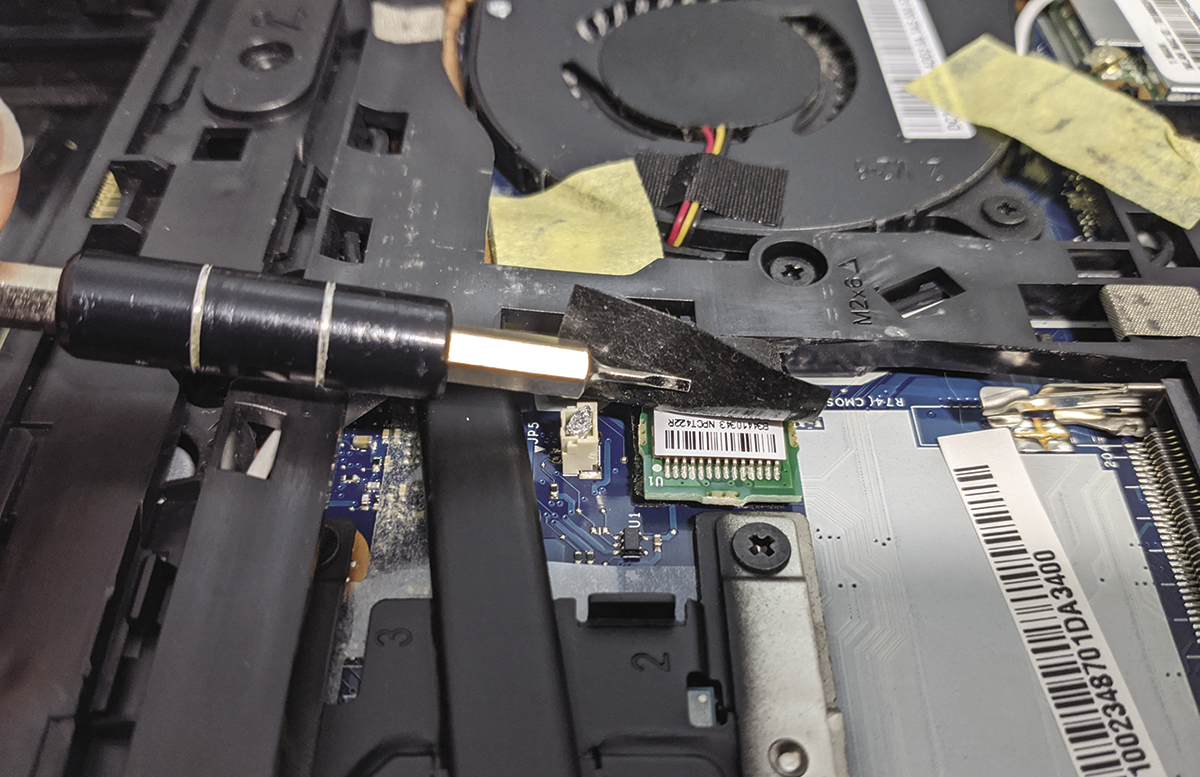
Now roll up the aluminum foil and compress it to the size of a grain of rice; you can press it into the jumper with the help of the tweezers, where it bridges the contacts and thus lifts the firmware’s write protection (Figure 6). This is fine for installing the new operating system, but certainly not as a permanent solution. Now you can reassemble the Chromebook, plug in the battery, connect the power supply, and start recovery mode.
Recovery and Developer Mode
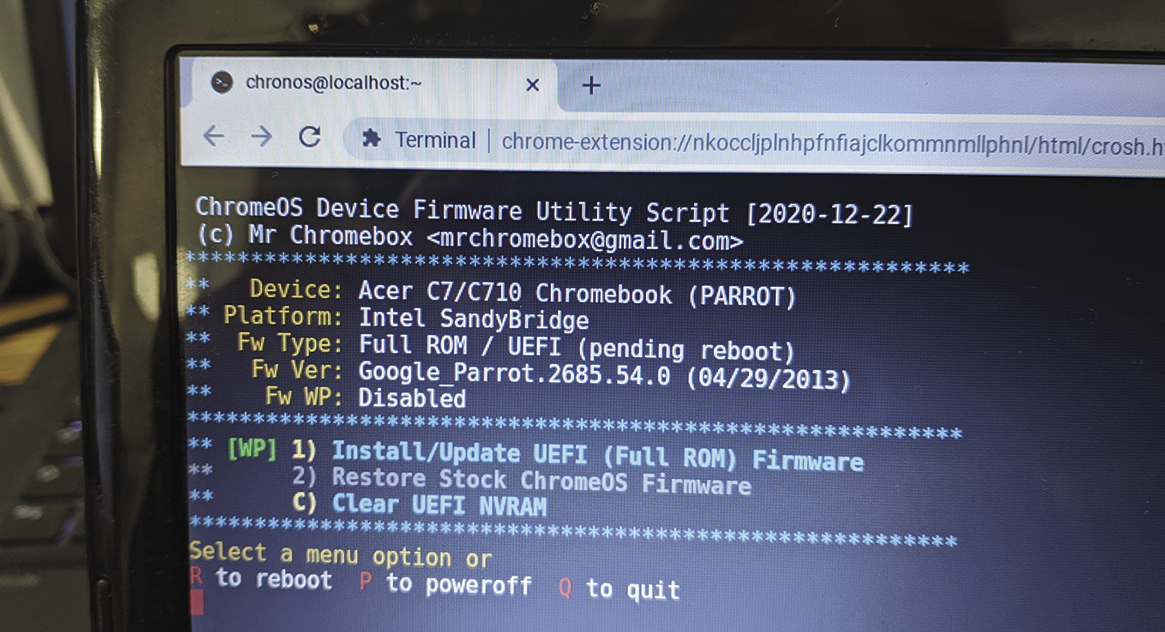
The keyboard shortcut Esc+F3+Power boots the Chromebook’s recovery system; when you get there, pressing Ctrl+D – not displayed on the screen – boots into Developer mode. In the graphical login manager, log in as a guest and start a Chrome Shell (Crosh) with Ctrl+Alt+T. In a second browser tab, go to the MrChromebox website, which provides the Chrome OS Device Firmware Utility Script (Listing 3), which can be downloaded using curl at the Crosh terminal (Listing 3, first line). Then proceed to install and launch (second and third line).
The largely self-explanatory utility script (Listing 4) installs either a UEFI update or a stock recovery image for Chrome OS. Some dead devices can also be persuaded to cooperate again by pressing C (Clear UEFI NVRAM) (Figure 7). Again, caution is advised; only start the firmware update if you have the correct hardware specs as identified by the script. If the aluminum rice grain is still in the right place, the script shows the note Fw WP: Disabled in the fifth line of the hardware information. Then it should run without any problems, including booting from the USB stick.
Listing 4: firmware-util.sh
#!/bin/bash
#
# This script offers provides the ability to update the
# Legacy Boot payload, set boot options, and install
# a custom coreboot firmware for supported
# Chrome OS devices
#
# Created by Mr.Chromebox <mrchromebox@gmail.com>
#
# May be freely distributed and modified as needed,
# as long as proper attribution is given.
#

#where the stuff is
script_url="https://raw.githubusercontent.com/MrChromebox/scripts/master/"

#ensure output of system tools in en-us for parsing
export LC_ALL=C

#set working dir
if cat /etc/lsb-release | grep "Chrom" > /dev/null 2>&1; then
  # needed for ChromeOS/ChromiumOS v82+
  mkdir -p /usr/local/bin
  cd /usr/local/bin
else
  cd /tmp
fi

#get support scripts
echo -e "\nDownloading supporting files..."
rm -rf firmware.sh >/dev/null 2>&1
rm -rf functions.sh >/dev/null 2>&1
rm -rf sources.sh >/dev/null 2>&1
curl -sLO ${script_url}firmware.sh
rc0=$?
curl -sLO ${script_url}functions.sh
rc1=$?
curl -sLO ${script_url}sources.sh
rc2=$?
if [[ $rc0 -ne 0 || $rc1 -ne 0 || $rc2 -ne 0 ]]; then
  echo -e "Error downloading one or more required files; cannot continue"
  exit 1
fi

source ./sources.sh
source ./firmware.sh
source ./functions.sh

#set working dir
cd /tmp

#do setup stuff
prelim_setup
[[ $? -ne 0 ]] && exit 1

#show menu
menu_fwupdate
Testing and Installing Gallium
At this point, the paths with and without tinfoil meet up again; now the USB stick with GalliumOS, created earlier on, is used for booting. As with all modern Linuxes, you can see how things will work using a live system before an installation on the hard disk gives you the hard facts. This includes accessing the hard disk previously used by Chrome OS, although recovery mode has permanently deleted it for security reasons.
Anyone who decides to install GalliumOS on the hard disk will quickly find themselves at home in Ubuntu’s default installer, Ubiquity. From then on, the Chromebook behaves like any other PC or laptop system. The advantage is that the Linux image is already adapted to the existing hardware, much like with Apple. Now, at last, assuming everything worked out, the aluminum rice grain has to be removed. From now on, the Chromebook will boot willingly from USB.
Xfce Desktop with HDMI Output
The Xfce desktop on GalliumOS (Figure 8) has everything a modern desktop needs. The layout and many settings are well tailored to the small display and low-powered hardware of the Acer.
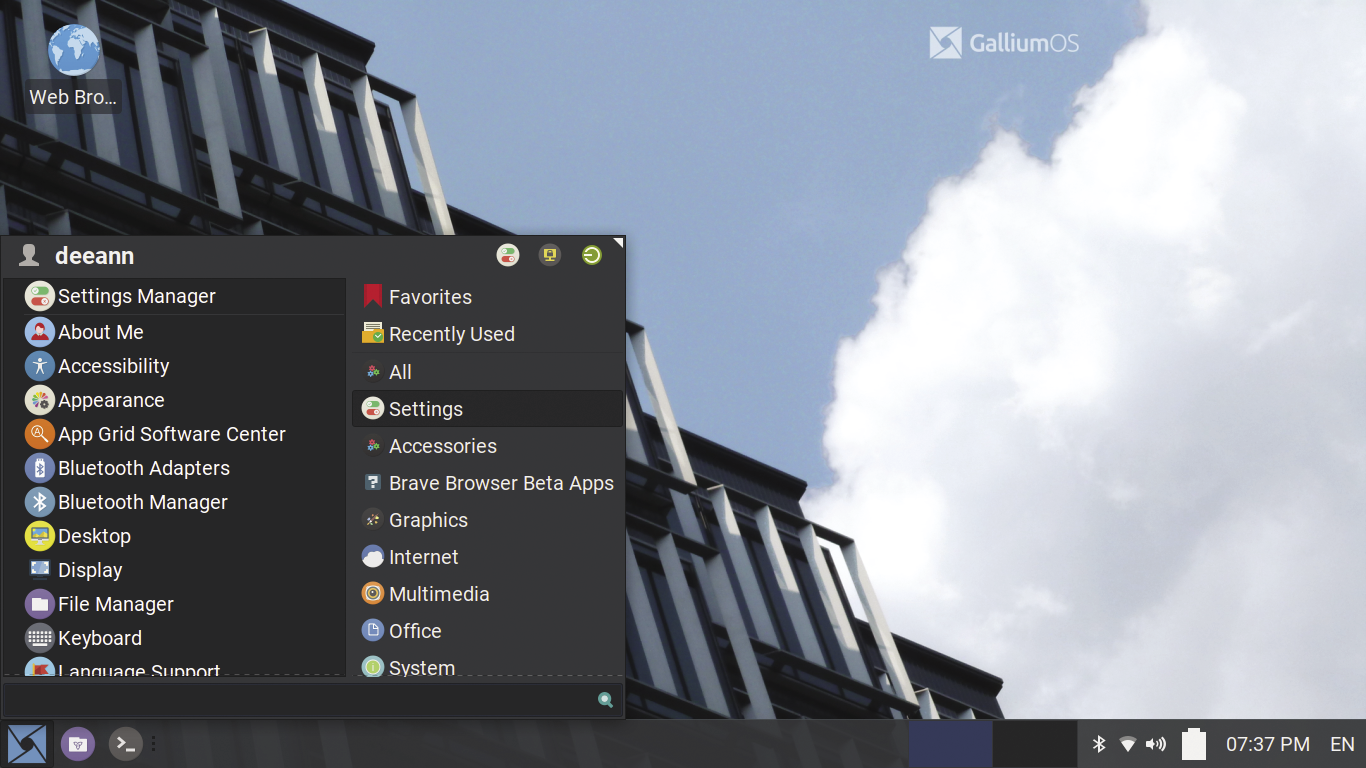
Having said this, the start menu already has a surprising number of entries, for example, a separate menu item for GalliumOSUpdate – a link to a root shell that executes apt -qq update (Figure 9). The -qq parameter ensures that all output except error messages is suppressed.
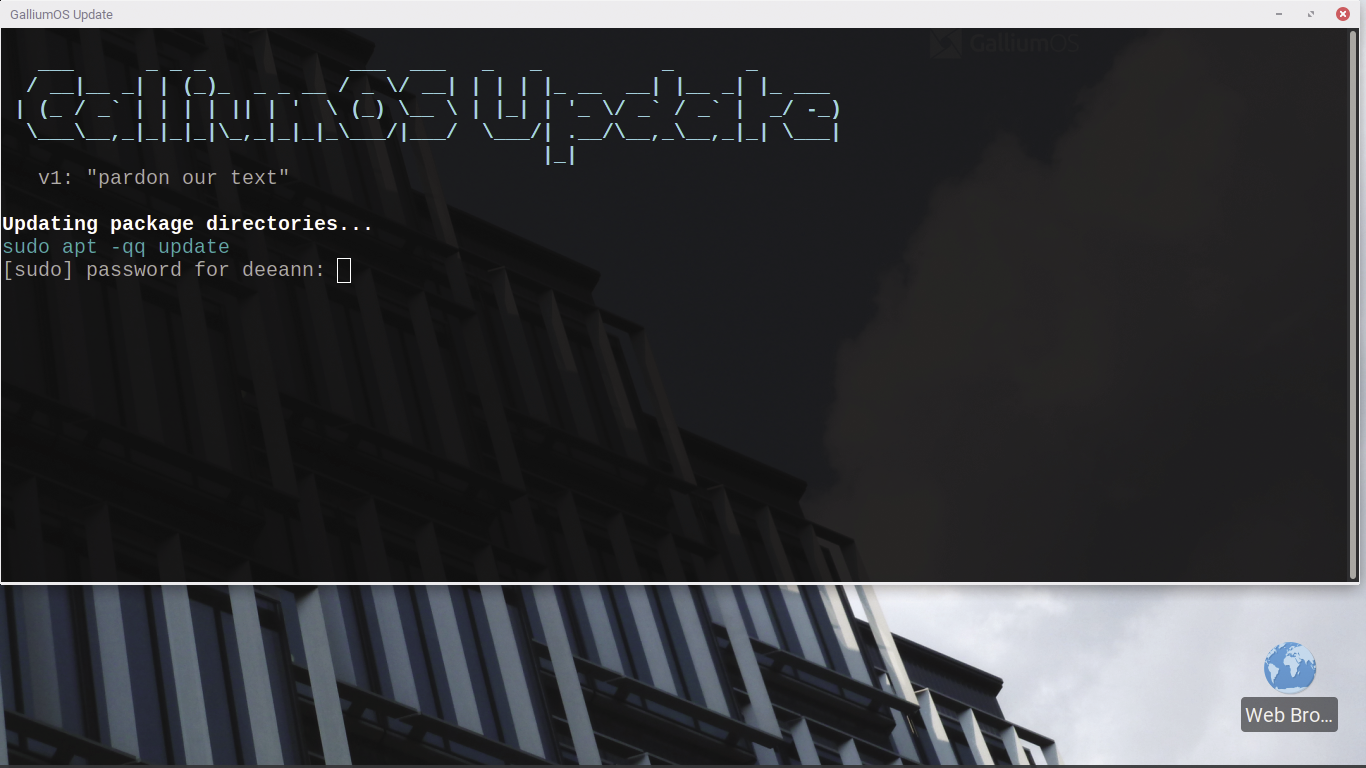
sudo apt -qq update.Enough Power
The Chromebook’s performance feels the same under GalliumOS, even if the fans now sound a little louder, especially during videos. However, lm-sensors quickly shows that there is no reason for concern. The (still first) battery lasts for around two hours, so not quite as long as with Chrome OS.
Touchpad, audio, webcam, WiFi, and Ethernet work without further intervention, as does my LG TV connected via HDMI with 720p resolution. The TV is about the same age as the Chromebook and a perfect match. YouTube, Amazon Prime, and Jitsi Meet work without any problems; only videoconferencing causes frequent lag. (The processor or I/O systems are probably struggling with the data demands of videoconferencing.)
It looks like these life-extending measures have paid off. A USB mouse and a USB keyboard complete the setup. The ensemble has been running smoothly for several weeks, delivering music, videos, TV, or movies to the office every day. Take that, Google!
