
Get creative with the FLUX beamo laser and open source software
With the FLUX beamo laser and a Raspberry Pi Board B10001, you can execute your own laser cutting projects on a wide range of materials.
Laser cutting mainly used to be the purview of hard-headed business owners with solid financial backing and a business plan to make sure the laser paid for its upkeep. And there were hobbyists who were more interested in the arts and crafts side of laser cutting and saw the laser as a tool for cutting and engraving materials such as wood, cloth, and acrylics in the scope of their arts and crafts projects. The trouble was, many people were more than a little worried about the Heath Robinson-style, low-budget lasers they could purchase at the time. The foundations of the laser world were to be shaken though, when FLUX – an organization founded by a “group of passionate young engineers and designers,” as the manufacturer itself states – launched the Beambox laser cutting machine back in 2018. FLUX quickly followed up with the beamo, promoted as “the world’s smallest laser cutting machine” the next year.
The FLUX laser family not only meant a paradigm shift in terms of laser cutting machine pricing, but also a move towards a community-driven approach. For one thing, the FLUX laser family relies on a Raspberry Pi, in the form of the Raspberry Pi Board B10001, to control the machine. And the downloadable software package that lets users send their ideas (in the form of, say, PNG images or vector diagrams) to the laser runs on your choice of operating system, whether this be Windows, macOS, or Linux. Expanding on the community idea, FLUX users can get together to exchange ideas on Facebook or at regular FLUX community meetings that take place all over the world – even in Germany, where we’re based. So, laser-affine readers, let’s get started with unboxing and the setup on the hardware and software side.
Unboxing
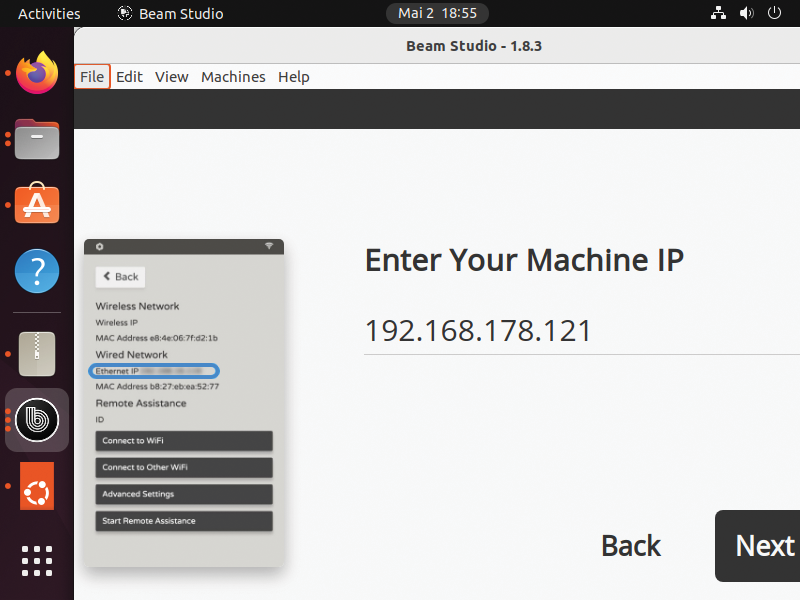
The FLUX beamo reaches its new owner in a very large and fairly heavy cardboard box. If you are worried about the state of your back, then it’s a good idea to ask a friend to help you lift the beast out of the box. Once you’ve done this, there are a couple of tasks to complete before you get started on your first project. Besides doing the obvious things like removing the vent hose and attaching it to the duct on rear of the laser with the clamp kindly provided by the supplier, attaching the WiFi antenna, and plugging in, there is also the software setup. This no big deal: After powering on your laser cutter, select Network on the Start screen (Figure 1) and then Connect to WiFi if you are using the machine’s wireless interface. Choose a WiFi network, enter the password, and let DHCP do its magic. You can alternatively use the Ethernet cable provided – this can be a good idea if the WiFi connection is too slow or unreliable. Once the machine has an IP address, make a note of the address and move on to the next stage, installing Beam Studio.

Beam Studio
If you worked with CO2 lasers prior to 2009, one of the biggest items on your wish list was probably a camera with software support that let you see what the laser was “seeing.” Something that would take the guesswork out of positioning the laser head and alleviate any worries about lasering beyond the edge of the medium. Amazingly, considering its low price compared to the laser behemoths of the past, the FLUX laser family has exactly that in the form of a built-in camera and Beam Studio.
To install Beam Studio (Figure 2), go to the FLUX website and select the version that matches your operating system. If you have a recent Ubuntu system, this will be v1.9.5 ‑ Ubuntu-18.04 x64. The name of the install file is beam-studio_1.9.5_amd64.deb, and you can install it using the Ubuntu package manager. Right-click on the downloaded file, select Open with other application, and then select Software Install. The installer prompts you for your password and then sets about installing Beam Studio. If you picked the DEB package up directly from FLUX, you can ignore the warnings about the software being potentially unsafe.
Beam Studio asks you to set up an account and then prompts you to choose how to connect to your laser cutter (Figure 3). You can also optionally choose to calibrate the camera (Figure 4).
Test Job
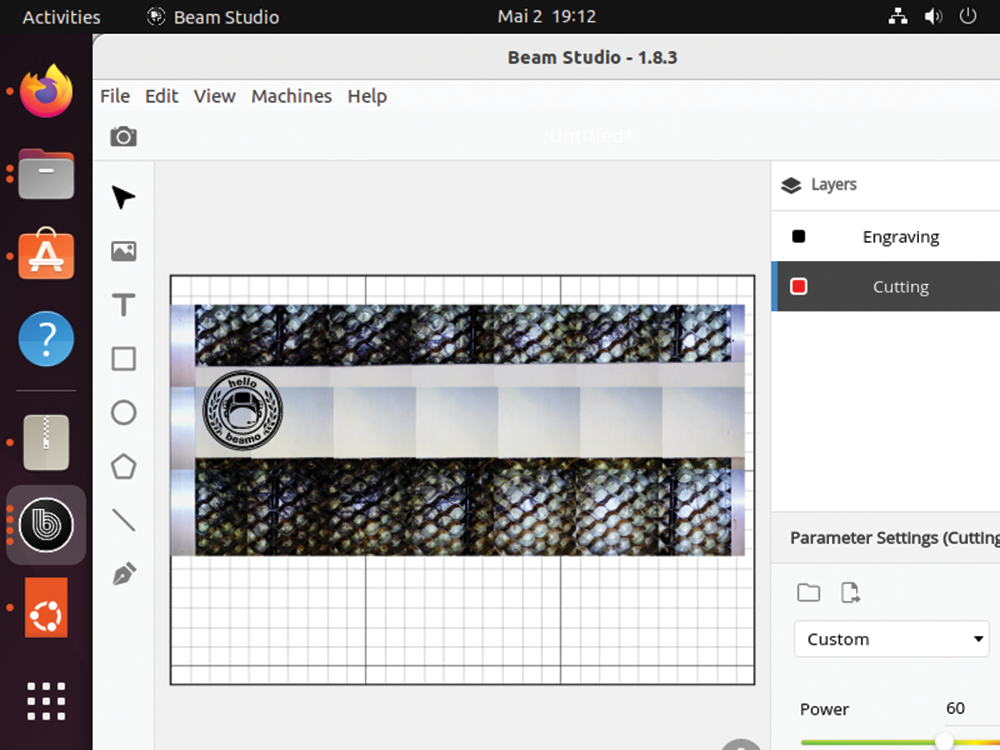
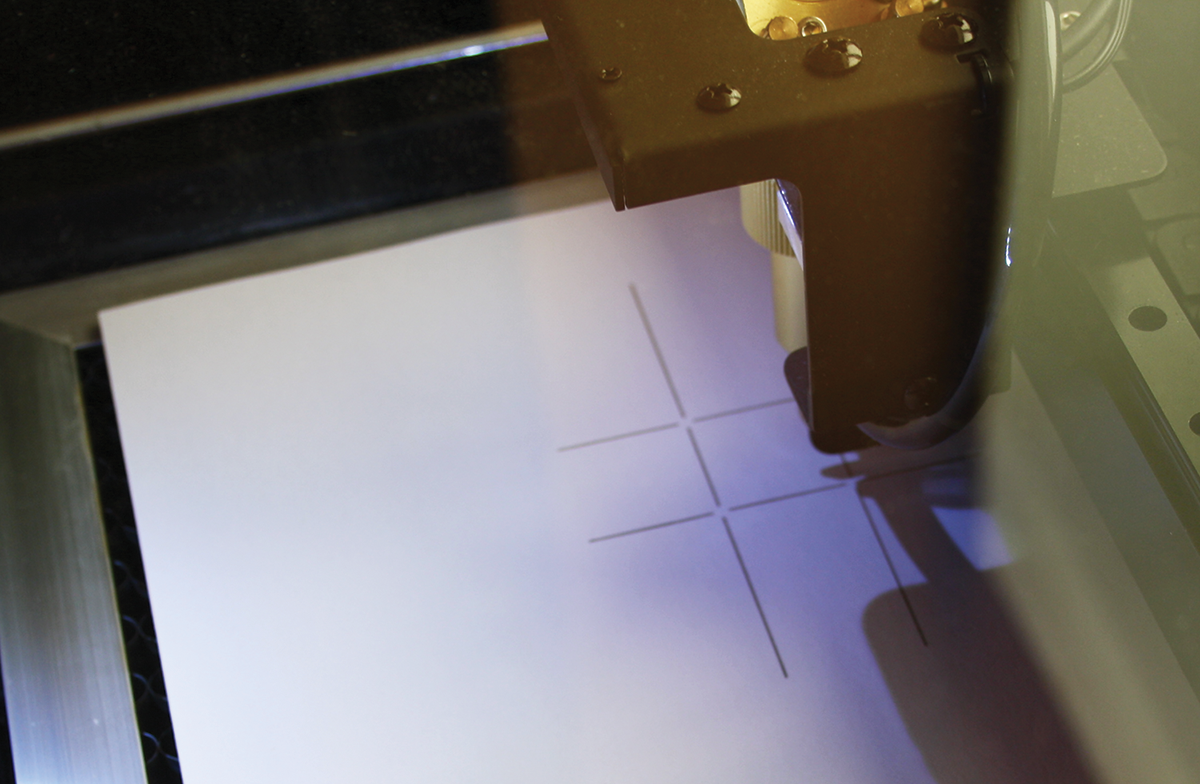
FLUX thoughtfully provides a tiny piece of plywood and a test job to help you get started. It’s a good way of finding out if your laser is correctly aligned. If it isn’t, see the “Smoke and Mirrors” box. Place the piece of plywood on the grid and follow the procedure to set the focus of your laser – either fold down the piece of Perspex for a manual focus, or use the optional autofocus feature. Now click on the camera icon and drag a frame around the area where you placed the piece of plywood. This tells the laser cutter to switch on the camera and scan for the exact position of the wood. Then select File | Example and load the imaginatively named Example of beamo file. As you can see from Figure 2, the file consists of two layers, a bitmap image with the hello beamo logo, and a single ring to cut out the engraving. This is an important feature. Layers let you engrave a bitmap image onto a suitable material such as wood or acrylics in one layer, and the cutting work with a simple vector image is assigned to a different layer with different parameters.
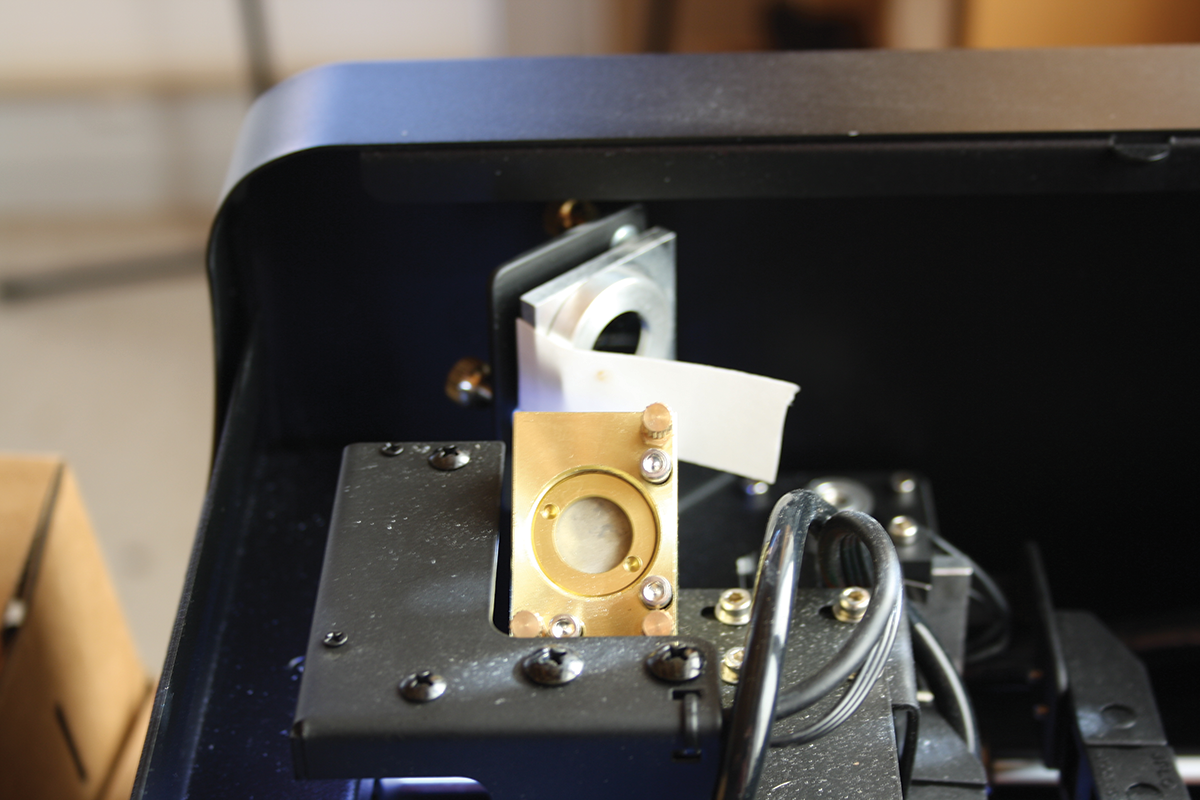
As you are probably aware, laser cutters are precision instruments. What you may not have been aware of up to this point is that the laser beam is deflected by mirrors to the laser head. Any knocks the laser’s packaging took en route to its new owner are likely to cause some misalignment issues. You may get lucky and not need to align the mirrors on your machine, and you may not. We were not so lucky and had to align the first reflecting mirror (Figure 5), which involves removing a large number of Allen screws before you can start the alignment. It sounds complicated, but if we managed it, we’re sure you can, too. Here’s what you need to do:
1. Mirror one: With the laser switched off, attach a piece of white sticky tape (that’s why it’s included in the scope of supply) to mirror number one. Close the laser’s lid and switch the power on. On the touch panel, tap Maintain. On the Maintenance screen, tap Motors. Then move the laser head manually to the top left position after doing so. Now press Laser Pulse to fire one shot at the tape (you should see a puff of smoke) and make sure you can see a dot. Now, move the laser head manually to the bottom left position. Make sure the lid is closed and fire another shot at the tape. If the dots from the laser shot line up, you can move on to the next mirror. If they don’t line up, adjust the screws on mirror number one and repeat the steps until the mirrors are lined up. If the second shot misses the tape entirely, move the head to center left position to check the direction in which you need to adjust. Turning the top left screw clockwise moves the dot down and to the left. Turning the top right screw clockwise moves the dot to the right, and moving the bottom screw moves the dot upward. Easy. All done. Now for mirror number two.
2. Mirror two: This time attach a piece of sticky tape to the metal ring on mirror three. Move the laser head to the center left position. Close the lid again and fire a shot. Then move the laser head to the center right position and fire another shot. The dots need to overlap. If not, adjust the screws on the second mirror until everything lines up. The screws are in different places and do different things this time. If you are really unlucky, you may need to adjust the laser head, the laser tube, and the third reflecting mirror, too. We’re not going to go into the procedures for doing so here, but again, it’s all smoke and mirrors. You may need to RTFM (which naturally means Read the FLUX Manual) at this point if you really need these adjustments. But let’s hope you were lucky and can move straight to the first actual laser engraving and cutting task.
Group the two images and center them on the plywood. The default parameter settings were chosen by FLUX and will be perfect for the job using the piece of plywood provided. Press Go, and then in the beamo window that appears, press the arrow button to start the job. If all of this worked, you are well on your way to getting creative with your FLUX laser. The next part of the journey involves creating your own designs on paper and scanning the results for post-processing with a software tool capable of handling both vector and bitmap images. In the Linux world, and beyond, the tool of choice here is likely to be Inkscape.
Inkscape
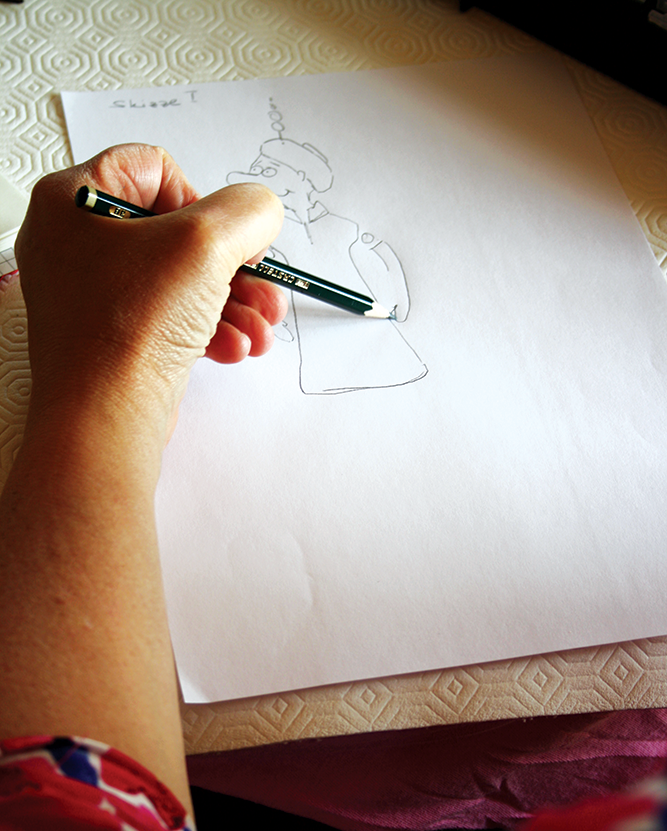
Installing Inkscape on Ubuntu is as easy as pie. If this amazing, free program isn’t already installed, simply launch the Ubuntu Software Center and type Inkscape in the search box. Then type your password when prompted, and wait for Inkscape to install. Now it’s time to get creative. Christa had this idea for a Christmas decoration showing the Three Wise Men, a star, and a camel. With her being one of those fortunate people who can imagine a scene in their heads and draw it on paper without needing photos or sketches as a reference, she just sat down and drew the image that you can see in Figure 6.
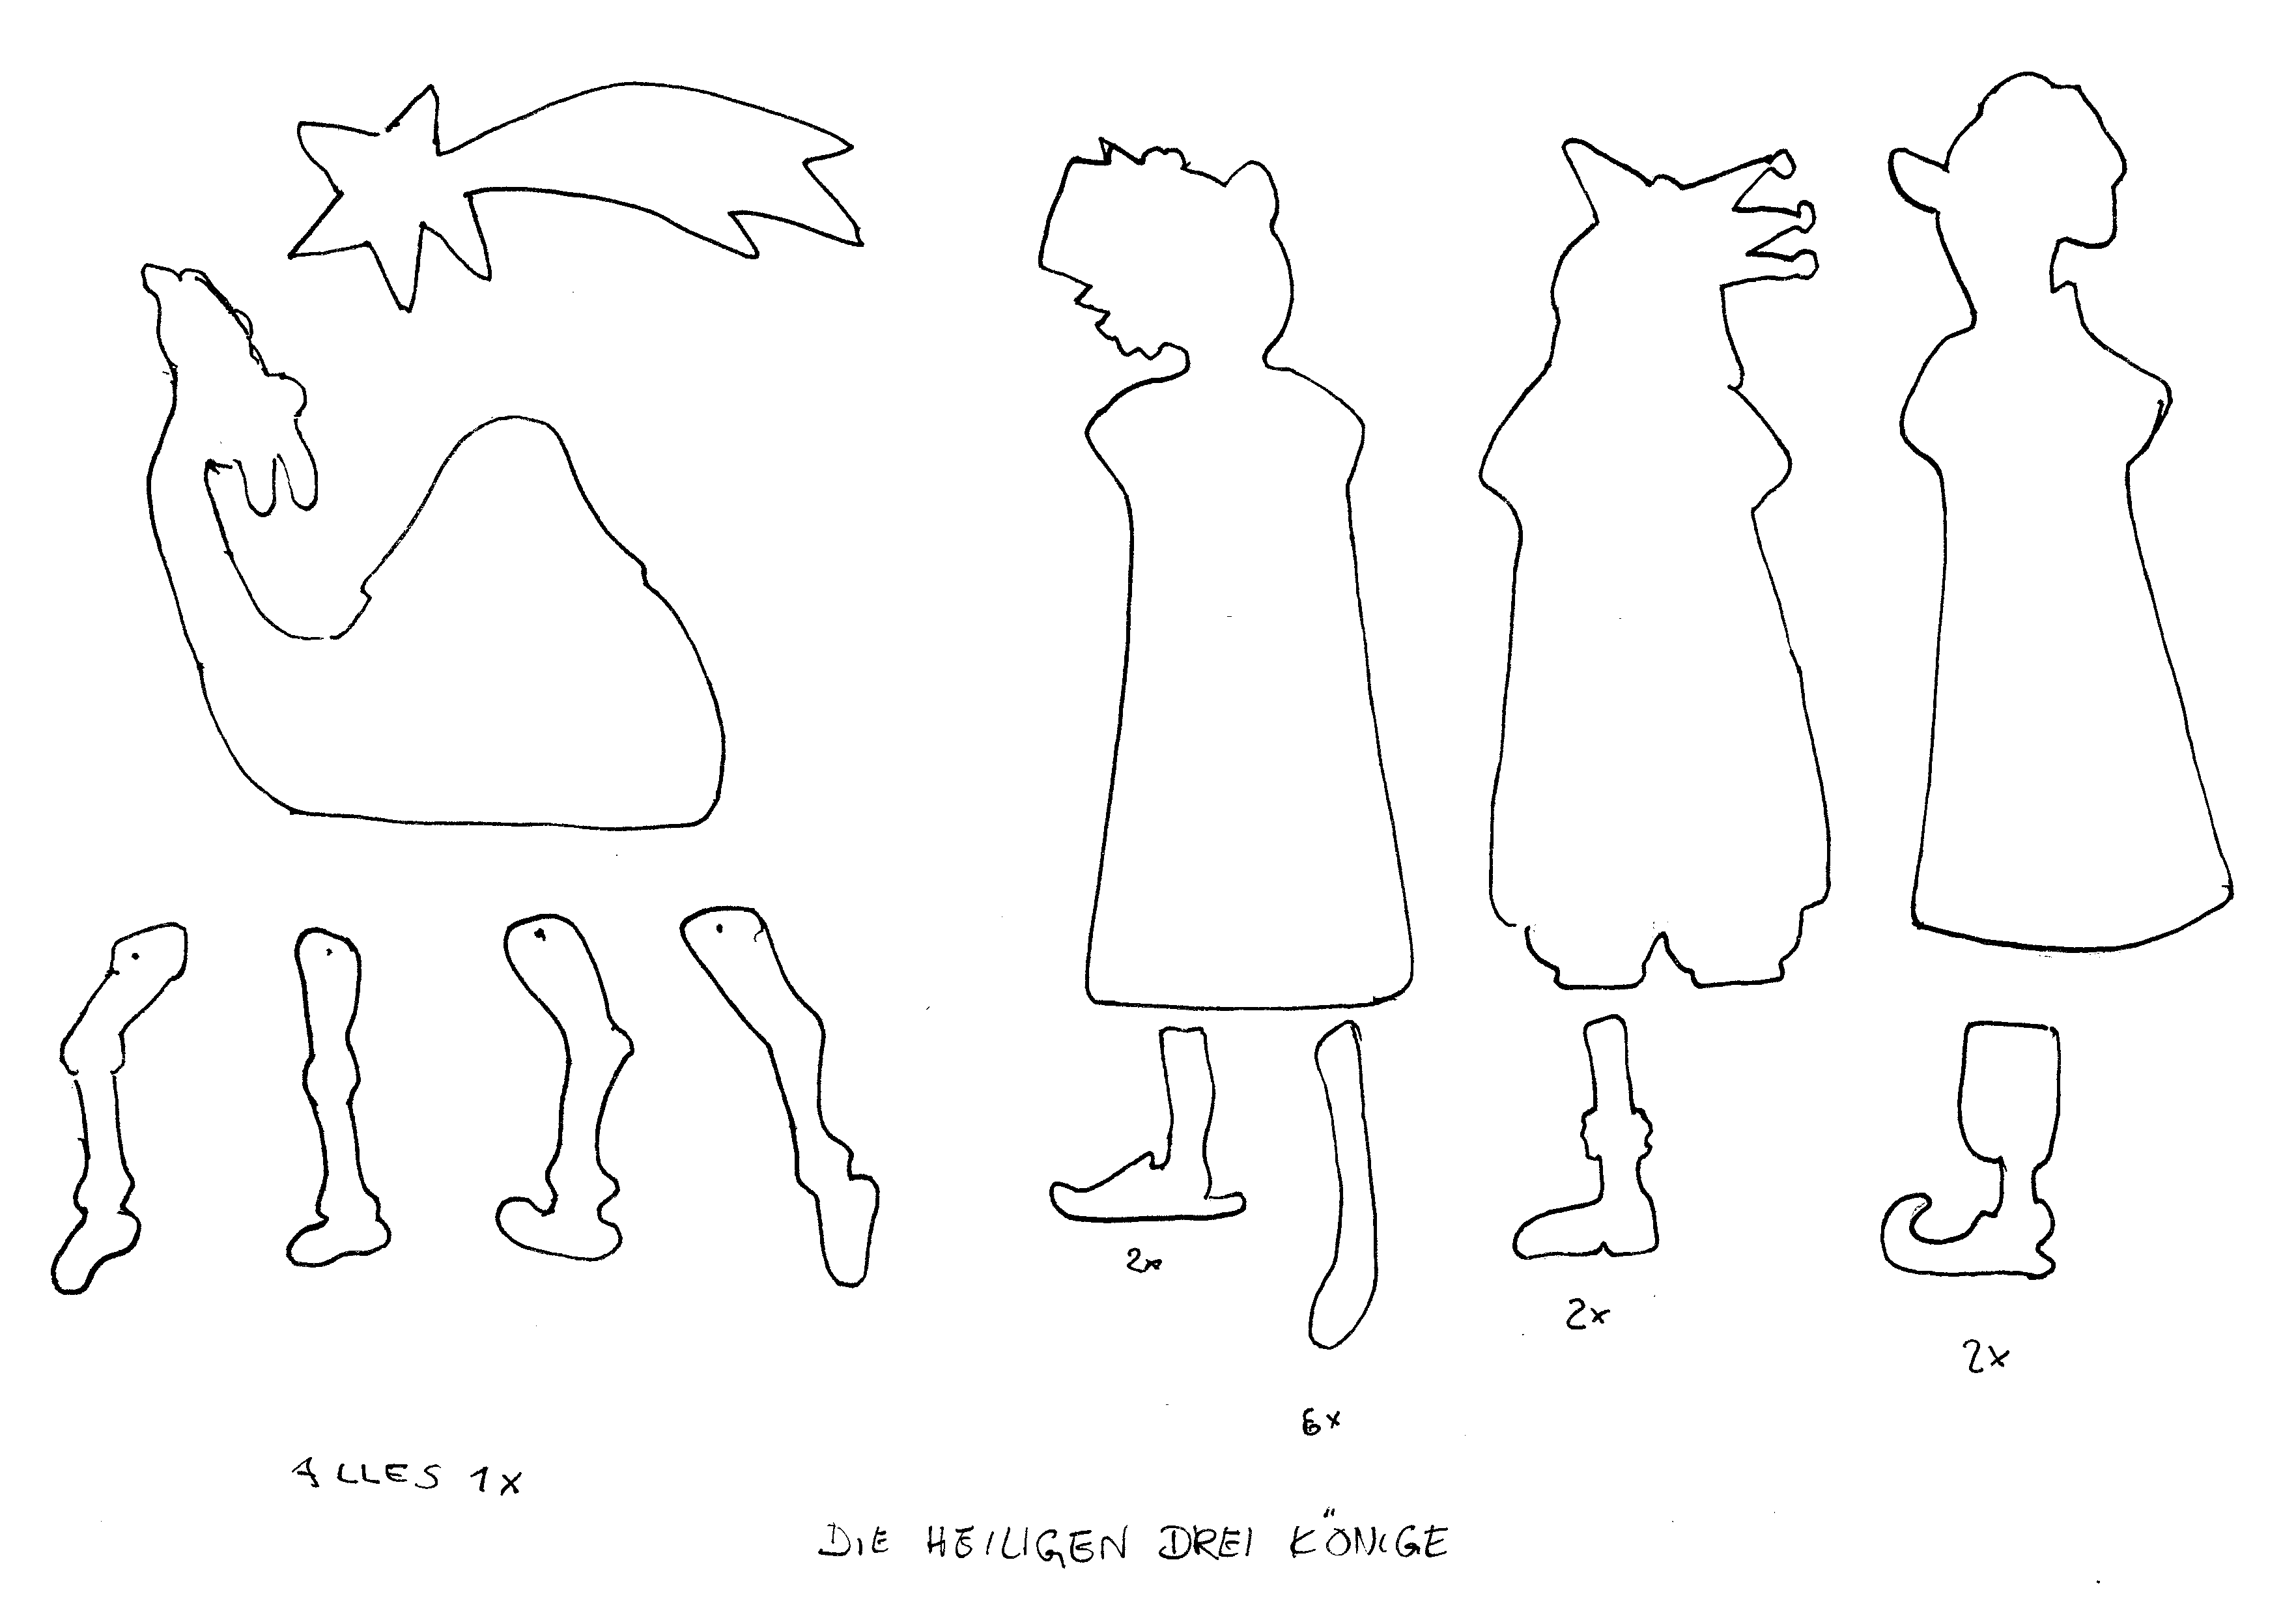
If you look closely at the figure, you’re probably wondering what happened to the wise men’s arms and legs. The idea here is that, if you want to keep something symmetrical, you just do the drawing work once and then scan it. Next, you load the scan in Inkscape, trace the drawing to create a vector diagram, and copy and paste the resulting object. While the kings’ torsos are needed once each, we need six arms and two of each of the legs, as you can see from Christa’s notes. If you are not good at drawing, don’t worry, there are plenty of free-to-use sketches out there on the web that you can download and process using similar steps to the ones we will be following.
There are two schools of thought on converting a bitmap, such as a PNG file, to a vector format (SVG in Inkscape) for laser cutting. One approach is to select Path | Trace Bitmap and let the algorithm follow the contours of the original drawing. The other is to use the original drawing as a template and do the tracing work yourself. Although the automatic trace seems to be the easier option, it will probably give you a very complex vector diagram with a huge number of nodes. Despite selecting Path | Simplify to reduce the number of nodes, post-processing is likely to take longer than the manual approach. The Simplify results are not always what you expect and there may be some artifacts. But this is something you need to try out for yourself, and the decision will always be driven by the results of a trace.
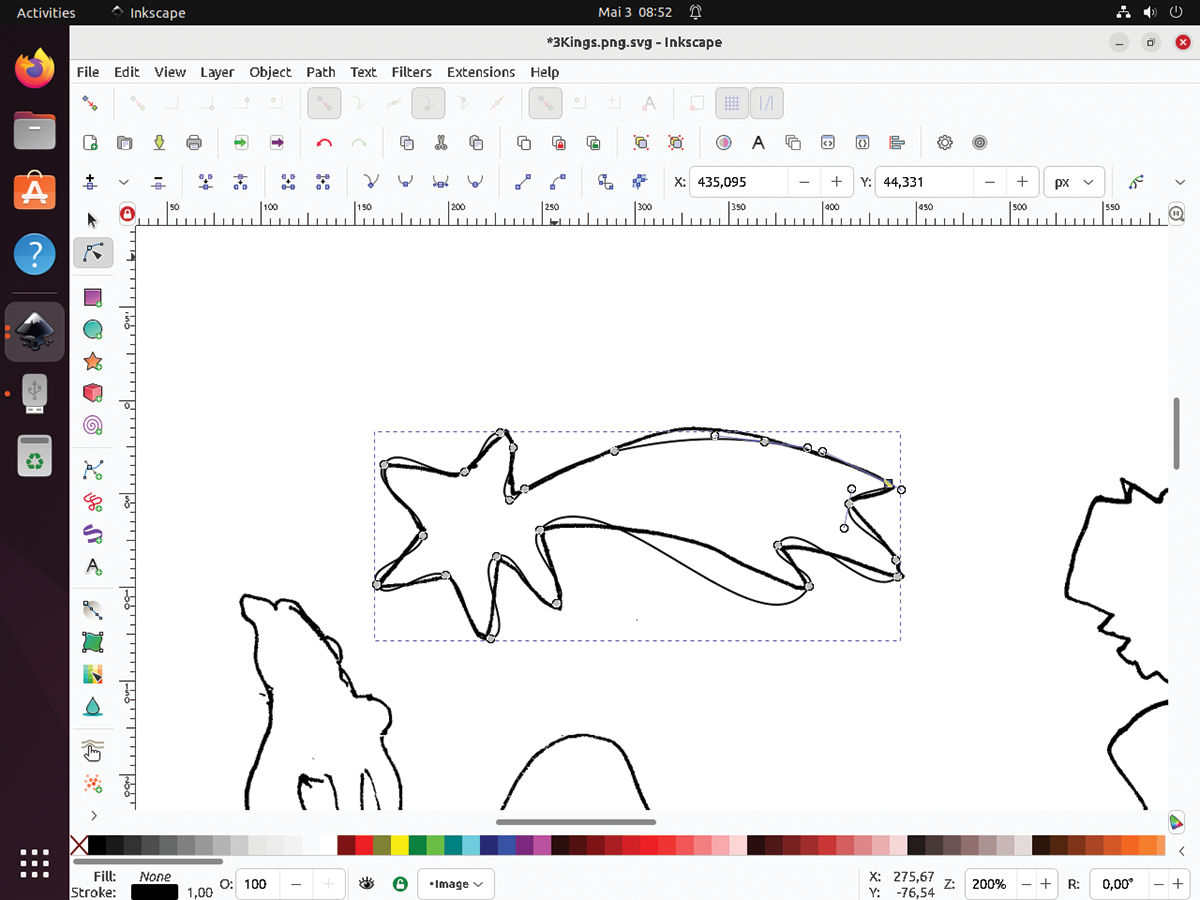
If you decide to do a manual trace (Figure 7) yourself, the steps are as follows: First select the Draw Bezier curves and straight lines tool in the buttonbar on the left of the Inkscape window. Click on a starting point and drag a line to the next point on the object you are tracing. Click again, drag again, and keep repeating until you have traced the whole object. When you are done, you will definitely need to select Edit paths by nodes and tidy up the curves and lines by clicking on the nodes and dragging the handles that Inkscape shows you. Once you have a vector replica of the object, you can delete the original hand-drawn object, but make sure you keep a backup copy, just in case you delete the wrong object – something that can easily happen.
After tracing an arm, we selected the object, right-clicked, selected Copy, and then clicked on a new location where we wanted to position the copy. Then it was just a matter of keeping on pasting until we had the right number of objects. This assumes that the wood doesn’t have a “good” side and a “bad” side and that you can work with mirror-symmetrical blanks. Of course, we had to do this again for the sets of legs.
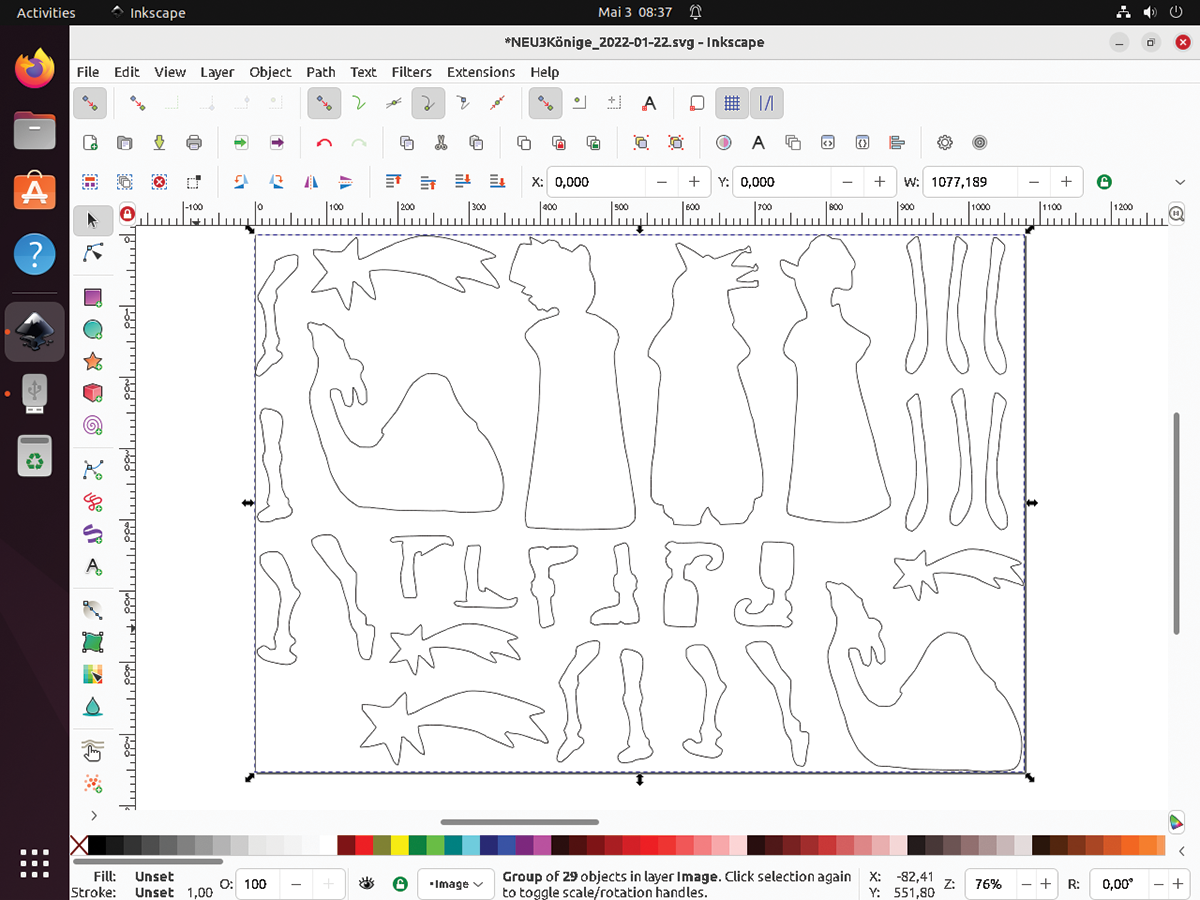
On our first attempt after converting the original drawing, and making sure we had the right number of arms and legs, we just ran out of space. If you look at Figure 8, you will see that the camel is far too small compared to the other figures, and the kings’ arms look a little spindly. Because the laser cutting space of the FLUX beamo is about the size of an A4 sheet of paper, we eventually had no option but to split the drawing across two A4 sheets of plywood. This gave us bigger kings, a bigger camel, and more sturdy arms that were less likely to break during the assembly and decorating process. Figure 9 shows one of the images featuring the camel and an assortment of legs both kingly and otherwise.
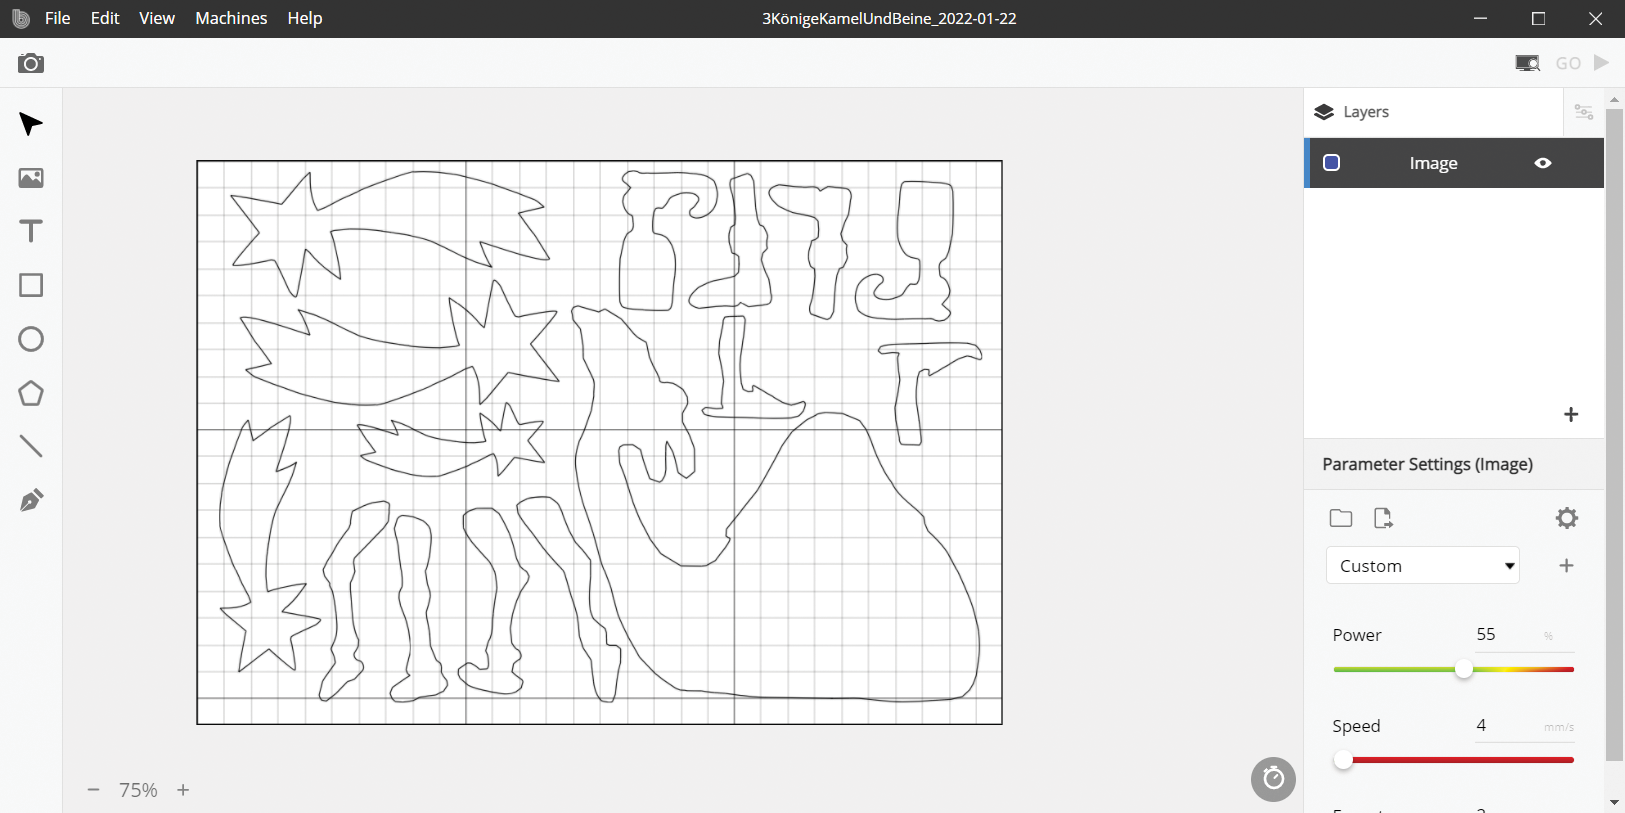
The next steps should be familiar from the test job with the FLUX beamo logo. Lay a sheet of plywood on the grid in the laser workspace. Check the setting for the laser head – you only need to do this if you are not using the same type of wood for this job as for the test job. Click the Camera icon and drag across the entire workspace to find out where the piece of wood is. Note that there is a blind area at the top of the workspace that the camera can’t see but the laser head can still reach. Center the SVG vector diagram in the laser workspace, making sure it fits nicely on the sheet of wood. Then check your settings for the laser power, speed, and number of repetitions. We discovered that poplar plywood is easiest to cut, needing just one repetition rather than the two repetitions you need for heavier birch wood. You can tell that the settings are right if the figures you cut drop out of the board when the laser has cut all around them. If this doesn’t happen, don’t panic, just relaunch the job with another repetition but without moving or changing anything (we wouldn’t want to waste that expensive wood). On a safety note, it’s always tempting to watch the laser at work, but looking directly at the bright spot of the laser beam is a not good for your eyes.
Making Up the Puzzle
A quick look at Figure 10 shows what you can expect when the laser has finished its work. It’s pretty, but not something that you would want to give to a friend or sell to a customer to finish off. In fact, this is where the second creative part of this build starts. But first, there is a little preparatory work to complete. As this is a hanging decoration, thin wire is a great way to connect the parts. The holes for threading the wire need to be drilled before you start decorating, and it’s a good idea to clean up the edges of the parts to remove the darker laser burn marks with some steel wool.
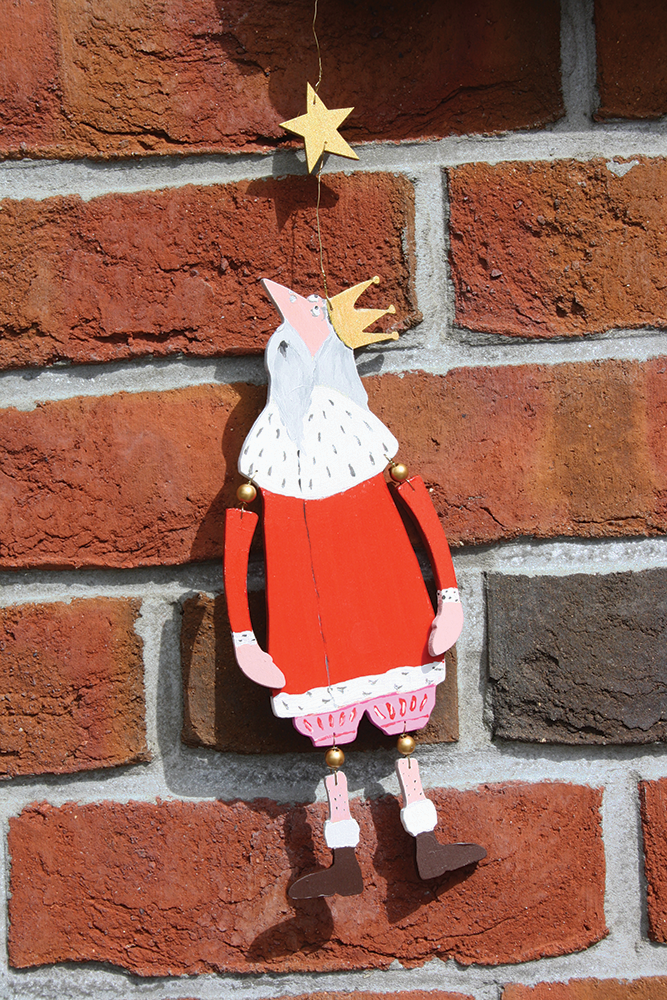
Again, Christa has a great eye for color and decoration. She knows exactly what she wants her Three Kings to look like (Figure 11). You will need acrylic paints for the artwork, which is really a matter of your own style and sense of aesthetics. The one thing you do need to think about is that wooden decorations on thin plywood will warp if you don’t paint both sides. You can paint the rear side in black if it will not be visible when the ornament is hanging, or go the whole hog and do realistic front and rear sides for more attractive results. Figure 12 shows you a fully decorated and assembled figure, ready for the next craft fair or as a unique gift.
More Applications with Lasers
There are virtually no limits to your creativity with the FLUX beamo. Other 2D projects include laser engraving rubber stamps and creating printed works of art with them, or engraving photos on plywood, acrylics, stone, bone, or glass. You can even laser-engrave creative patterns or lettering on your jeans to make a fashion statement or cut cardboard to make inventive pop-up greeting cards. FLUX even offers an extension kit for engraving cylindrical objects, such as glasses with a diameter of up to 80mm if you want to surprise a friend with a personalized champagne glass, for example.
Conclusions
As this walk-through has demonstrated, you don’t need to rob a bank to own a dependable laser cutting machine. There is no need to worry about vendor lock-in thanks to Beam Studio’s ability to run on the Linux operating system and the fact that excellent, open source tools can be used for the tasks involved. Of course, a machine alone can’t hope to replace the kind of artistic talent it takes to create original and attractive pieces of work that customers will want to purchase.